3 posts tagged with "container"

View All Tags

Containers and Kubernetes development with Podman Desktop

· 6 min read
Matt Demyttenaere
Product Manager

In the world of modern software development, containers and Kubernetes are no longer optional; they are essential. That’s where Podman Desktop comes in, your ultimate tool for building, managing, and deploying containers and Kubernetes clusters with ease and confidence. In this blogpost we will walk through a typical development workflow, creating and building a container and then testing it in a local Kubernetes cluster. Let’s dive in.

Building Containerized Applications with Podman Desktop

First, let's start by building an application in a container with Podman Desktop. We need our application code and a Containerfile. For a simple application, your Containerfile might look something like:

FROM docker.io/nginxinc/nginx-unprivileged

COPY <<EOF /usr/share/nginx/html/index.html
<!DOCTYPE html>
<html>
<head>
<title>Simple NGINX Container</title>
</head>
<body>
<h1>Hello from my Podman NGINX Container!</h1>
<p>This content is being served by NGINX running in a Podman container.</p>
</body>
</html>
EOF

To enhance security, we utilize the nginx-unprivileged image. This helps avoid root access, which is enforced by default in some Kubernetes distributions like OpenShift. The default NGINX image uses port 80, which is forbidden in rootless mode.

Once your application and Containerfile are ready, Podman Desktop makes the build process straightforward: Build image
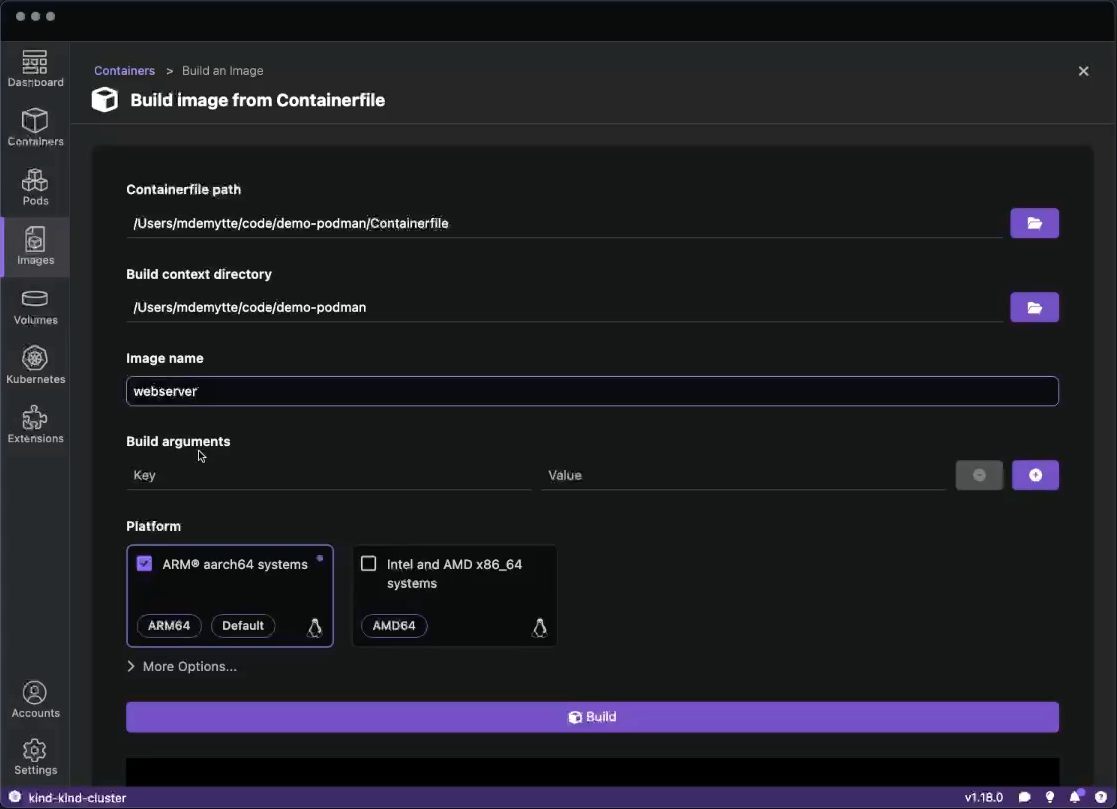
  1. Navigate to the "Images" section
  2. Select your Containerfile
  3. Provide a name for your image (e.g. webserver)
  4. Click "Build"

After building your image, you can immediately run it with a single click, and your container will appear in the "Containers" list.
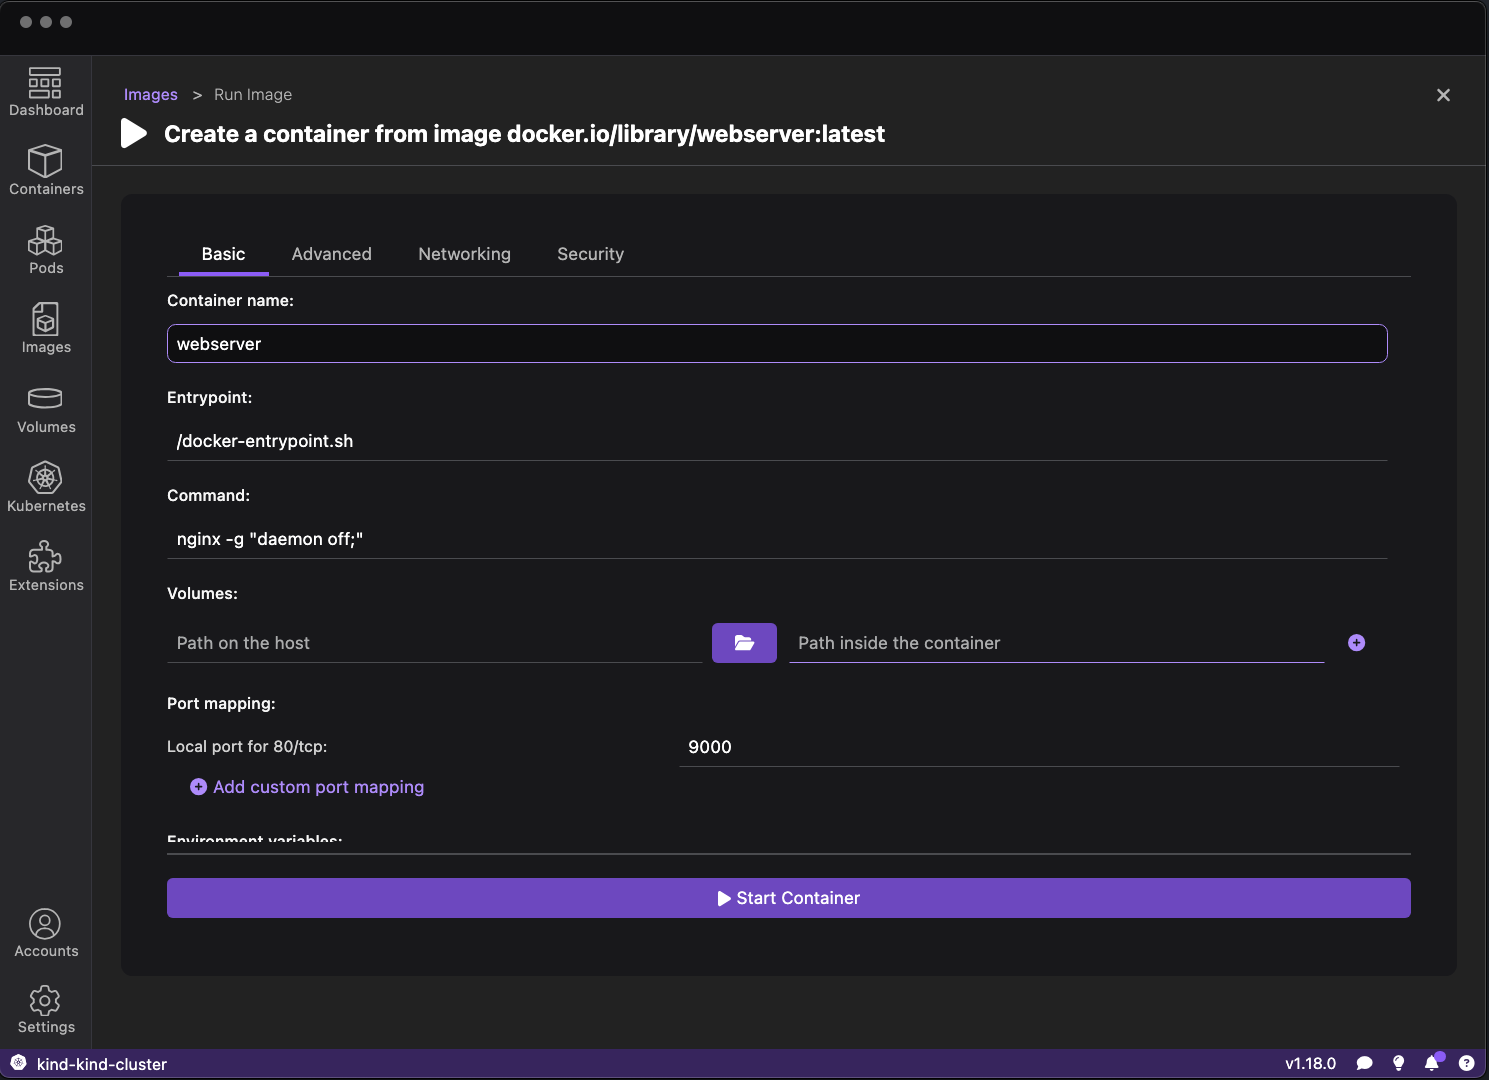
Start container

  1. Find your container on the “Images” list
  2. Click the “Run Image ▶️” button
  3. Give your container a name we will call it: “webserver”

Container Management and Log Analysis

Now that our webserver container is running we can inspect it in the UI View container details
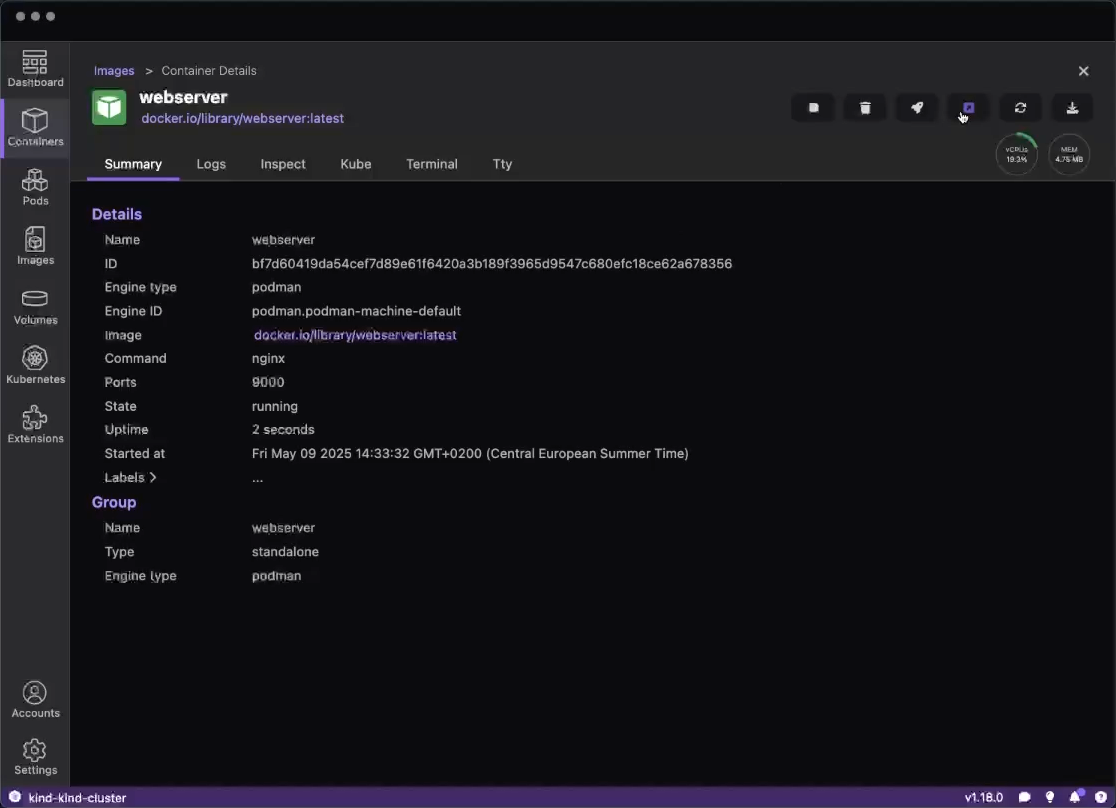
We can click the Open Browser button to see the webserver in our browser: Webserver open in browser
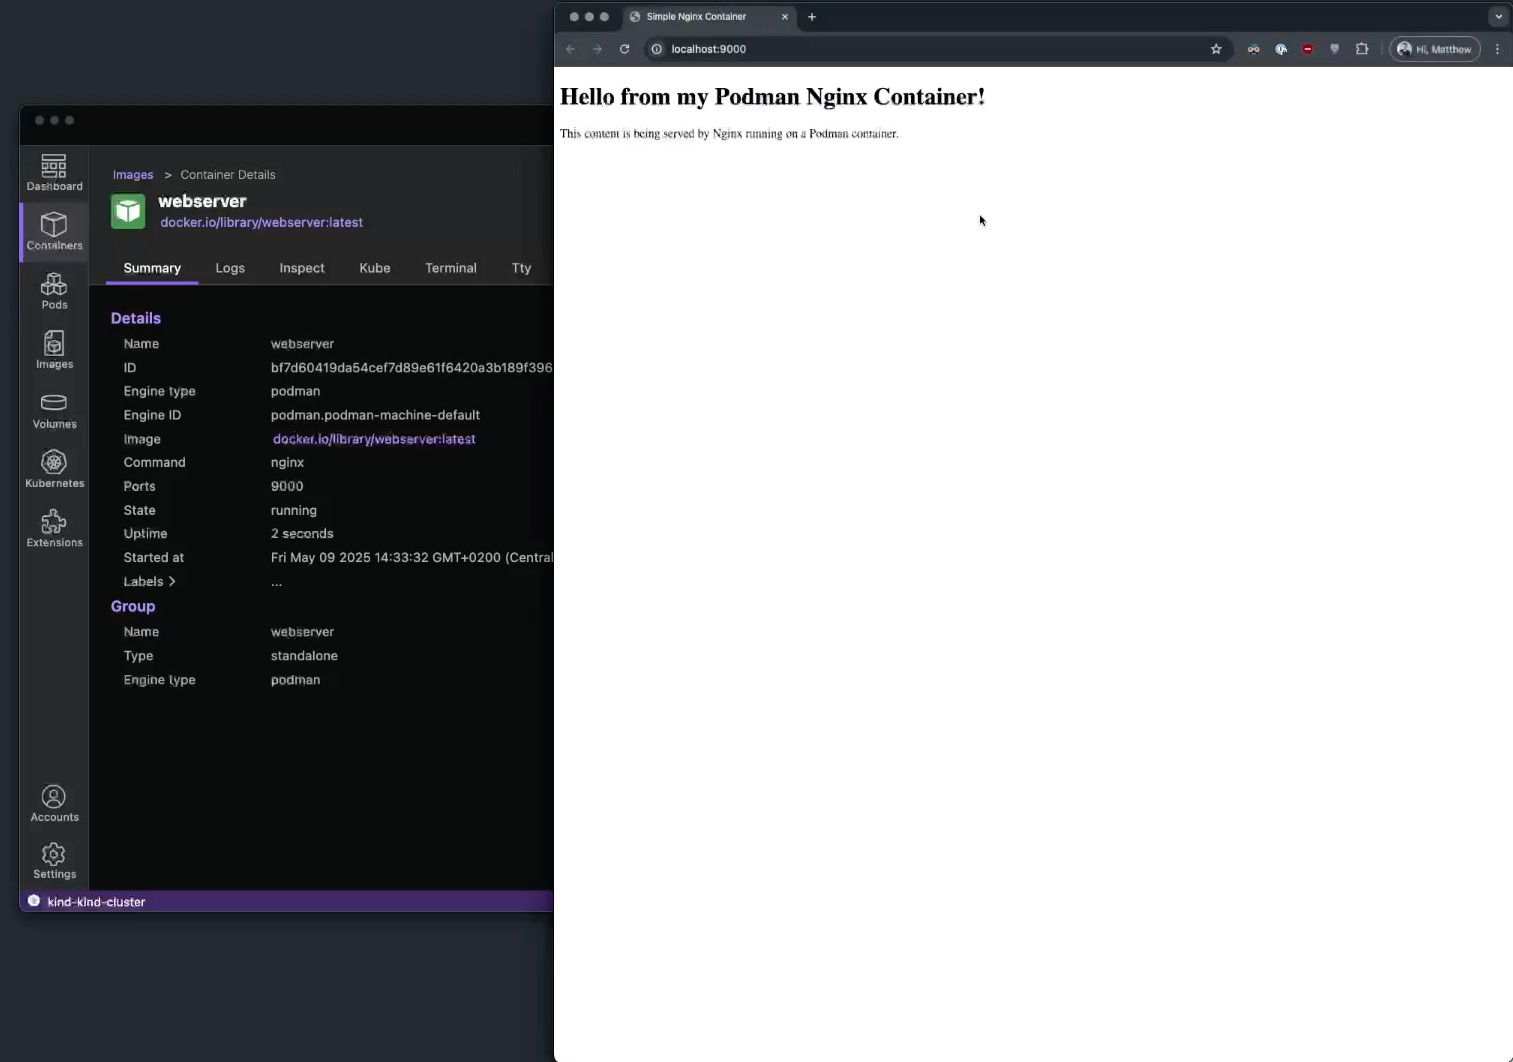
Monitoring container logs is crucial for debugging and understanding application behavior. Let's use Podman Desktop to view the logs of the newly created container.

  1. Select your running container from the "Containers" list
  2. Click on the "Logs" tab to view the container's logs
  3. In the newest version of Podman Desktop you can also search in the logs!
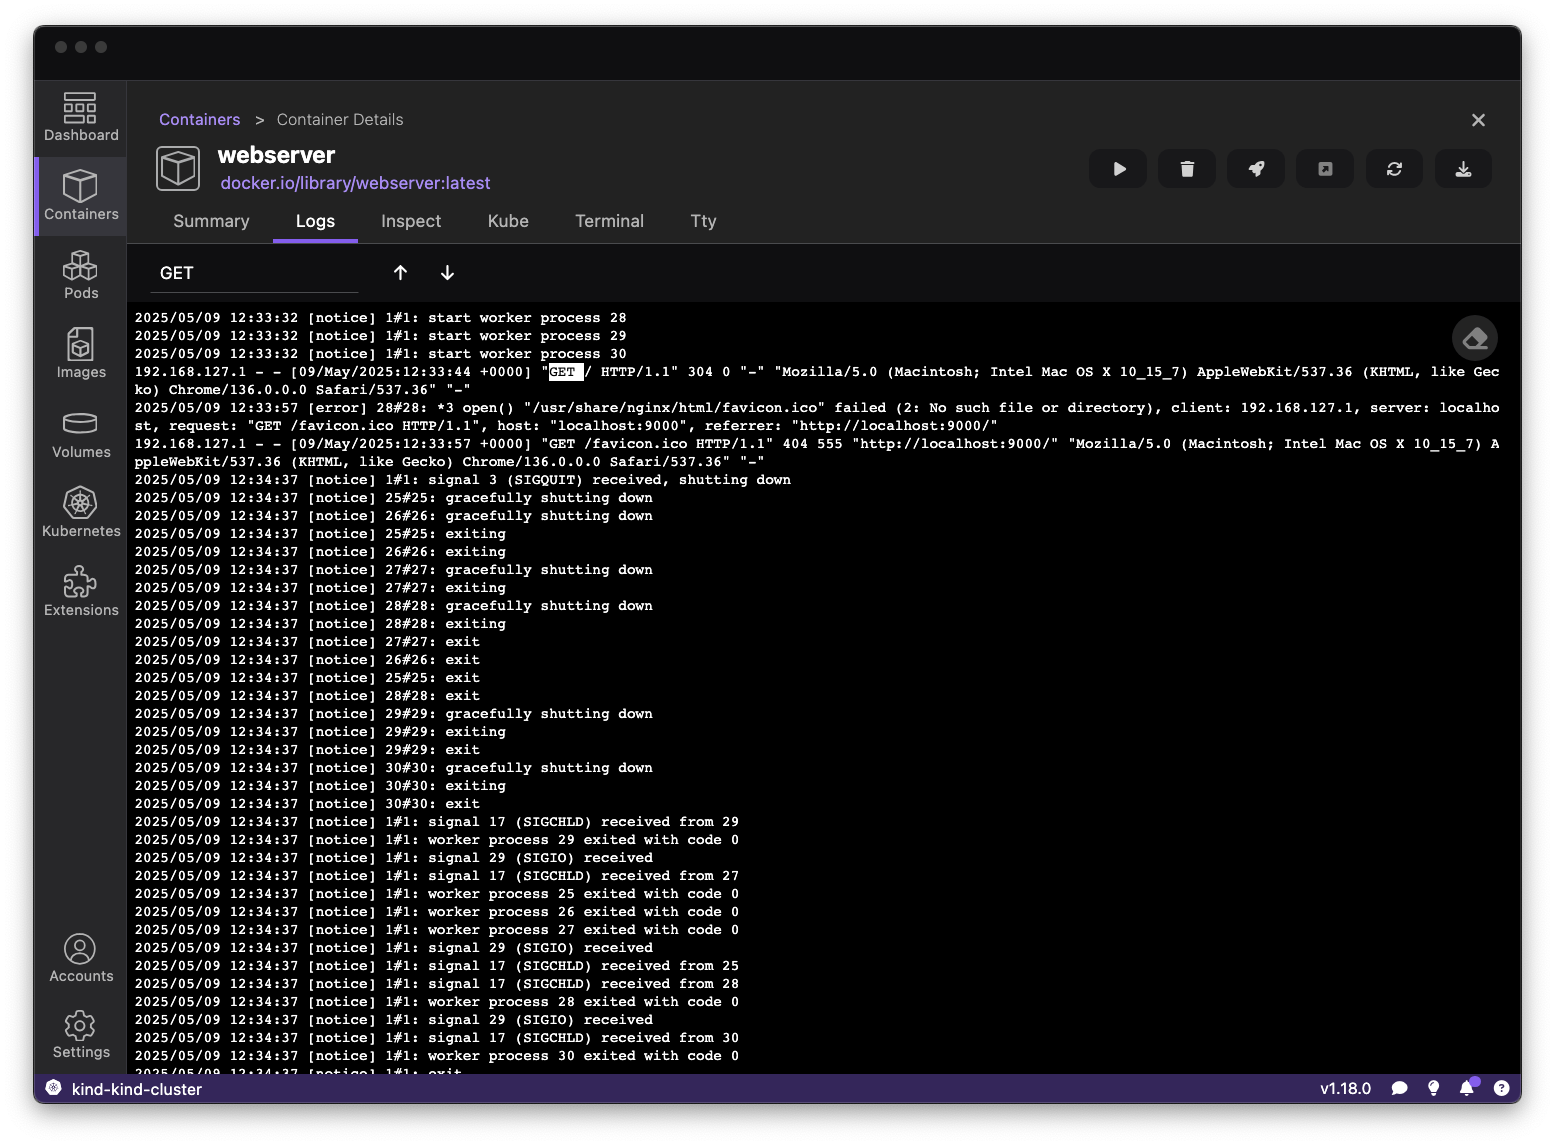
View container logs

With that, we can continue the development process. We are able to rebuild our container when we have updated code. On top of that, we can share our Containerfile with our team who will be able to reproduce the exact same environment as us to build and test their code.

Working with Kubernetes and OpenShift

Now that we have a development setup up and running, it’s time to get ready for production. In today's world, it is natural for us to move to Kubernetes. Having a locally running cluster, we are able to iterate quickly but still have an environment that is as close to production as possible. This aids in a smoother migration in the future. Podman Desktop is here to help you test and execute that migration.

With kind or minikube, we are able to have a locally running Kubernetes cluster in minutes. This will allow us to test our application in a Kubernetes environment. Kind comes installed together with Podman Desktop so you will be able to get started instantly.

  1. Start by navigating to the “Kubernetes” page
  2. Click on the “Create new Kind cluster” button
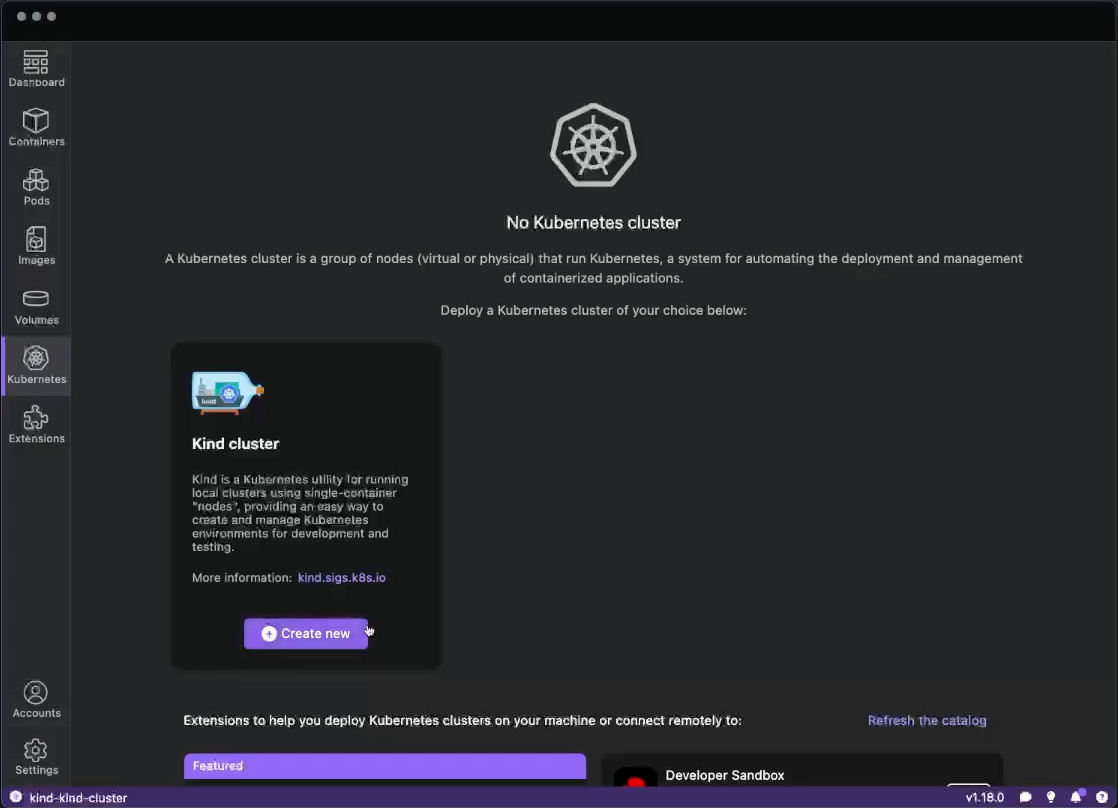
Create kind cluster

  1. Click “Create”
  2. Wait until the kind cluster gets created
  3. Once the cluster is created, Podman Desktop will automatically switch your Kubernetes context to the new kind cluster. If you want to change your cluster, you can switch contexts in the statusbar.

We now have a locally running Kubernetes cluster which we can explore on the Kubernetes dashboard.
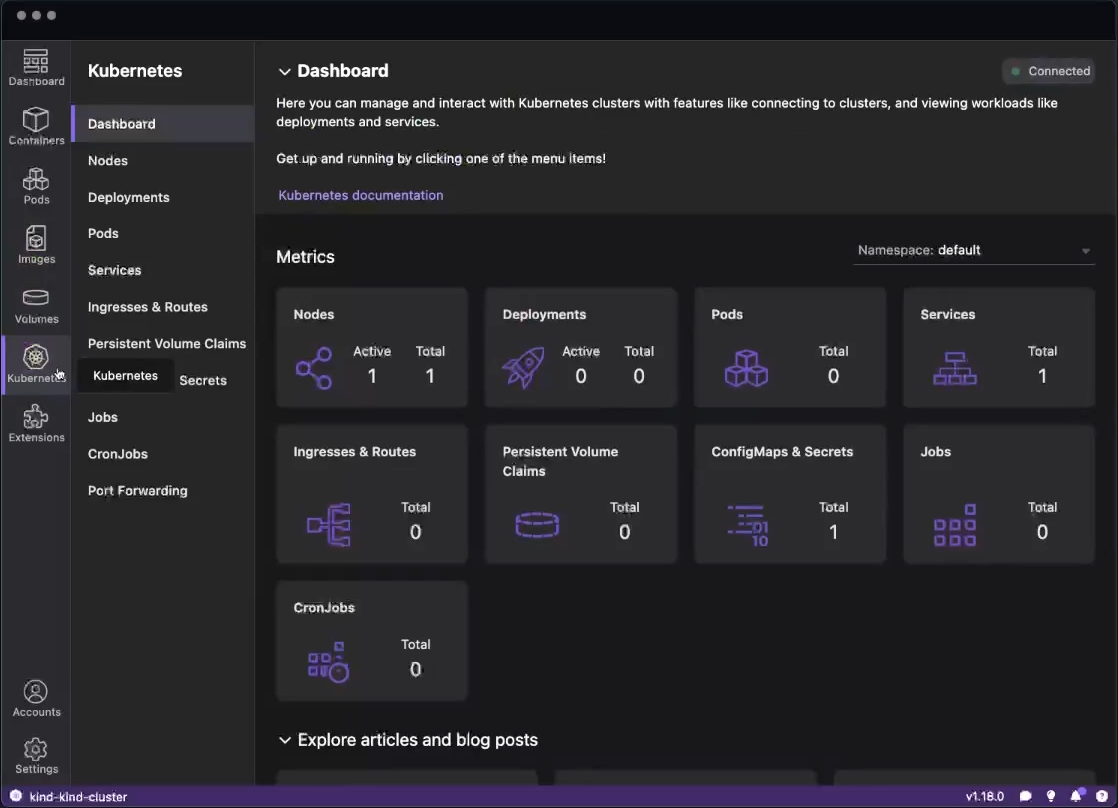
Kubernetes dashboard

This dashboard not only gives you an overview of your cluster but it also provides quick access to the different Kubernetes objects that exist in the cluster.

Creating the Pod on your local Kubernetes cluster

With a running Kubernetes cluster, we can now create our pod in the Kubernetes cluster. Using Podman Desktop, we can convert our previously created container into a Pod in our kind cluster.

First we have to push our image to our kind cluster. Push image to kind
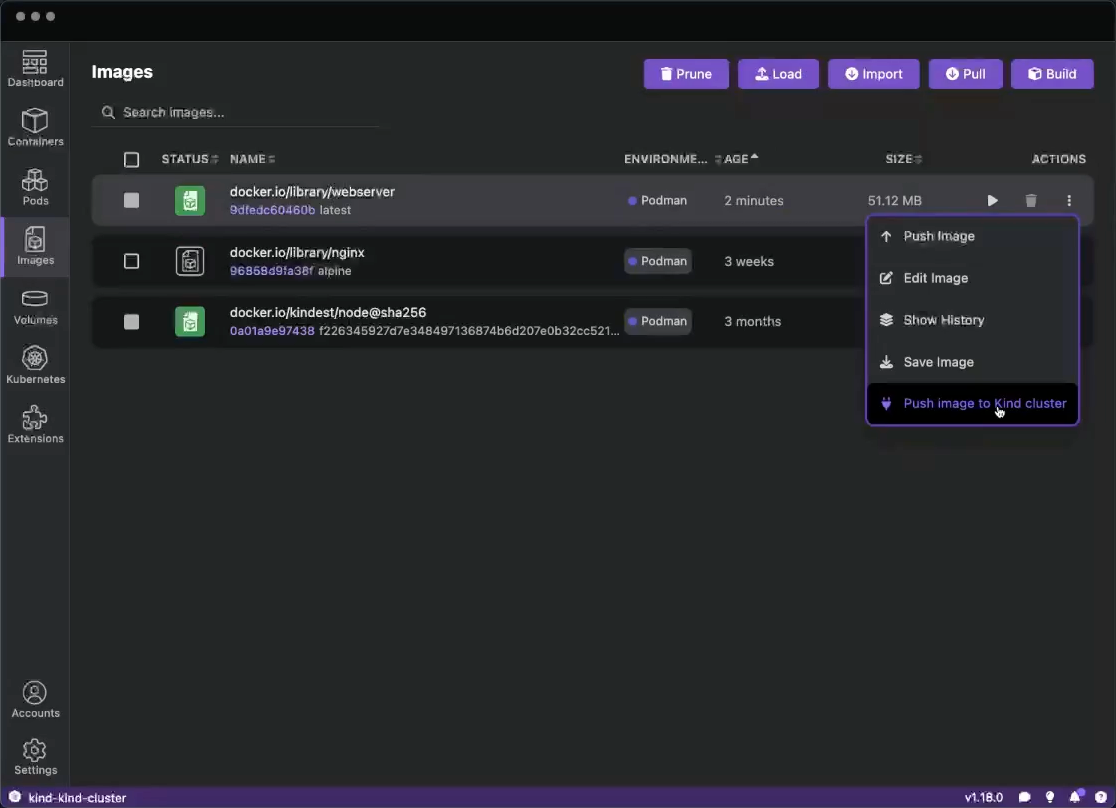
Now that the image is available we can use the Podman Desktop UI to Deploy our container to a Pod Deploy to Kubernetes
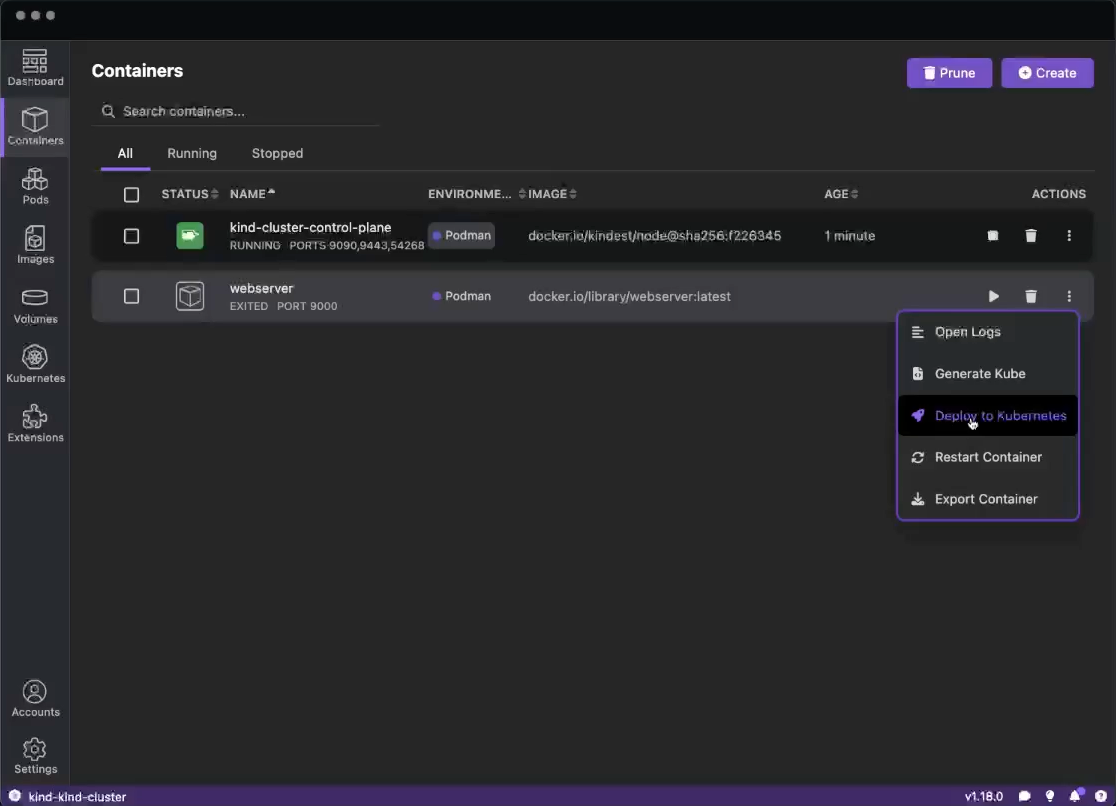
  1. Navigate to the “Containers” section
  2. On the webserver container, click the “Deploy to Kubernetes” button
  3. Choose your kind cluster

The conversion from containers to Kubernetes manifests is particularly valuable, eliminating the need to manually write YAML files for simple deployments. Podman Desktop adds imagePullPolicy: IfNotPresent to the generated Kubernetes YAML. This ensures that we use the image that we just pushed to the cluster is also the one we will use. Make sure to add this to your Kubernetes YAML or use a specific tag on your image to avoid the default pull policy (Always).

Monitoring Kubernetes Events and Resources

Understanding what's happening in your Kubernetes cluster is essential for effective development. In the latest version of Podman Desktop, you can now check the events of your Kubernetes Pods in the UI.

Let's check if our pod was created and running successfully.

  1. Navigate to the “Kubernetes” in the left-navigation
  2. Click on the “Pods” sub-navigation
  3. Click on the pods you just created
  4. Scroll to the bottom and check the “Events”
  5. We can see that our Pod was started and is running
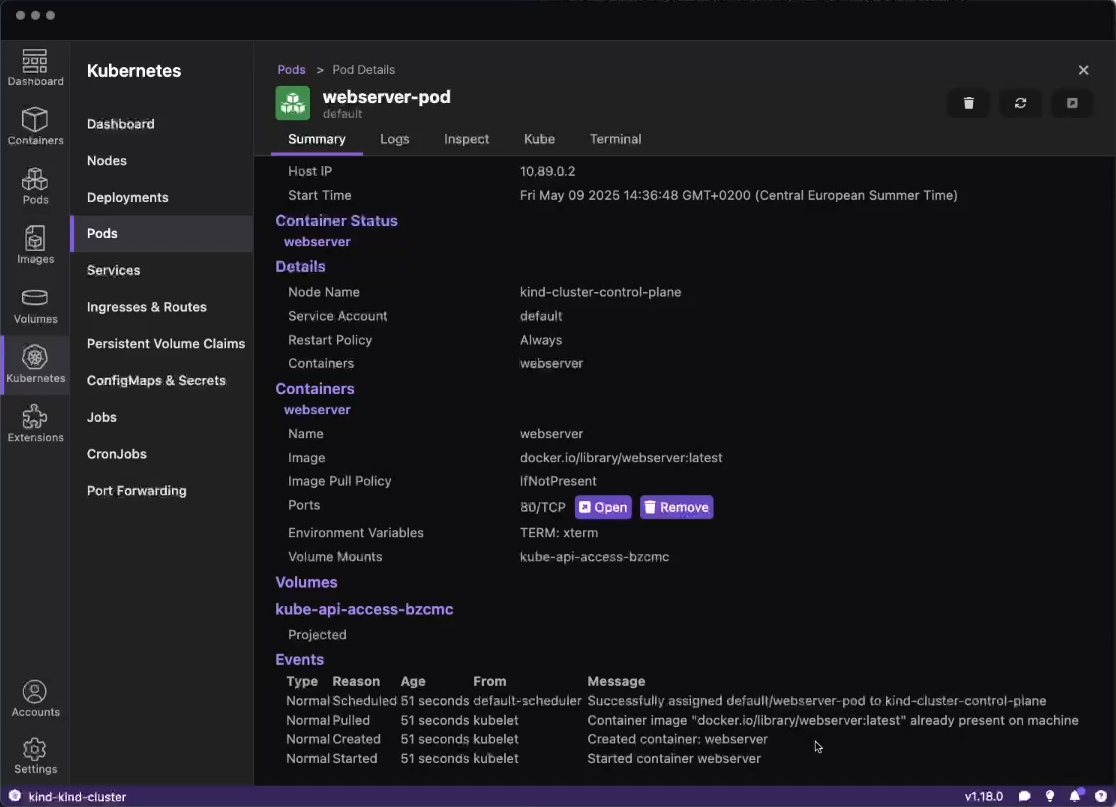
View pod events

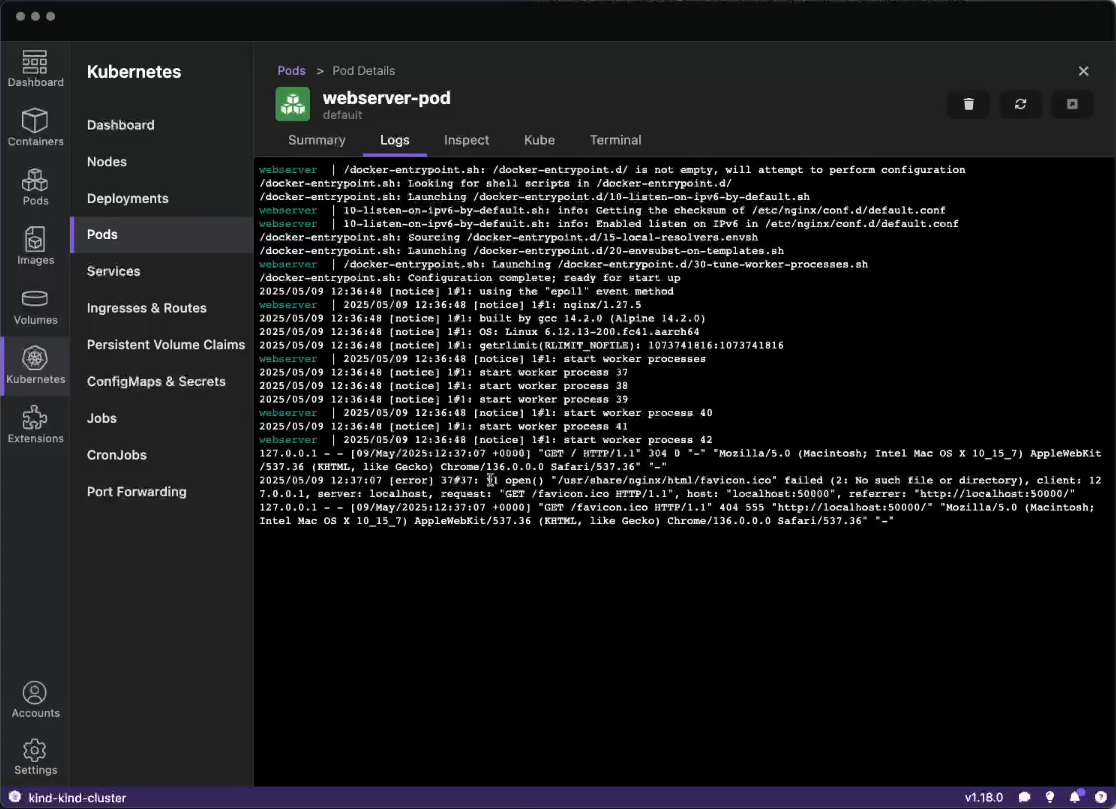
We can also check out the “Logs” tab to see the logs of the running Pod. View pod logs
Video walkthrough

Conclusion

Podman Desktop significantly streamlines the container and Kubernetes development experience by providing:

  • A unified interface for building and managing containers
  • Seamless integration with Kubernetes and OpenShift
  • Powerful logging and debugging tools
  • A bridge between local development and production Kubernetes environments

Whether you're just starting with containers or managing complex Kubernetes deployments, Podman Desktop offers tools that simplify your workflow and increase productivity. As a CNCF project, it continues to evolve with the needs of the cloud-native community, making it an increasingly valuable tool in any developer's toolkit.

Try Podman Desktop today and experience how it can transform your container, Kubernetes and OpenShift workflows!

Supercharge Your Container Development in VS Code with Podman and Podman Desktop

· 5 min read
Matt Demyttenaere
Product Manager

Developing containerized applications can sometimes feel complex, but with the right tools, it can be a smooth and efficient process. In this blog post, we'll explore how to leverage the power of Visual Studio Code (VS Code) together with Podman and Podman Desktop to streamline your container development workflow. We'll cover setting up and using two VS Code extensions that integrate with Podman.

VS Code: Your IDE for Container Development

VS Code is a popular and versatile code editor that can be extended to enhance its functionality. For container development, several excellent extensions integrate seamlessly with Podman.

Prerequisites

Before we begin, ensure you have the following installed:

VS Code Extensions

To integrate VS Code with Podman, we have 2 extensions as options:

  1. Microsoft’s Container Tools extension: The "Container Tools" extension provides excellent support for container-related tasks, including building images, managing containers, and working with Containerfiles and Dockerfiles. Microsoft recently announced that they will be evolving the Docker extension into the Container Tools extension to support other tools like Podman!
  2. Pod Manager: This extension was created by one of the members of our community and is completely open source. It is designed to help you manage Podman containers, images, volumes, and networks directly from the VS Code interface.

While it's unlikely that you would use both extensions simultaneously, comparing them will help you understand the strengths and weaknesses of each, ultimately making it easier to select the one that best fits your needs. So for this blog post, we'll install them one by one.

Option 1: Microsoft’s Container Tools extension

To install the extension:

  1. Open VS Code.
  2. Click on the Extensions icon in the Activity Bar (or press Ctrl+Shift+X or Cmd+Shift+X).
  3. Search for "Container Tools" and install the extension by Microsoft.

Configuring VS Code for Podman

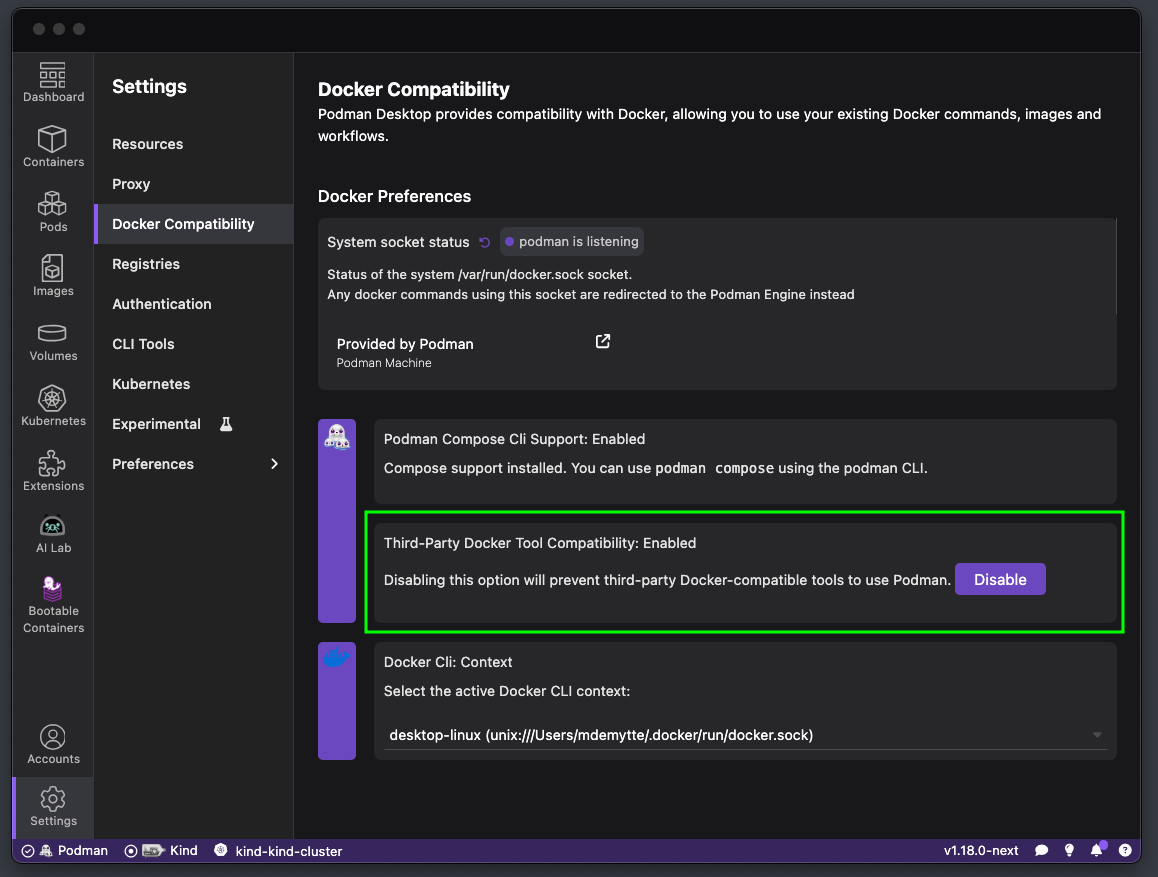
The Container Tools extension usually automatically detects Podman if Docker isn't running, by looking at the DOCKER_HOST environment variable. In Podman Desktop navigate to Settings > Docker Compatibility > Third-Party Tool Compatibility and make sure the option is enabled. Learn more about the Docker Compatibility in our documentation.

enabling docker compatibility in the settings

Option 2: Pod Manager

To install the extension:

  1. Open VS Code.
  2. Click on the Extensions icon in the Activity Bar (or press Ctrl+Shift+X or Cmd+Shift+X).
  3. Search for "Pod Manager" and install the extension by dreamcatcher45.

Using the VS Code Extensions

Now that we have the extensions installed and configured, let's see how to use them.

Working with Containerfiles and Dockerfiles

Both extensions provide syntax highlighting, code completion, and linting for Containerfiles and Dockerfiles. Open a Containerfile in VS Code, and you'll immediately benefit from these features.

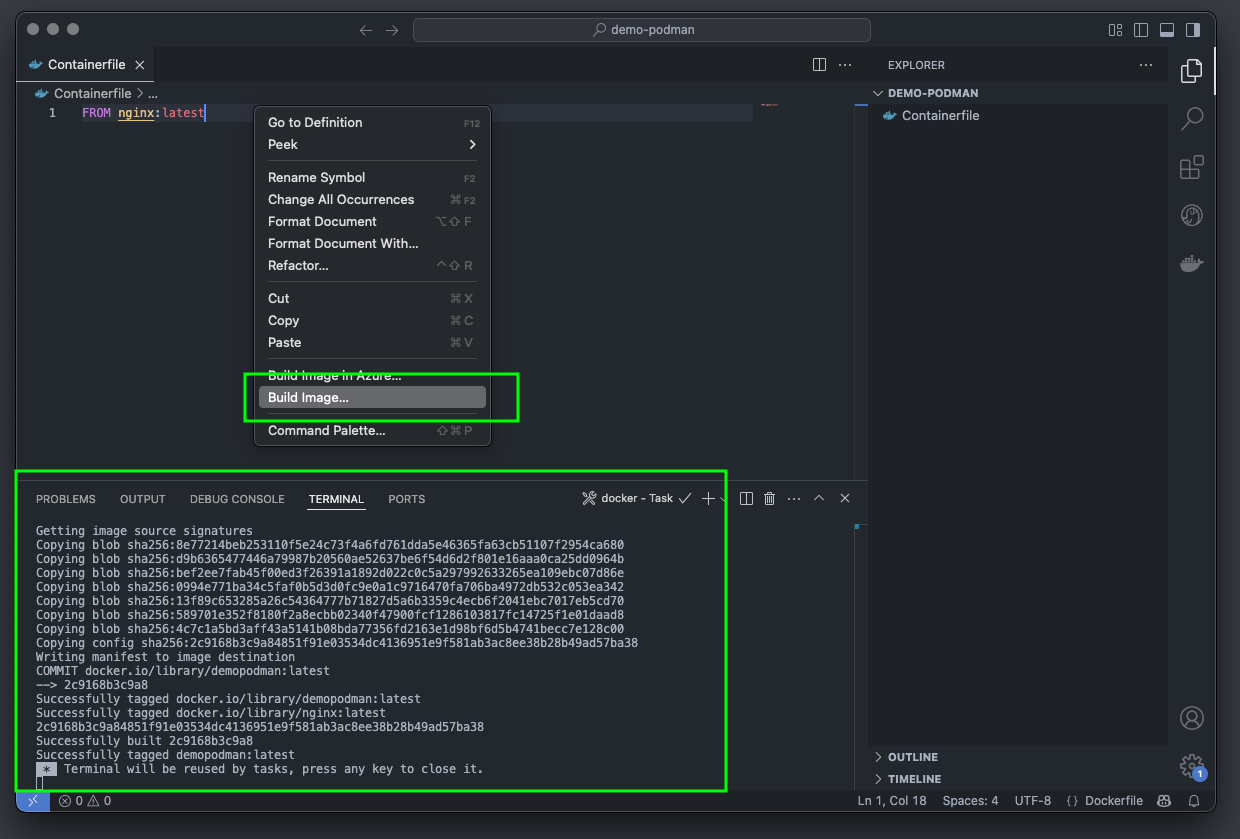
You can also build images directly from VS Code:

  1. Right-click on the Containerfile in the Explorer view.
  2. Select "Build Image".
  3. VS Code will prompt you for an image name and tag.
  4. The extension will then build the image using Podman.
  5. After that you will see the built image in the sidebar.

If you are using the CLI commands to build images, you will also see them here.

building a Containerfile in vs code using the microsoft extension

Managing Containers

The extensions also allow you to manage containers directly from VS Code. You can start, stop, restart, and remove containers, as well as view their logs and inspect their configuration.

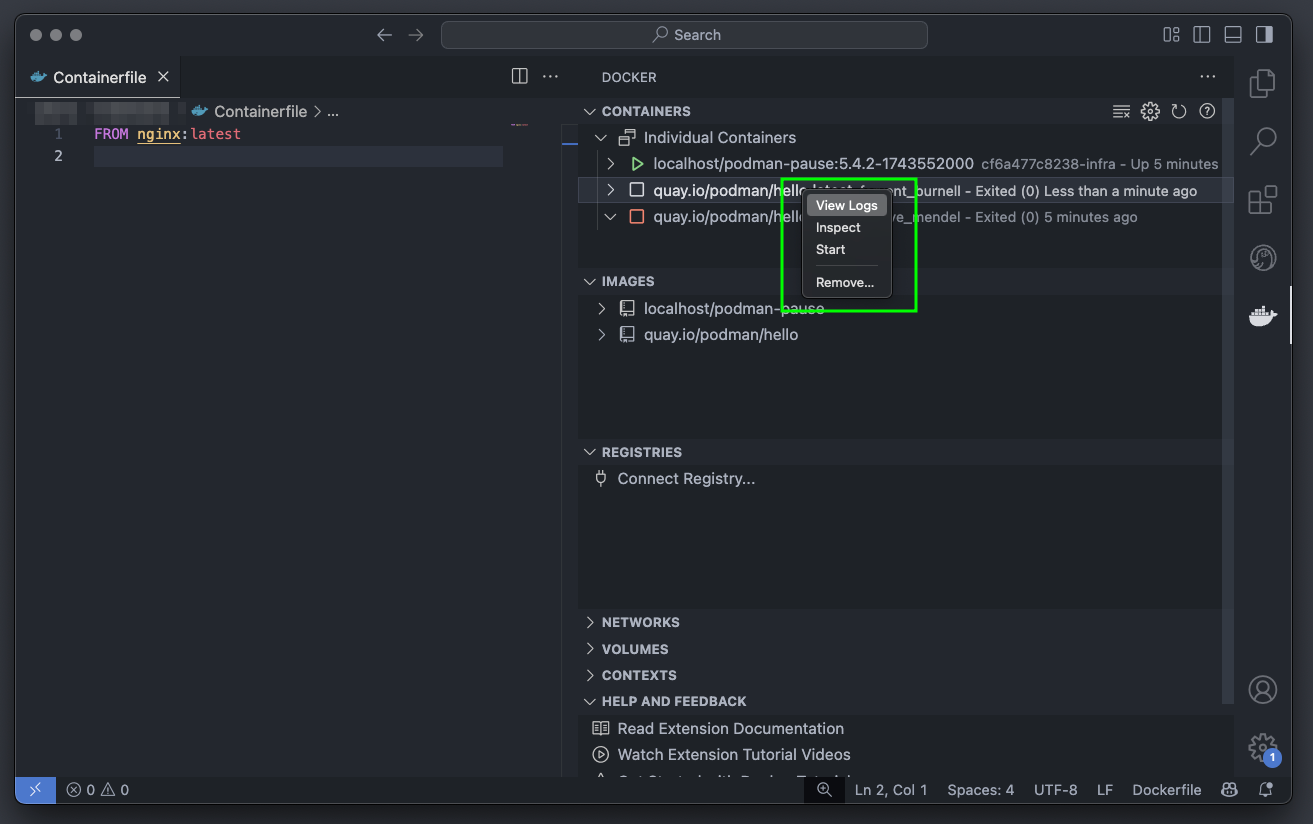
To view the container logs:

  1. Click on the Container icon in the Activity Bar.
  2. You'll see a list of your containers, images, and networks.
  3. Right-click on a container to perform actions.

using Container Tools extension to view the logs of the container

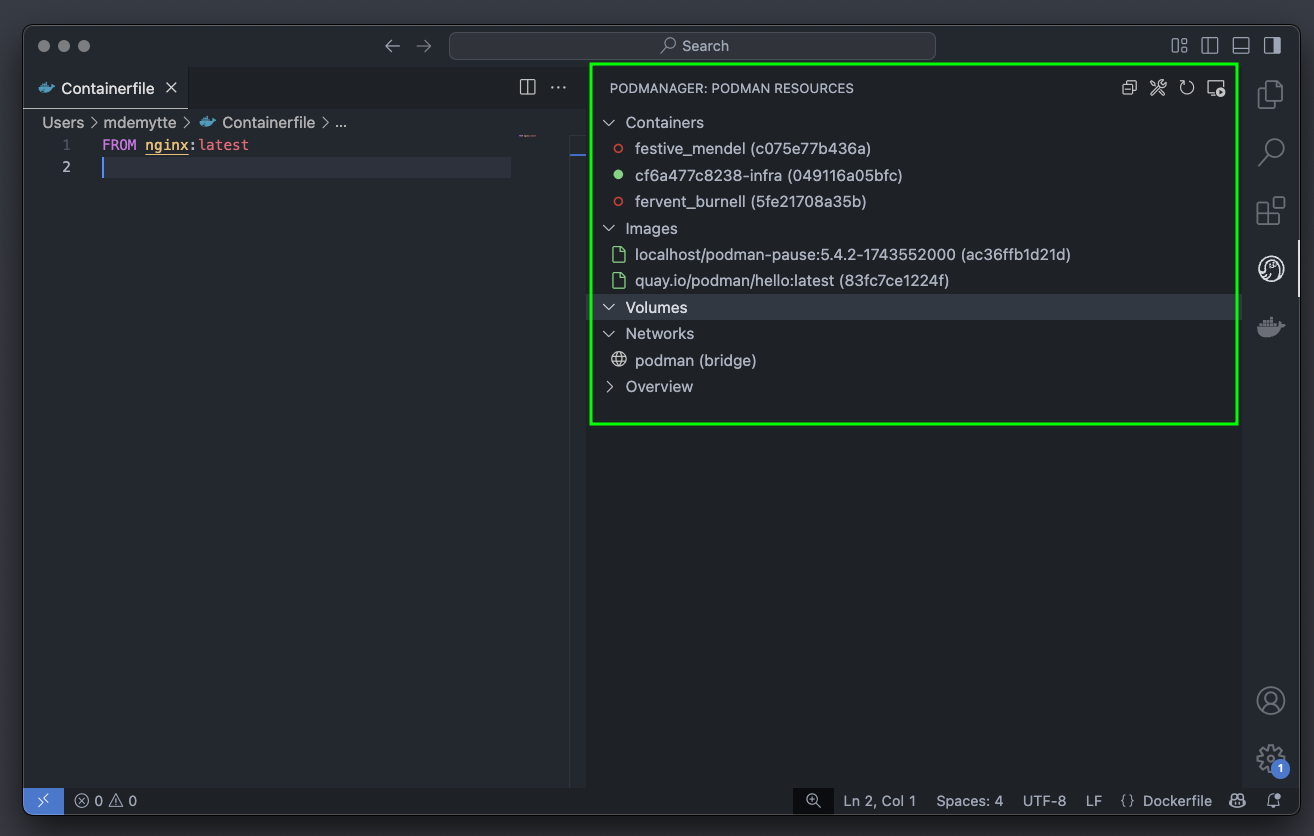
Similarly using the Pod manager extension we can visually inspect containers, images, and volumes.

  1. Click on the Pod manager icon in the Activity Bar.
  2. You'll see a list of your containers, images, and networks.

using podmanager to view all the running containers, images and volumes

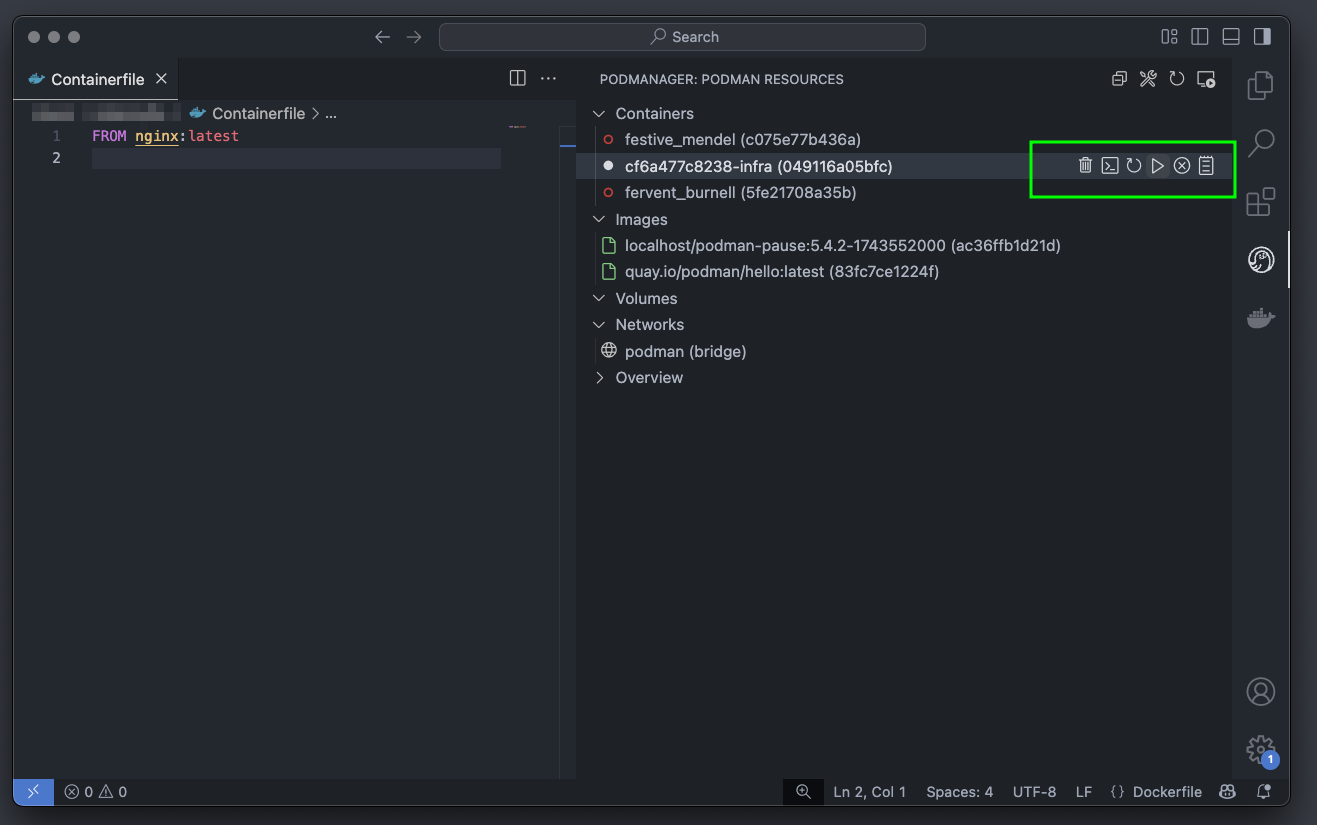
and manage the container lifecycle.

using podmanager to manage the lifecycle of the container

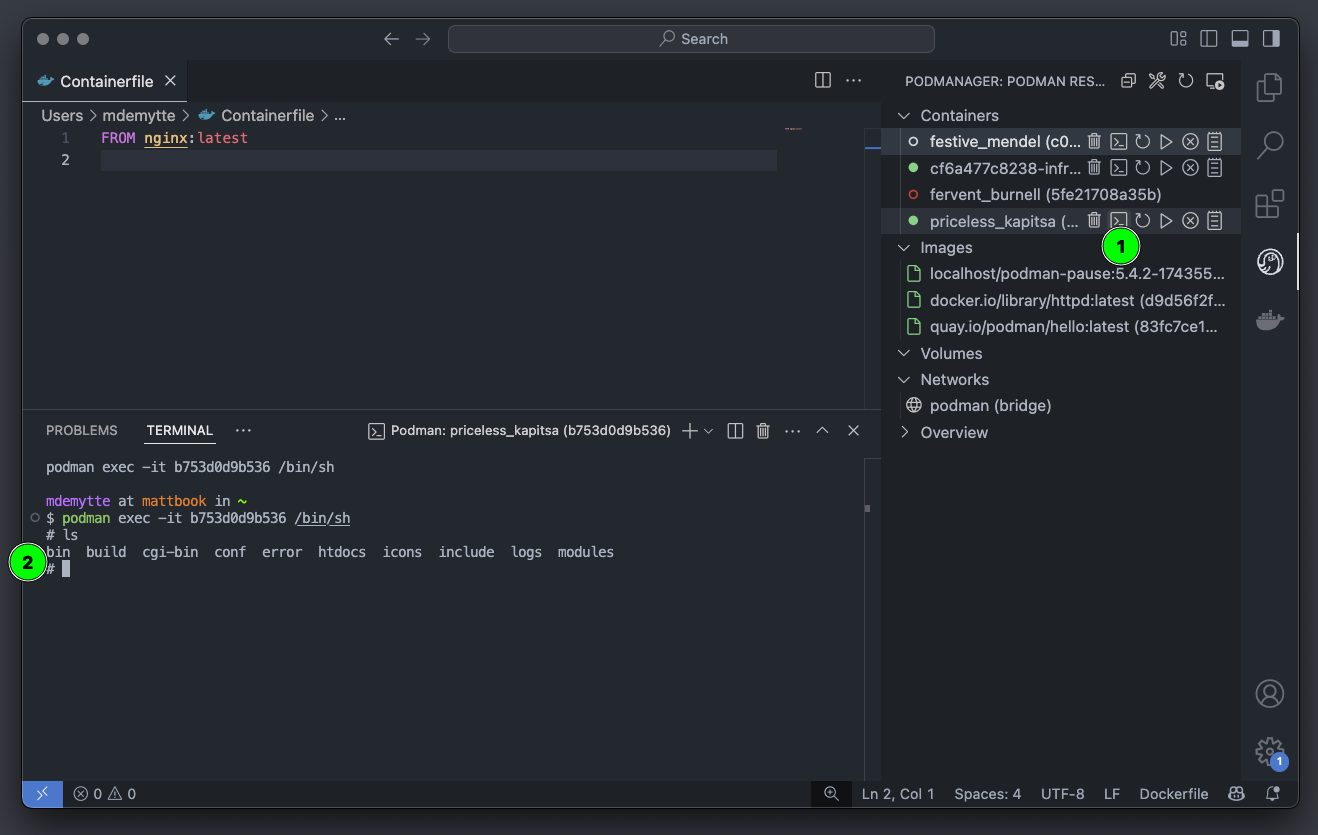
and of course troubleshoot issues with a visual interface.

using podmanager to enter the container

Conclusion

In comparison, both extensions provide a nearly identical set of features, so it is really up to you which UI you prefer. Personally I will stick with the Pod Manager because the logo is a seal 🦭. Remember if you encounter any issues using these tools or with Podman Desktop let us know by starting a discussion or creating an issue.

By combining the power of VS Code, Podman, and Podman Desktop, you can create a streamlined and efficient container development workflow. The VS Code extensions provide excellent integration with Podman, allowing you to manage containers, build images, and work with Containerfiles directly from your code editor. We are excited to see that Microsoft is embracing Podman and building support into their ecosystem. Podman Desktop complements this with a visual interface for managing your container environment and will help to move from your development environment to a production Kubernetes environment. Embrace these tools and elevate your container development experience!

Podman Desktop + CNCF - Community Driven Move

· 5 min read
Markus Eisele
Product Marketing
Stevan Le Meur
Product Manager

banner

Today, we're thrilled to announce our application for Podman Desktop to join the Cloud Native Computing Foundation (CNCF) as a Sandbox project.This is a huge milestone for our project and our community, and we're incredibly excited for what the future holds.

About Podman Desktop

Podman Desktop builds upon the innovations brought by Podman, offering a powerful yet user-friendly environment for containerized development. Podman provides a daemonless, rootless container engine that enhances security and flexibility, while Podman Desktop delivers an intuitive graphical interface for managing containers and interacting with Kubernetes. Enhanced by a plug-in system that allows developers to customize their inner loop container workflows to their needs and offers flexible extension points for other projects as well as other container engines.

Why the CNCF?

The CNCF is a vital organization for the cloud-native world, supporting collaboration and driving innovation for critical projects like Kubernetes, Prometheus, and Envoy. As a CNCF project, Podman Desktop will benefit from increased visibility, a neutral home for open governance, and access to a wealth of resources and expertise. CNCF projects will take a renewed interest in collaborating with us. This move will help us grow our community, ensure the project's long-term sustainability, and accelerate its development.

How Podman Desktop simplifies containers and Kubernetes

Developing with containers can be complex. Podman Desktop simplifies this by providing an intuitive interface and powerful tools for building, managing, and running containers. This allows developers to focus on writing code, not wrestling with infrastructure. Why is this important? Because in today's complex world, developer productivity is paramount. By removing friction and simplifying workflows, Podman Desktop empowers developers to deliver value faster. Podman Desktop enables developers to run Kubernetes locally, mirroring their production environment. This eliminates the "works on my machine" problem and allows for early detection of configuration issues. By closing the gap between development and production, Podman Desktop reduces deployment risks and accelerates the feedback loop. This leads to higher quality software and faster release cycles.

Open source and the CNCF: A perfect match for developer tools

We believe in the power of open source. Open source software fosters transparency, encourages collaboration, and drives innovation. By donating Podman Desktop to the CNCF, we're ensuring it remains open and accessible to all, fostering a vibrant community around it. The CNCF is the perfect home for Podman Desktop because it champions open source values and provides a neutral ground for collaborative development. This ensures that Podman Desktop remains vendor-neutral and driven by the needs of its users, keeping options open and avoiding vendor lock-in.

Furthermore, while the CNCF has fostered incredible innovation and many developers profit from the number of projects available through the CNCF, there's a recognized need for more developer-focused tooling. Podman Desktop fills this gap perfectly by providing a developer-centric, streamlined, and intuitive experience for containerizing, managing, and deploying cloud-native applications. Podman Desktop has a natural affinity to Kubernetes due to its design and features that seamlessly bridge the gap between local container development and Kubernetes deployments. This close relationship aligns perfectly with the CNCF's mission to drive the adoption of cloud-native technologies.

Join the growing Podman Desktop community

As a CNCF project, we have the opportunity to open our doors to a wider community of contributors and users. We believe that open source thrives on collaboration and diverse perspectives. By broadening our contributor base, we can accelerate innovation, improve the quality of Podman Desktop, and ensure it meets the needs of a diverse range of users.

You can contribute in various ways

  • Reporting issues: If you encounter bugs or have suggestions for improvements, you can report them on the GitHub issue tracker. Be sure to provide detailed information and steps to reproduce the issue.

  • Working on issues: You can browse the issue tracker and contribute by fixing bugs or implementing new features. This involves forking the repository, making changes, and submitting pull requests.

  • Contributing code: Beyond addressing existing issues, you can propose and contribute entirely new features or enhancements to Podman Desktop's functionality, user interface, or integrations with other tools. Learn more about how to contribute.

  • Contributing plug-ins: Feel like there is an integration missing? You can contribute your own plug-in functionality for Podman Desktop. Check out the guide.

  • Improving documentation: Clear and comprehensive documentation is essential. You can contribute by improving existing documentation, adding new guides, or creating tutorials.

  • Providing website contributions: The Podman Desktop website is also open source. You can contribute to its content, design, or translations.

  • Becoming an Adopter: If you are a happy user, we’d love to know and share the word. Consider adding yourself or your organization to the list of adopters with a pull request.

Before you start contributing, it's helpful to familiarize yourself with the project's contribution guidelines and code architecture. These resources provide valuable information on coding style, testing procedures, and the overall development process. You can also join #podman-desktop on the Kubernetes Slack to connect with other contributors and get help.

KubeCon 2024 and beyond

We are at KubeCon NA 2024 in Salt Lake, to officially announce this exciting news and share more about Podman Desktop and our roadmap. Stop by the Red Hat booth to say hello, contribute to the project, and help us shape the future of cloud-native development.

Get involved and learn more

We're incredibly excited about this new chapter for Podman Desktop and can't wait to see what we can achieve together with the CNCF community.