Managing your application resources
This tutorial covers the tasks that you can perform to manage the following resources visually:
- Containers and pods
- Images
- Volumes
- Kubernetes objects
- Other resources, such as Podman machines, clusters, and CLI tools
Several useful actions are available in the UI to make resource management easy.
Before you begin
Make sure you have:
- Installed Podman Desktop.
- A running Podman machine.
- A valid Kubernetes context and connection to manage Kubernetes resources.
Managing containers and pods
Based on your needs, perform any of the following actions after navigating to the component page:
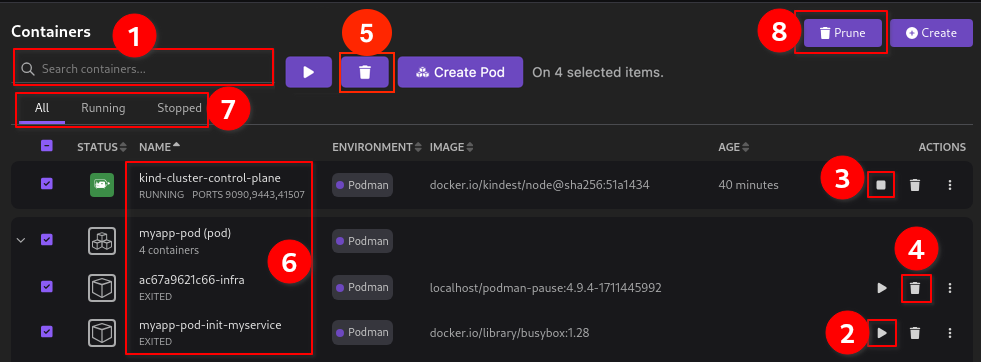
Common actions for containers and pods

-
Search a container or pod using the search box.
-
Start a container or pod using the Start icon.
-
Stop a container or pod using the Stop icon.
-
Delete a container or pod using the Delete icon.
note- You cannot delete a container if it is being used in any pods. In such cases, you must delete the pod and then delete the container.
-
Bulk deletion: Select containers or pods and delete them by using the Delete button.
-
Click the name of the container or pod to:
- View its summary and logs.
- View its kube configuration if the container or pod is a Kubernetes resource.
- Interact with the container using a terminal
-
View containers or pods based on their status:
- Select the Running tab to view all running containers or pods
- Select the Stopped tab to view all stopped containers or pods
-
Use the Prune button to remove all unused containers or pods from the Podman engine.
Container-specific actions

-
Use the Create button to create a container with a container or docker file or from an existing image.
-
Create a pod with selected containers using the Create Pod button.
-
Use the overflow menu to:
- Open and view logs.
- Kubernetes action: Generate and view configuration for a Kubernetes container.
- Kubernetes action: Deploy a container to a Kubernetes cluster.
- Kubernetes action: Open a browser to check the cluster status.
- Open a terminal to interact with the container.
- Restart your container.
- Export a container to your local machine.
-
Bulk start: Select multiple containers and run them in a single step.
noteYou might see varying options in the overflow menu based on status and configuration of the container.
Pod-specific actions

-
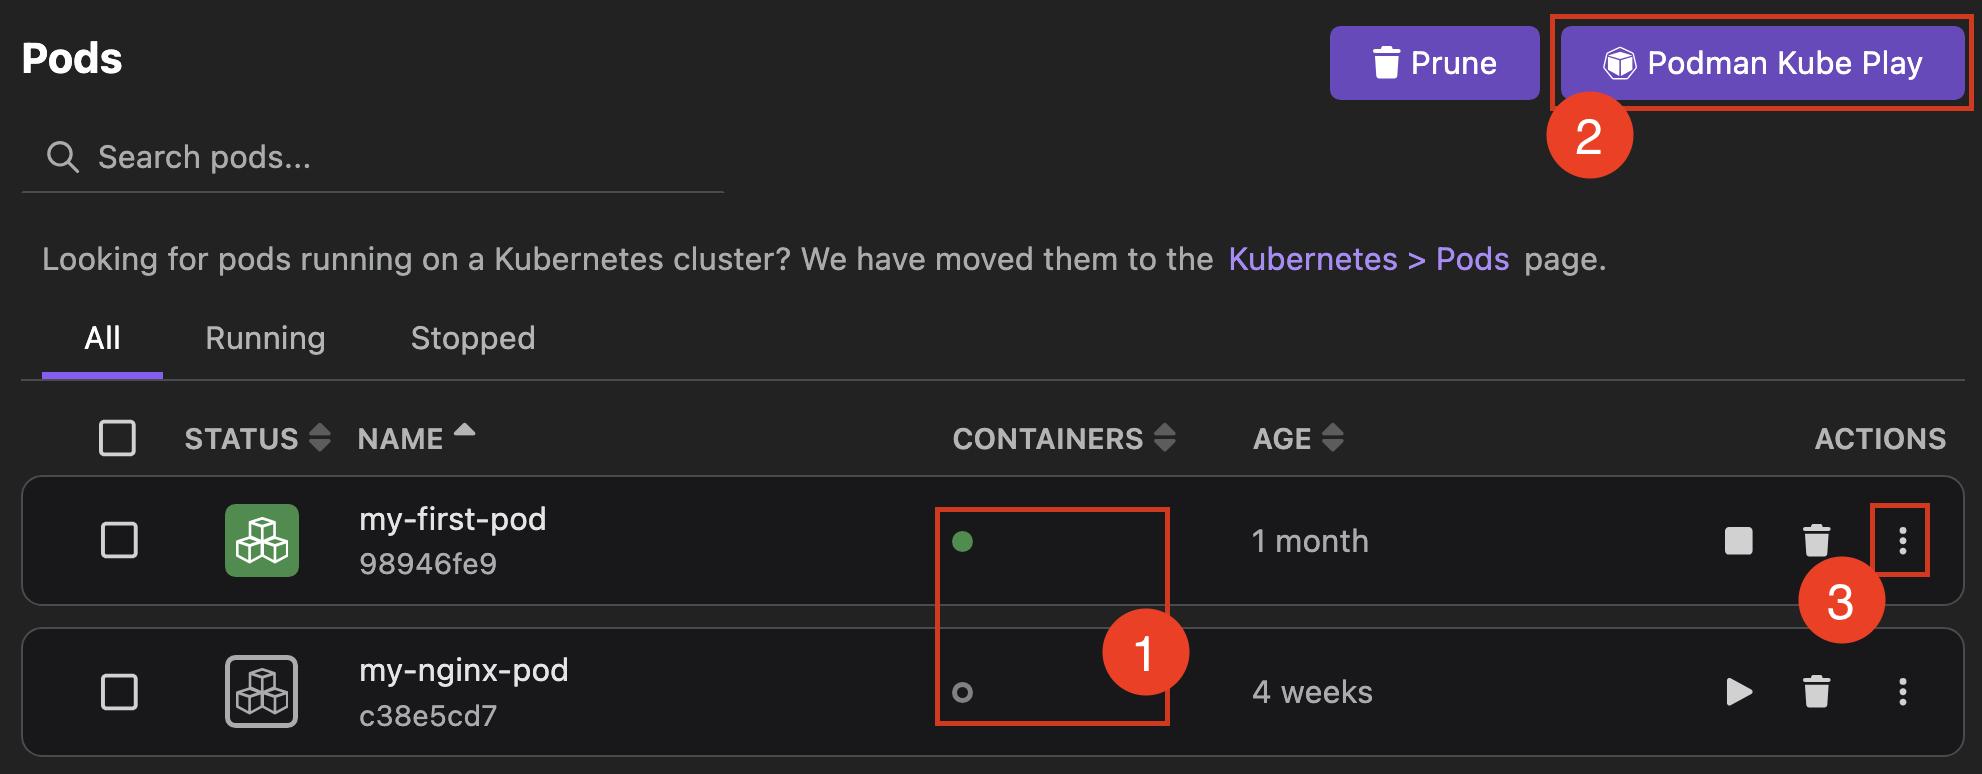
View the status of each container by hovering over it in the CONTAINERS column. The status can be
Running,Created,Exited, orWaiting. -
Create a Podman pod from a YAML configuration file using the Podman Kube Play button.
noteTo create a Kubernetes pod, refer to the Applying a YAML manifest section.
-
Use the overflow menu to:
- Kubernetes action: Generate and view configuration for a Kubernetes pod.
- Kubernetes action: Deploy a pod to a Kubernetes cluster.
- Restart your pod.
Managing images
Perform any of the following actions after navigating to the component page:

-
Search an image using the search box.
-
Create a container from the image using the Run icon.
-
Delete an image using the Delete icon.
note- You cannot delete an image if it is being used in any containers. In such cases, you must delete the container and then delete the image.
- By selecting multiple images, you can delete or save them in a single step.
-
Use the overflow menu to:
- Push an image to a configured registry.
- Edit the image name and tag.
- View history to check the commands that created each layer of the image.
- Save an image to your local machine.
- Push an image to a cluster, such as a Kind or Developer Sandbox cluster.
-
Access other useful actions:
- Use the Prune button to remove all unused images from the Podman engine.
- Load images from a tar archive on your local machine.
- Import images from your local machine into the Podman Desktop application.
- Pull an image from a configured registry.
- Build an image from a container or docker file.
Managing volumes
Perform any of the following actions after navigating to the component page:

-
Search a volume using the search box.
-
Use the Delete icon to delete a volume. You can also select multiple volumes and delete them in one step by using the delete button on the page.
note- You cannot delete a volume if it is being used in any containers. In such cases, you must delete the container and then delete the volume.
- By selecting multiple volumes, you can delete them in a single step.
-
Click the name of the volume to view its summary.
-
Access other useful actions:
- Use the Prune button to remove unused volumes from the Podman engine.
- Click Gather volume sizes to determine the size used for volumes.
- Click the Create button to create a volume.
Managing Kubernetes objects
Perform any of the following actions after navigating to the component page:

- Search for objects using the search box.
- Delete an object using the Delete icon.
- Create an object using the Apply YAML button.
- Click the name of the object to:
- View its summary
- View its Kubernetes configuration
- Edit its Kubernetes configuration and apply those changes to your cluster.
Managing other resources
You can manage other resources, such as your Podman machine, cluster, or CLI tools using the Podman Desktop Settings.
Managing your Podman machine
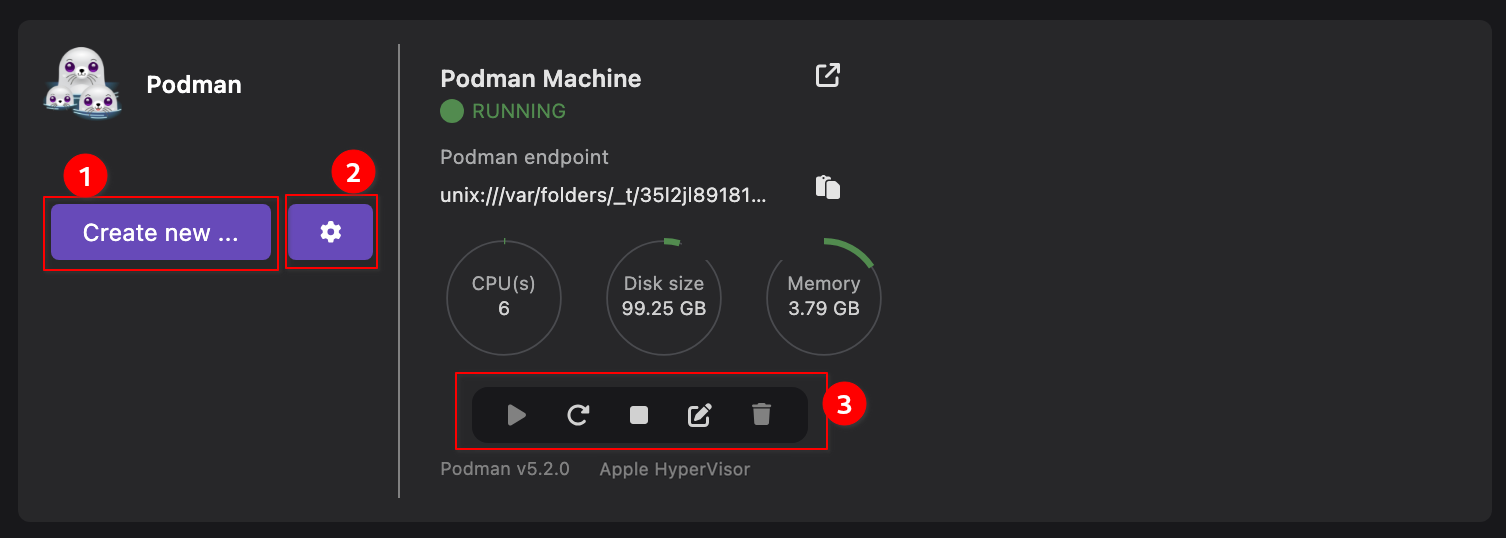
On the Settings > Resources page, perform any of the following actions:

- Create a new Podman machine.
- Set up Podman machine preferences.
- Access other useful actions to start, restart, stop, edit, or delete a Podman machine.
Managing your cluster
On the Settings > Resources page, perform any of the following actions:

- Create a new cluster.
- Access other useful actions to start, restart, stop, or delete a cluster.
- Upgrade your cluster to the latest version.
Managing your CLI tools
If you have installed a CLI tool extension, you can set up, upgrade, or downgrade the CLI tool from the UI.
- On the Settings > Resources page, click Setup to download the CLI tool and install it system wide.

- On the Settings > CLI tools page, click the Upgrade/Downgrade icon or link to update the version of the CLI tool.
