Writing custom extensions for Podman Desktop
Extensions let you add custom features to Podman Desktop -- new commands, status bar indicators, tray menus, webview dashboards, configuration panels, providers, onboarding workflows, and more. In this tutorial we walk through building a real extension from scratch, covering the most important APIs along the way.
The content is based on the DevConf.CZ 2026 workshop "Podman Desktop -- Creating extensions to simplify container workflows". The companion repository provides 14 progressive branches, each introducing one API concept with a numbered placeholder comment you fill in yourself.
Prerequisites
- Podman Desktop 1.17 or later (download)
- Node.js 24+ and npm 11+
- A running Podman machine (macOS / Windows) or Podman installed natively (Linux)
- A container to experiment with --
podman run -d fedora sleep infinityis enough
NOTE: this workshop is built on top of a POC extension, so keep in mind that some of the features might not work as expected or might not work at all. Target this extension at containers that can tolerate some pressure -- don't point it at anything you care about.
Podman Desktop Extension features
These guides cover the most frequently used APIs when building an extension:
- Commands -- register actions users can invoke from the command palette and menus
- Configuration -- declare settings in
package.jsonand read them at runtime - Menus -- add items to context menus
- Status bar -- add clickable indicators to the bottom bar
- Progress tasks -- show progress in the task widget during long operations
- Tray menu -- add items to the system tray icon menu
- CLI tools -- register CLI tools in the Settings page
- Onboarding workflow -- guide users through first-time setup
- Webview messaging -- communicate between the extension and its webview panel
- Adding UI components -- use the
@podman-desktop/ui-sveltelibrary in webviews - Adding icons -- customize your extension's icons
If you want to learn more about the internals of the extension check Developing a Podman Desktop extension.
Project setup
Clone the workshop repository and check out the first branch:
git clone https://github.com/gastoner/extension-template-full
cd extension-template-full
git checkout workshop/01-progress-task
npm install && npm run build
The repository is a monorepo with three packages:
| Package | Role |
|---|---|
packages/backend | Extension entry point (activate / deactivate), Podman API calls, chaos engine |
packages/frontend | Svelte 5 + Tailwind CSS dashboard with @podman-desktop/ui-svelte |
packages/shared | RPC types and message proxy connecting frontend and backend |
The extension can use @podman-desktop/ui-svelte UI package with basic UI components to help you build your extension. For building the feature set of your extension you can use @podman-desktop/api to do so.
Loading the extension in Podman Desktop for development
- Open Settings > Preferences and enable Development Mode, Status Bar and Toast.
- Navigate to Extensions > Local Extensions.
- Click Add a local folder... and select the
packages/backendfolder. - The extension appears in the Installed tab and a Chaos Lab entry shows up in the navigation bar.
IMPORTANT: After each rebuild (
npm run build) you need to disable and re-enable the extension in Podman Desktop, or you can usenpm run watchin the extension to automatically build it, you still need to re-enable the extension though.
NOTE: If you clone the Podman Desktop repository and you run it using
pnpm watch --extension-folder ../relative_path_to_the_extension/packages/backend, the extension will be updated automatically.
How the workshop branches work
Each branch (workshop/01-progress-task through workshop/14-cli-tool) contains a numbered placeholder comment in the source code. Your task is to replace the placeholder with real code. The next branch always contains the solution for the previous step, and the dev_conf branch has everything completed.
workshop/01-progress-task   →  #1  (withProgress)
workshop/02-status-bar      →  #2  (createStatusBarItem)
workshop/03-status-bar-dynamic → #3 (dynamic status bar)
...
workshop/14-cli-tool        →  #14 (createCliTool)
dev_conf                    →  all placeholders completed
Before each step you should have some kind of container 'attack' running, e.g. resource limiting.
Step 1 -- Progress tasks
Branch: workshop/01-progress-task | File: packages/backend/src/chaos/chaos-api-impl.ts | Docs: Progress tasks
The withProgress API shows a task in the Podman Desktop task widget with a title, message, and progress bar.
In packages/backend/src/chaos/chaos-api-impl.ts, the placeholder comment above the call to this.engine.stopAll() describes what to implement:
async stopAllChaos(): Promise<void> {
  // -------------------------------------------------------------------------
  // #1: Show a progress task while stopping all chaos
  // Wrap the call to this.engine.stopAll() inside extensionApi.window.withProgress():
  //   - location: extensionApi.ProgressLocation.TASK_WIDGET
  //   - title: 'Stop All Chaos'
  // Inside the callback, use progress.report({ message }) to show status,
  // then call this.engine.stopAll(), then report completion with increment: 100.
  // Bonus: use increment (0-100) in progress.report() to show intermediate progress steps.
  // Hint: extensionApi.window.withProgress({ location, title }, async (progress) => { ... })
  // -------------------------------------------------------------------------
  await this.engine.stopAll();
}
Replace it with a progress-reporting version:
async stopAllChaos(): Promise<void> {
  await extensionApi.window.withProgress(
    { location: extensionApi.ProgressLocation.TASK_WIDGET, title: 'Stop All Chaos' },
    async progress => {
      progress.report({ increment: 0, message: 'Stopping all chaos operations...' });
      await new Promise(resolve => setTimeout(resolve, 1500));
      progress.report({ increment: 50, message: 'Hacking NASA in meantime...' });
      await new Promise(resolve => setTimeout(resolve, 1500));
      await this.engine.stopAll();
      progress.report({ increment: 100, message: 'All chaos operations stopped' });
    },
  );
}
progress.report() accepts message (text shown under the title) and increment (0--100 progress bar value).
Steps 2--3 -- Status bar
Branch: workshop/02-status-bar, workshop/03-status-bar-dynamic | File: packages/backend/src/extension.ts | Docs: Status bar
Creating a static status bar item
In packages/backend/src/extension.ts, createStatusBarItem() adds a clickable item to the bottom bar. Set its .text, .command, and call .show():
const chaosStatusBar = extensionApi.window.createStatusBarItem();
chaosStatusBar.text = 'Chaos Lab';
chaosStatusBar.command = 'chaos-lab.openChaos';
if (settings.showStatusBarChaos) {
  chaosStatusBar.show();
}
extensionContext.subscriptions.push(chaosStatusBar);
Dynamically updating the text
Still in packages/backend/src/extension.ts, use setInterval to poll chaosEngine.getState() and reflect the number of active attacks:
statusBarUpdateInterval = setInterval(() => {
  const state = chaosEngine?.getState();
  if (state && state.runningAttacks > 0) {
    chaosStatusBar.text = `Chaos Lab (${state.runningAttacks} active)`;
  } else {
    chaosStatusBar.text = 'Chaos Lab';
  }
}, 3000);
extensionContext.subscriptions.push({
  dispose: () => {
    if (statusBarUpdateInterval) {
      clearInterval(statusBarUpdateInterval);
      statusBarUpdateInterval = undefined;
    }
  },
});
Always push disposables to extensionContext.subscriptions so they are cleaned up when the extension deactivates.
Static status bar item:
Dynamic updates reflecting active attacks:
Steps 4--5 -- Commands
Branch: workshop/04-command-stop-all, workshop/05-command-open-dashboard | File: packages/backend/src/extension.ts | Docs: Commands
Commands are registered with extensionApi.commands.registerCommand(id, callback). The id must match entries in package.json under contributes.commands.
"Stop All Chaos" command
Registered in packages/backend/src/extension.ts:
const stopAllCommand = extensionApi.commands.registerCommand('chaos-lab.stopAll', async () => {
  await chaosApiImpl.stopAllChaos();
  await extensionApi.window.showInformationMessage('All chaos operations have been stopped and rolled back.');
});
extensionContext.subscriptions.push(stopAllCommand);
showInformationMessage displays a toast notification in the UI.
"Open Dashboard" command
Also in packages/backend/src/extension.ts:
const openChaosCommand = extensionApi.commands.registerCommand('chaos-lab.openChaos', () => {
  panel.reveal();
});
extensionContext.subscriptions.push(openChaosCommand);
Make sure to also declare the command in packages/backend/package.json:
{
  "contributes": {
    "commands": [
      { "command": "chaos-lab.stopAll", "title": "Chaos Lab: Stop All Chaos" },
      { "command": "chaos-lab.openChaos", "title": "Chaos Lab: Open Dashboard" }
    ]
  }
}
"Stop All Chaos" command with toast notification:
"Open Dashboard" command revealing the extension's Chaos Lab tab:
Step 6 -- Webview messaging
Branch: workshop/06-command-view-container | File: packages/backend/src/extension.ts | Docs: Webview messaging
In packages/backend/src/extension.ts, extensions communicate with their webview via postMessage. This command receives a container object from a context menu, opens the dashboard, and tells the frontend to navigate to that container's detail page:
const viewContainerCommand = extensionApi.commands.registerCommand(
  'chaos-lab.viewContainerUsage',
  async (container: { id?: string; Id?: string }) => {
    const containerId = container?.id ?? container?.Id;
    panel.reveal();
    await new Promise(resolve => setTimeout(resolve, 200));
    await panel.webview.postMessage({
      type: 'navigate',
      url: `/chaos/container/${containerId}`,
    });
  },
);
extensionContext.subscriptions.push(viewContainerCommand);
The short delay gives the webview time to become visible before receiving the message. On the frontend side, a message listener in Svelte picks up { type: 'navigate' } and routes accordingly.
The context menu entry is declared in packages/backend/package.json:
{
  "contributes": {
    "menus": {
      "dashboard/container": [{ "command": "chaos-lab.viewContainerUsage", "title": "View Container (Chaos Lab)" }]
    }
  }
}
Step 7 -- Tray menu
Branch: workshop/07-tray-menu | File: packages/backend/src/extension.ts | Docs: Tray menu
In packages/backend/src/extension.ts, register a submenu in the system tray that groups related commands:
const trayItem = extensionApi.tray.registerMenuItem({
  id: 'chaos-lab.tray',
  type: 'submenu',
  label: 'Chaos Lab',
  submenu: [
    { id: 'chaos-lab.openChaos', label: 'Open Dashboard', type: 'normal' },
    { id: 'chaos-lab.stopAll', label: 'Stop All Chaos', type: 'normal' },
  ],
});
extensionContext.subscriptions.push(trayItem);
Each submenu item's id must match a registered command. When the user clicks a tray entry, Podman Desktop invokes the corresponding command.
Steps 8--9 -- Configuration
Branch: workshop/08-config-change-listener, workshop/09-config-read-values | File: packages/backend/src/settings-manager.ts | Docs: Configuration
Configuration properties are declared in package.json under contributes.configuration. The extension reads them at startup and reacts to changes.
Declaring configuration in package.json
Add this under contributes.configuration in packages/backend/package.json:
{
  "contributes": {
    "configuration": {
      "title": "Chaos Lab",
      "properties": {
        "chaos-lab.chaosSafeContainers": {
          "type": "string",
          "default": "",
          "description": "Comma-separated container name patterns that should never be targeted by chaos or isolation (supports * wildcards). Example: 'postgres*,redis-prod'."
        },
        "chaos-lab.showStatusBarChaos": {
          "type": "boolean",
          "default": true,
          "description": "Show the Chaos mode indicator in the status bar."
        }
      }
    }
  }
}
Listening for changes
In packages/backend/src/settings-manager.ts:
load(): void {
  this.readConfig();

  this.disposable = extensionApi.configuration.onDidChangeConfiguration(e => {
    if (e.affectsConfiguration(CONFIG_SECTION)) {
      this.readConfig();
      for (const listener of this.changeListeners) {
        listener(this.current);
      }
    }
  });
}
Reading configuration values
Still in packages/backend/src/settings-manager.ts:
private readConfig(): void {
  const config = extensionApi.configuration.getConfiguration(CONFIG_SECTION);

  this.current = {
    chaosSafeContainers: this.parseSafeContainers(
      config.get<string>('chaosSafeContainers') ?? '',
    ),
    showStatusBarChaos:
      config.get<boolean>('showStatusBarChaos') ?? DEFAULT_SETTINGS.showStatusBarChaos,
  };
}
getConfiguration(section) returns a config reader scoped to your extension. Use config.get<T>(key) with a fallback to handle missing values.
Steps 10--11 -- Provider and connection factory
Branch: workshop/10-create-provider, workshop/11-connection-factory | File: packages/backend/src/chaos-provider.ts
Providers appear in the Podman Desktop Resources page and can manage connections (machines, engines).
Creating the provider
In packages/backend/src/chaos-provider.ts:
providerInstance = extensionApi.provider.createProvider({
  id: 'chaos',
  name: 'Chaos',
  status: 'installed',
  version: '1.0.0',
  images: {
    icon: './icon.png',
    logo: { dark: './icon.png', light: './icon.png' },
  },
  emptyConnectionMarkdownDescription: 'No Chaos machines running. Click **Create** to spin up a new Chaos machine.',
});
extensionContext.subscriptions.push(providerInstance);
Setting up the connection factory
Still in packages/backend/src/chaos-provider.ts, the connection factory lets users create new "machines" from the Resources page:
providerInstance.setContainerProviderConnectionFactory({
  creationDisplayName: 'Chaos Machine',
  creationButtonTitle: 'Create Chaos Machine',

  create: async (params, logger, _token) => {
    const machineName = (params['chaos.factory.machine.name'] as string) || `chaos-${Date.now()}`;
    const cpus = Number(params['chaos.factory.machine.cpus']) || DEFAULT_CONFIG.cpus;
    const memoryBytes = Number(params['chaos.factory.machine.memory']) || DEFAULT_CONFIG.memoryMb * 1024 * 1024;
    const diskBytes = Number(params['chaos.factory.machine.diskSize']) || DEFAULT_CONFIG.diskGb * 1024 * 1024 * 1024;

    const memoryMb = Math.round(memoryBytes / (1024 * 1024));
    const diskGb = Math.round(diskBytes / (1024 * 1024 * 1024));
    const config: MachineConfig = { cpus, memoryMb, diskGb };

    logger?.log(`Creating Chaos machine '${machineName}' (${cpus} CPUs, ${memoryMb} MB RAM, ${diskGb} GB disk)...`);
    registerMachineConnection(machineName, config);
    providerInstance?.updateStatus('ready');
    logger?.log(`Chaos machine '${machineName}' created and running`);
  },
});
The params object contains values from configuration properties scoped to ContainerProviderConnectionFactory. The factory parameters (name, CPUs, memory, disk) are declared in the same contributes.configuration section of package.json with "scope": "ContainerProviderConnectionFactory".
The Chaos provider on the Resources page:
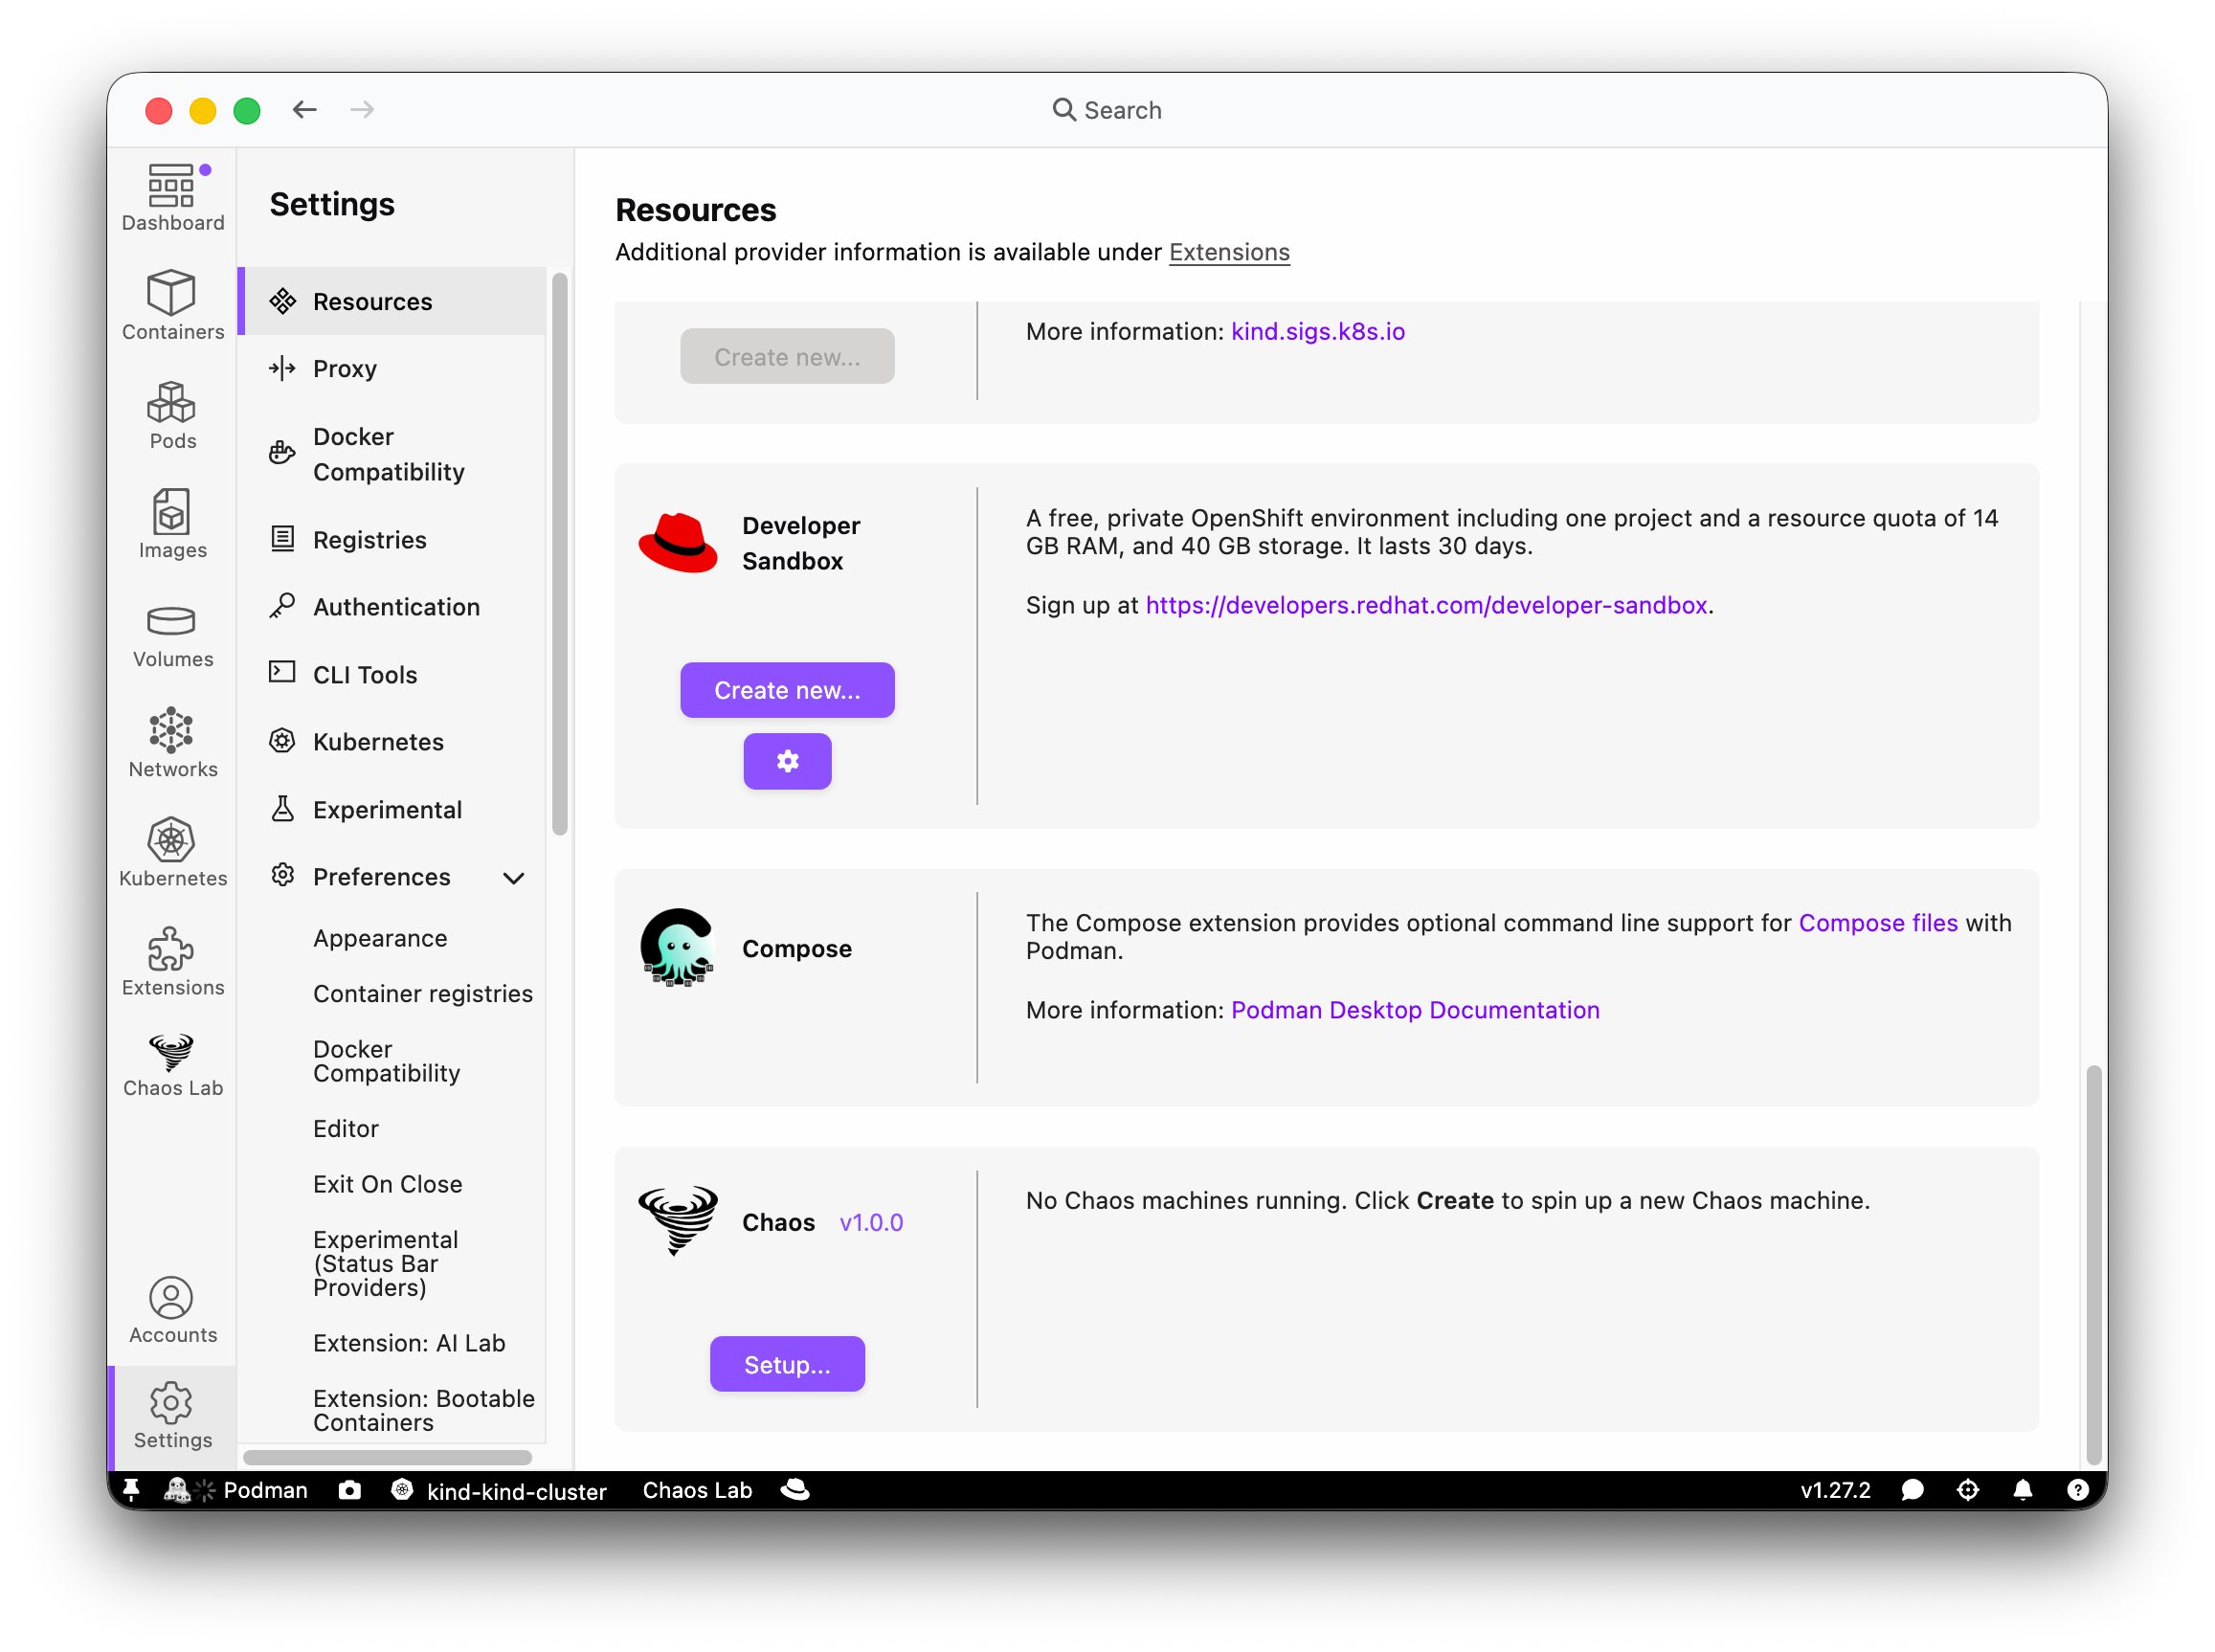
Creating a Chaos Machine via the connection factory:
Step 12 -- CI/CD workflows
Branch: workshop/12-ci-workflows | Files: Containerfile, .github/workflows/pr-check.yaml, .github/workflows/build-next.yaml
Packaging as an OCI image
The repository-root Containerfile uses a multistage build: the first stage installs and builds, the second copies only the built artifacts into a scratch image:
FROM node:24-slim AS builder
ENV PNPM_HOME="/pnpm"
ENV PATH="$PNPM_HOME:$PATH"
COPY . /app
WORKDIR /app
RUN npm install --frozen-lockfile
RUN npm run build
FROM scratch
COPY /app/packages/backend/dist/ /extension/dist
COPY /app/packages/backend/package.json /extension/
COPY /app/packages/backend/media/ /extension/media
COPY /app/LICENSE /extension/
COPY /app/packages/backend/icon.png /extension/
COPY /app/README.md /extension/
LABEL org.opencontainers.image.title="Podman Desktop Chaos Lab Extension" \
org.opencontainers.image.description="Containers durability harness tool" \
org.opencontainers.image.vendor="DevConf Podman Desktop / Extension demo" \
io.podman-desktop.api.version=">= 1.22.0"
The io.podman-desktop.api.version label tells Podman Desktop which API version the extension requires.
PR check workflow
The .github/workflows/pr-check.yaml workflow runs lint, format, typecheck, tests, and builds the extension image on every pull request:
name: pr-check
on: [pull_request]

jobs:
  lint-format-unit:
    runs-on: ubuntu-24.04
    steps:
      - uses: actions/checkout@v6
      - uses: actions/setup-node@v6
        with:
          node-version: 24
          cache: 'npm'
      - run: npm install
      - run: npm run lint:check
      - run: npm run format:check
      - run: npm run test
      - run: npm run typecheck
      - run: npm run build

  build-container:
    runs-on: ubuntu-24.04
    steps:
      - uses: actions/checkout@v6
      - run: |
          podman build -t local_image ./
          CONTAINER_ID=$(podman create localhost/local_image --entrypoint "")
          mkdir -p output/plugins
          podman export $CONTAINER_ID | tar -x -C output/plugins/
          podman rm -f $CONTAINER_ID
Nightly build
The .github/workflows/build-next.yaml workflow pushes the extension image to ghcr.io on every merge to main or dev_conf, tagged with both nightly and the commit SHA:
name: Build and Push
on:
  push:
    branches: ['main', 'dev_conf']
  workflow_dispatch:

jobs:
  build:
    runs-on: ubuntu-24.04
    steps:
      - uses: actions/checkout@v6
      - name: Login to ghcr.io
        run: echo "${{ secrets.GITHUB_TOKEN }}" | podman login --username ${{ github.repository_owner }} --password-stdin ghcr.io
      - name: Publish Image
        run: |
          IMAGE_NAME=ghcr.io/${{ github.repository_owner }}/podman-desktop-extension-chaos-lab
          podman build -t ${IMAGE_NAME}:nightly .
          podman push ${IMAGE_NAME}:nightly
          podman tag ${IMAGE_NAME}:nightly ${IMAGE_NAME}:${GITHUB_SHA}
          podman push ${IMAGE_NAME}:${GITHUB_SHA}
Step 13 -- Onboarding
Branch: workshop/13-onboarding | File: packages/backend/src/chaos-provider.ts + packages/backend/package.json | Docs: Onboarding workflow
Onboarding workflows guide first-time users through setup. The UI is declared in package.json and Podman Desktop renders it automatically -- your code just sets context values. This flow has five steps: checking for an existing provider, a welcome/info screen, creating a Chaos Machine, handling creation failures, and a success screen.
Declarative onboarding in package.json
In packages/backend/package.json:
{
  "contributes": {
    "onboarding": {
      "title": "Chaos Lab Setup",
      "enablement": "!onboardingContext:chaosProviderReady",
      "steps": [
        {
          "id": "checkProviderCommand",
          "label": "Check Provider",
          "title": "Checking for Chaos provider",
          "command": "chaos-lab.onboarding.checkProvider",
          "completionEvents": ["onCommand:chaos-lab.onboarding.checkProvider"]
        },
        {
          "id": "welcomeView",
          "label": "Setup",
          "title": "Chaos Lab Setup",
          "when": "!onboardingContext:chaosProviderReady",
          "content": [
            [{ "value": "Chaos Lab needs a Chaos Machine to run chaos experiments against your containers." }],
            [
              {
                "value": "The next step will create a Chaos Machine using the provider's connection factory. You can customize CPU, memory, and disk settings.",
                "highlight": true
              }
            ]
          ]
        },
        {
          "id": "createMachineView",
          "label": "Create Machine",
          "title": "Create a Chaos Machine",
          "when": "!onboardingContext:chaosProviderReady",
          "component": "createContainerProviderConnection",
          "completionEvents": ["onboardingContext:chaosProviderReady"]
        },
        {
          "id": "createMachineFailure",
          "title": "Failed creating Chaos Machine",
          "when": "onboardingContext:chaosMachineCreationFailed",
          "state": "failed",
          "content": [
            [
              {
                "value": "Failed to create the Chaos Machine. :button[Retry setup]{command=chaos-lab.onboarding.checkProvider}"
              }
            ]
          ]
        },
        {
          "id": "setupSuccess",
          "title": "Chaos Lab is ready",
          "when": "onboardingContext:chaosProviderReady",
          "state": "completed",
          "content": [
            [
              {
                "value": "#### Chaos Lab is ready!\nYour Chaos Machine has been created. Open the **Chaos Lab Dashboard** to start running chaos experiments.\n\n:button[Open Dashboard]{command=chaos-lab.openChaos}",
                "highlight": true
              }
            ]
          ]
        }
      ]
    }
  }
}
Setting context values from code
In packages/backend/src/chaos-provider.ts:
const checkProviderDisposable = extensionApi.commands.registerCommand(
  'chaos-lab.onboarding.checkProvider',
  async () => {
    const ready = machines.size > 0;
    extensionApi.context.setValue('chaosProviderReady', ready, 'onboarding');
  },
);
extensionContext.subscriptions.push(checkProviderDisposable);
In the connection factory create callback (packages/backend/src/chaos-provider.ts), set the context on success or failure:
try {
  registerMachineConnection(machineName, config);
  providerInstance?.updateStatus('ready');
  logger?.log(`Chaos machine '${machineName}' created and running`);
  extensionApi.context.setValue('chaosProviderReady', true, 'onboarding');
} catch (err) {
  extensionApi.context.setValue('chaosMachineCreationFailed', true, 'onboarding');
  throw err;
}
The third argument 'onboarding' scopes the value so the onboarding UI's when clauses can react to it.
Resetting onboarding for repeated testing
While iterating on this step you'll likely complete the onboarding once and then want to see it again. In both cases below, first delete the Chaos Machine from the Resources page so checkProviderCommand sees machines.size === 0 again -- the chaosProviderReady / chaosMachineCreationFailed context values above live in memory rather than on disk, so they need machines.size === 0 to be re-evaluated. Then reset with either:
- Click the Reset Onboarding button inside the Chaos Lab extension -- the onboarding Setup button reappears immediately, no restart required.
- If you also want to reset Podman Desktop's own general "Welcome" screen (the first-run splash, unrelated to this extension, tracked via a
"welcome.version"entry in your localsettings.json): remove that entry, install the extension from the published GitHub image instead of a local folder (see Packaging and distribution below), and restart Podman Desktop.
"welcome.version": "initial"
By default settings.json lives at ~/.local/share/containers/podman-desktop/configuration/settings.json (macOS, Windows, and most Linux installs); on newer Linux installs following the XDG Base Directory spec without a pre-existing legacy config, it's instead at ~/.config/containers/podman-desktop/settings.json. See CONTRIBUTING.md for details.
NOTE: if your extension is still loaded as a local folder (Extensions > Local Extensions > Add a local folder...), it will not survive this restart and you'll need to add it again -- installing from the published image avoids that.
Step 14 -- CLI tool
Branch: workshop/14-cli-tool | File: packages/backend/src/extension.ts | Docs: CLI tools
In packages/backend/src/extension.ts, register a CLI tool so it appears in the Podman Desktop CLI tools settings:
const chaosCli = extensionApi.cli.createCliTool({
  name: 'chaos-cli',
  displayName: 'Chaos CLI',
  markdownDescription: 'CLI for managing chaos experiments from the terminal',
  images: { icon: './icon.png' },
  version: '0.1.0',
  path: '/usr/local/bin/chaos-cli',
});
extensionContext.subscriptions.push(chaosCli);
The chaos-cli registered in the CLI Tools settings:
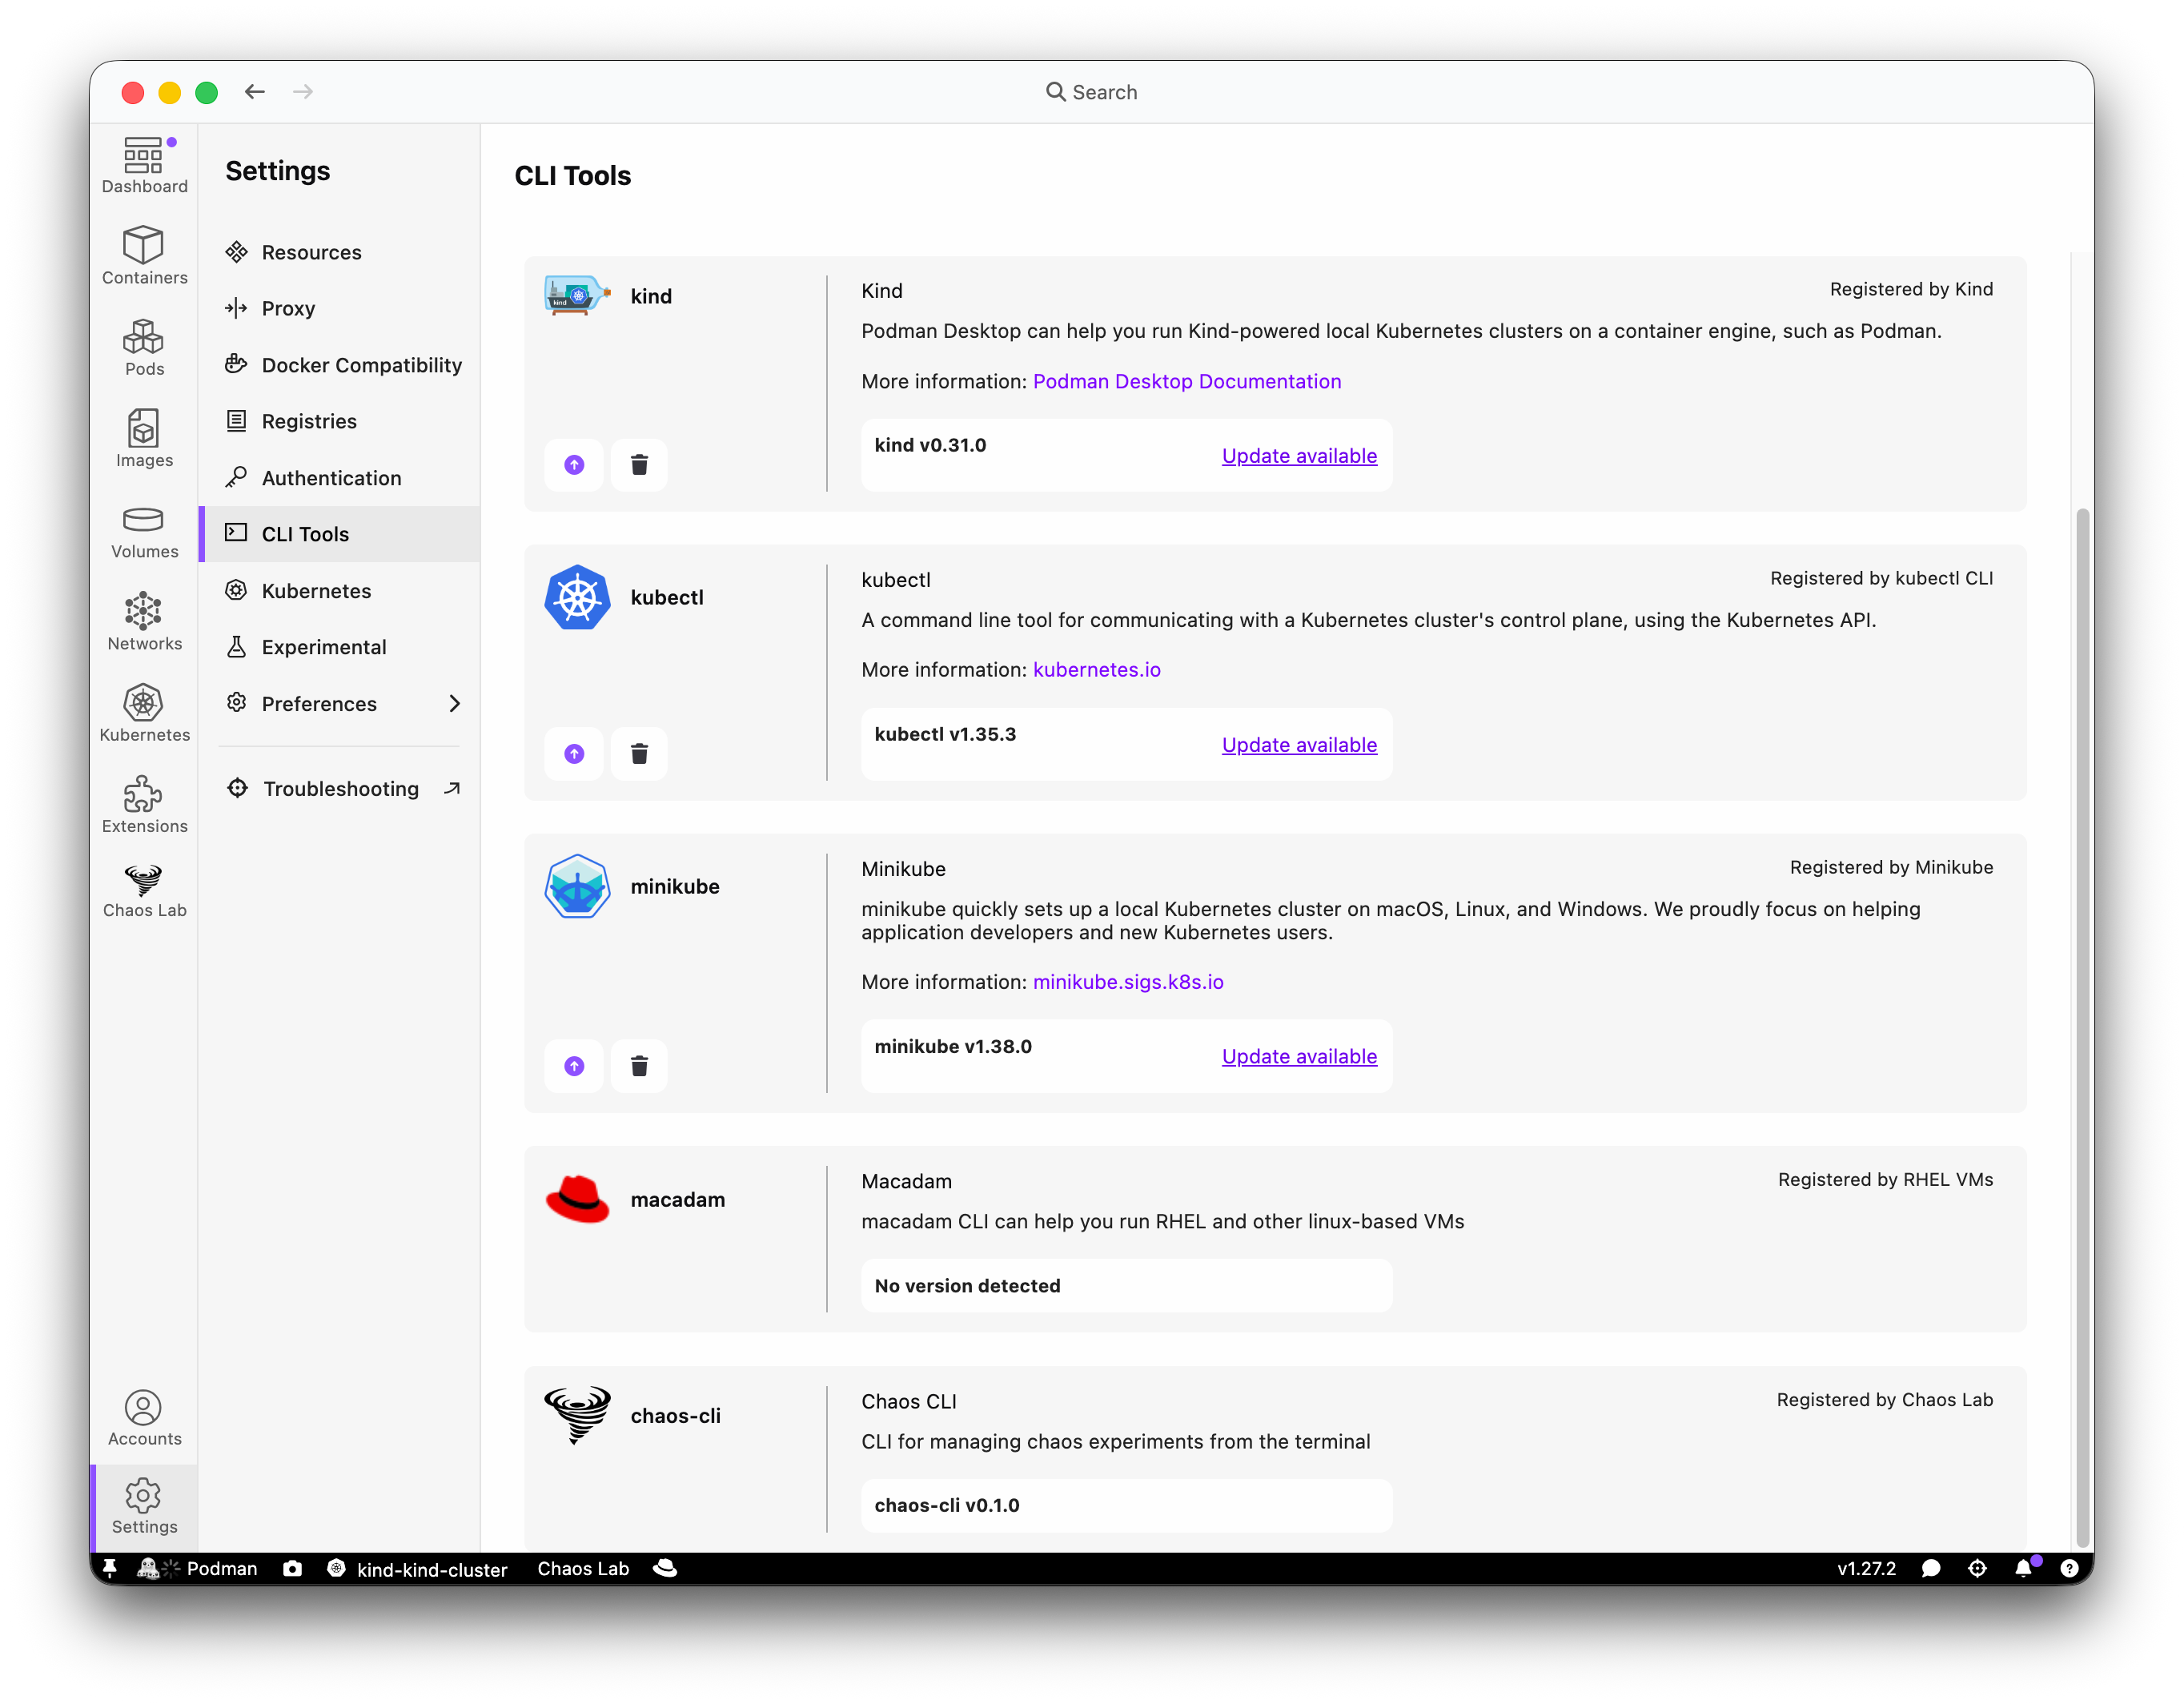
This step only registers the tool so it's visible on the CLI Tools page. If you want to further enhance the CLI tool settings see CLI tools for how to wire up install and update actions.
Packaging and distribution
Building the OCI image locally
podman build -t chaos-lab .
Installing from a local image
Extract the image filesystem into the Podman Desktop plugins directory:
pluginsFolder=~/.local/share/containers/podman-desktop/plugins/
mkdir -p $pluginsFolder

CONTAINER_ID=$(podman create localhost/chaos-lab --entrypoint "")
podman export $CONTAINER_ID | tar -x -C $pluginsFolder
mv $pluginsFolder/extension $pluginsFolder/chaoslab-extension

podman rm -f $CONTAINER_ID
podman rmi -f localhost/chaos-lab:latest
Restart Podman Desktop and the extension appears automatically.
Installing a published image
Once an extension image is published to a registry, users can install it from Extensions > Install Custom... using the image reference -- no need to build anything locally. This applies even if you cloned the workshop repository to follow along: you don't have to build an image yourself unless you've made changes you want to keep. There are two ways to get a published image reference:
Option A -- use the pre-built image from GitHub Container Registry
Just following along without modifying the code? Since the companion repository lives on GitHub, its Build and Push workflow builds and publishes the extension image to ghcr.io on every push to main and dev_conf, tagged with both nightly and the commit SHA -- so you can install a working build without touching your local clone at all:
ghcr.io/gastoner/podman-desktop-extension-chaos-lab:72801bd25586393e1476489cad2475b8b5d510f0
Use the SHA tag above to install that exact commit, or ghcr.io/gastoner/podman-desktop-extension-chaos-lab:nightly for the latest build.
Option B -- build and publish your own image
Made your own changes to the cloned repository? Build and publish your version instead:
podman build -t quay.io/myusername/chaos-lab .
podman login quay.io
podman push quay.io/myusername/chaos-lab
Then use quay.io/myusername/chaos-lab as the image reference.
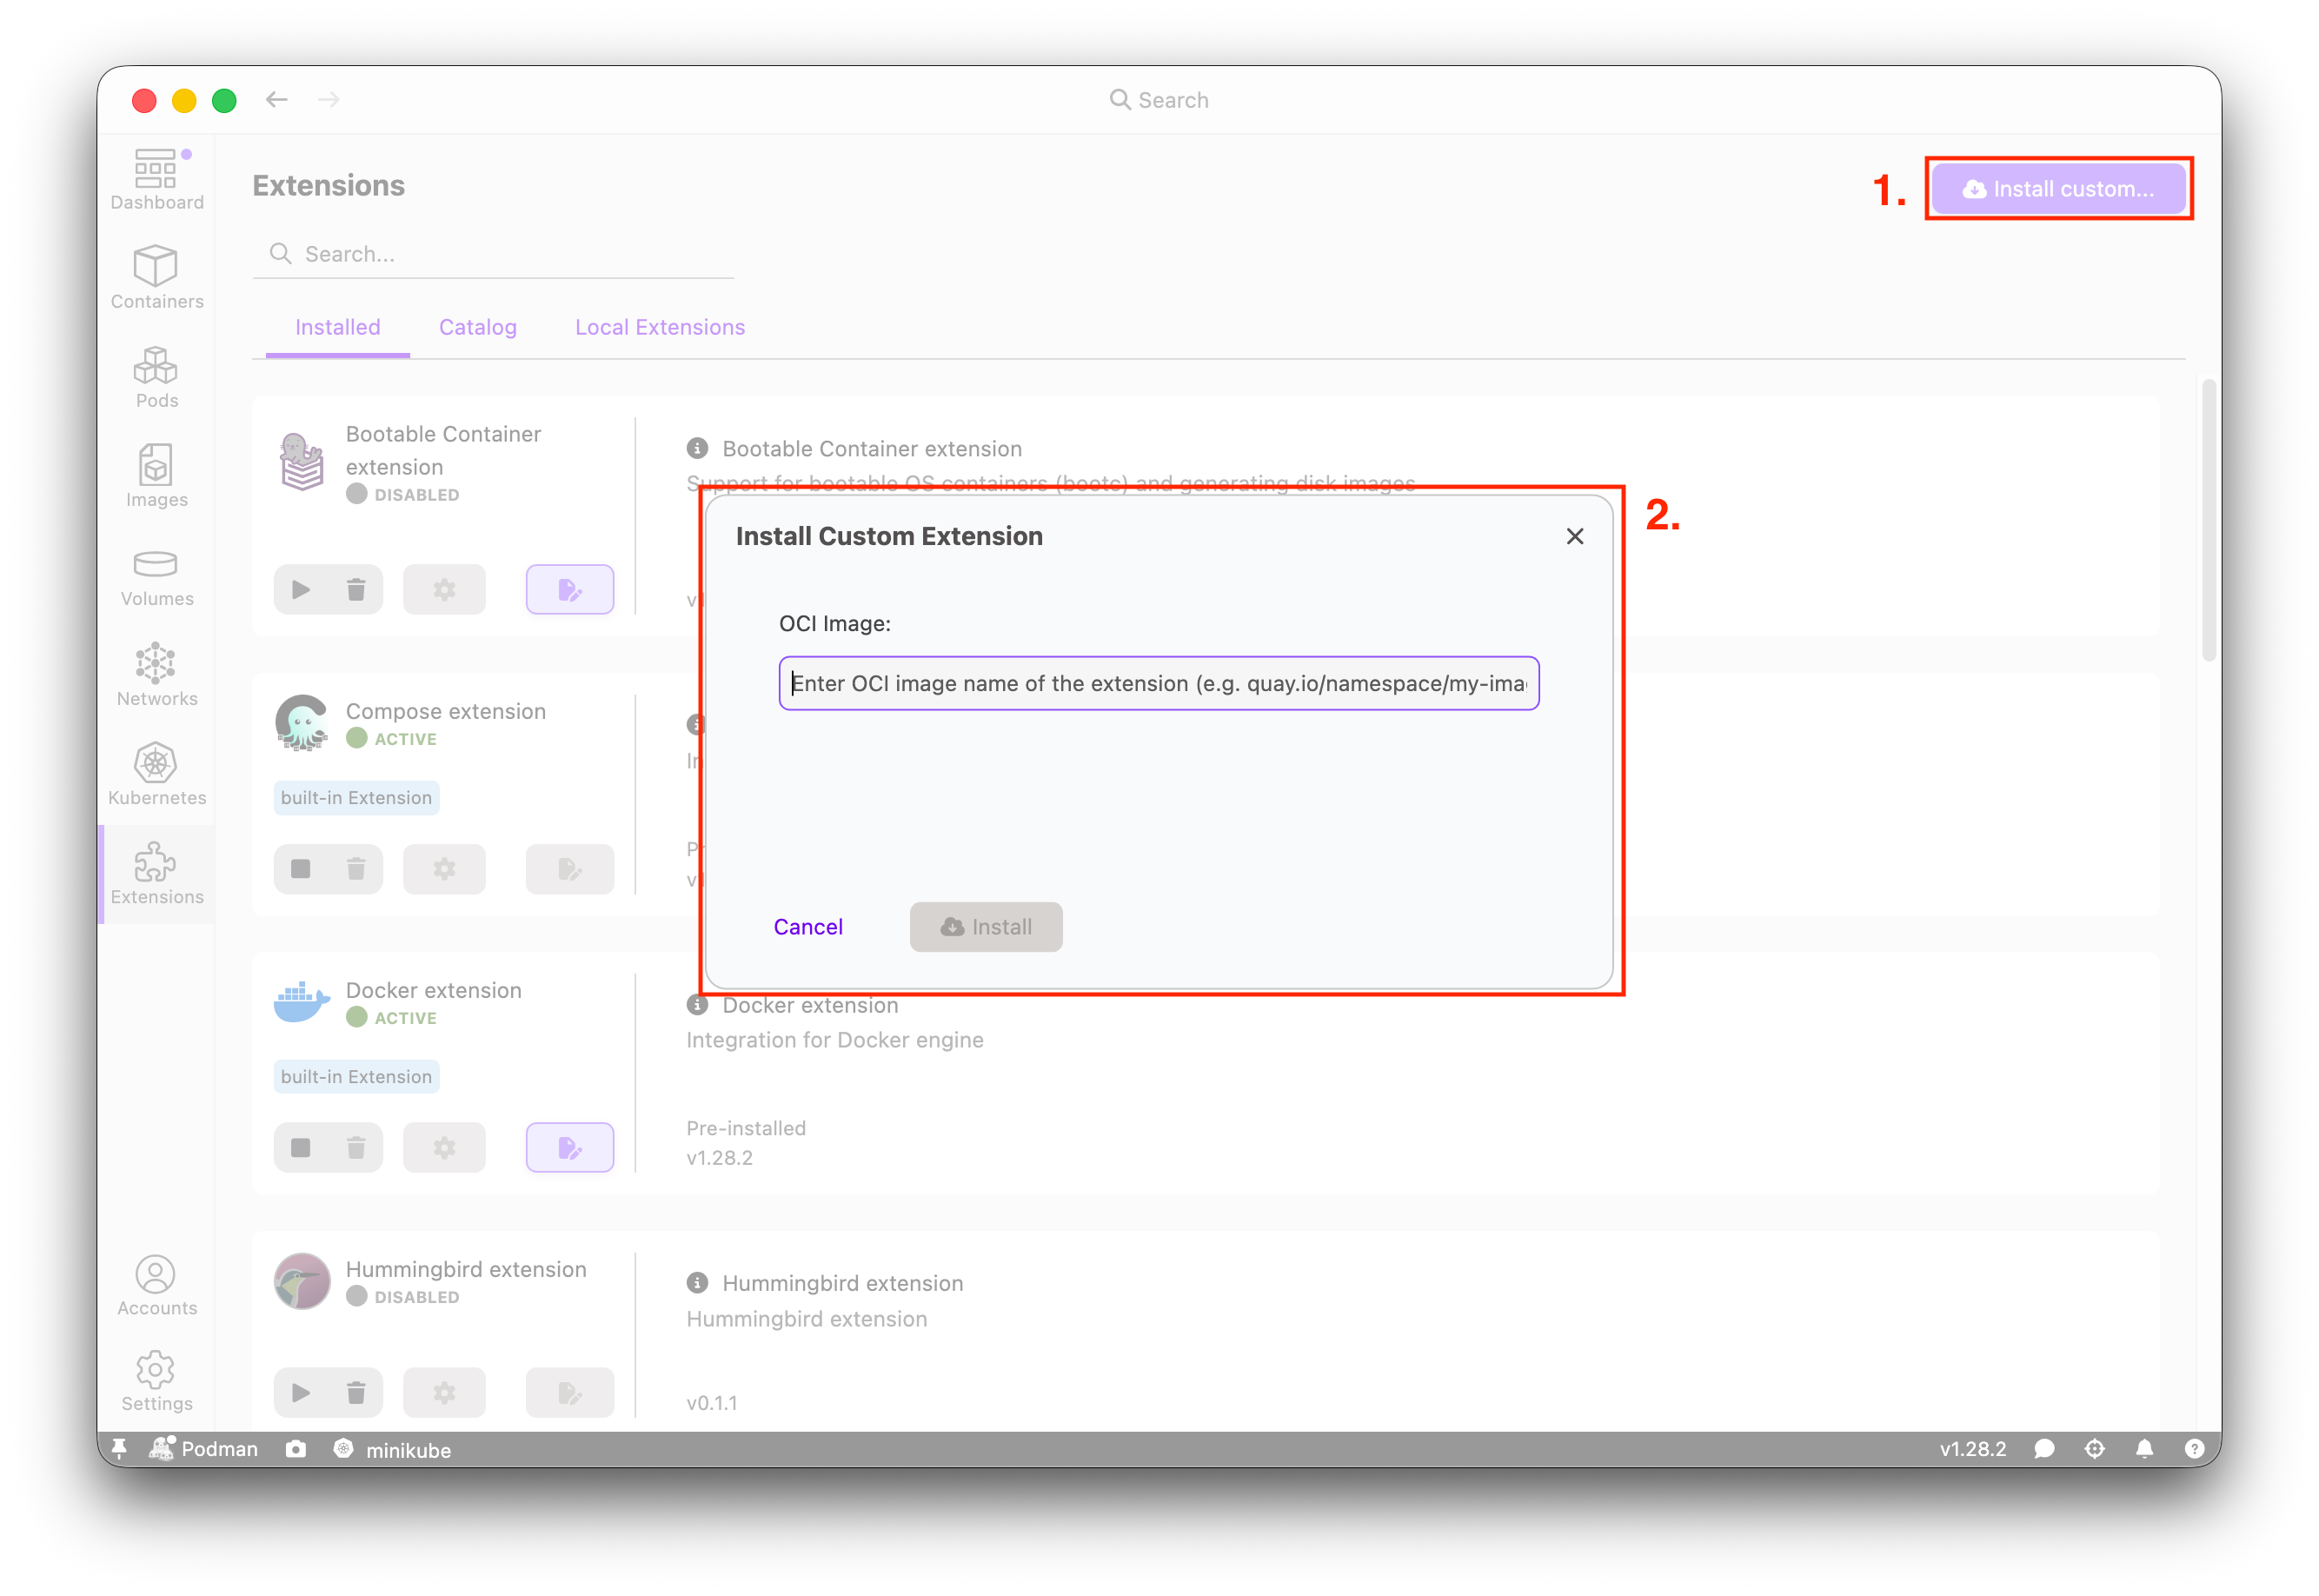
Testing with a custom catalog
To test catalog integration locally, create an extensions.json file based on the official catalog, add your extension entry, serve it with a local HTTP server, and point Podman Desktop to it.
Add an entry to the extensions array following the catalog schema:
{
  "publisher": { "publisherName": "your-namespace", "displayName": "Your Name" },
  "extensionName": "chaos-lab",
  "displayName": "Chaos Lab",
  "shortDescription": "Chaos engineering toolkit for containers",
  "categories": ["Other"],
  "versions": [
    {
      "version": "0.1.0",
      "preview": true,
      "lastUpdated": "2026-07-15T00:00:00Z",
      "ociUri": "ghcr.io/gastoner/podman-desktop-extension-chaos-lab:nightly"
    }
  ]
}
Then serve the file with a local HTTP server:
python -m http.server 8080
Add to your settings.json:
{
  "extensions.registryUrl": "http://localhost:8080/extensions.json"
}
Open Extensions > Catalog and your extension appears alongside the official ones.
Conclusion
In this walkthrough we covered the core Podman Desktop extension APIs:
| API | What it does |
|---|---|
window.withProgress | Show progress tasks in the task widget |
window.createStatusBarItem | Add indicators to the status bar |
commands.registerCommand | Register clickable actions |
window.showInformationMessage | Display toast notifications |
webview.postMessage | Communicate with webview panels |
tray.registerMenuItem | Add items to the system tray |
configuration.getConfiguration | Read user settings |
configuration.onDidChangeConfiguration | React to setting changes |
provider.createProvider | Register a provider on the Resources page |
setContainerProviderConnectionFactory | Let users create connections |
context.setValue | Drive onboarding workflows |
cli.createCliTool | Register CLI tools |
The full workshop repository with all 14 progressive branches is available at gastoner/extension-template-full. Check out the dev_conf branch for the completed solution.
For more details, see: