Podman Desktop 1.23 Release

Podman Desktop 1.23 Release! 🎉

Podman Desktop 1.23 is now available. Click here to download it!
This release brings exciting new features and improvements:
- Dedicated network page: Manage networks on their own page. Configure networks entirely without touching the terminal.
- Customizable columns and dashboard sections: Show only what matters to you. Rearrange columns and sections to your liking.
- Enhanced search: Find containers, images, and documentation faster without hunting through menus.
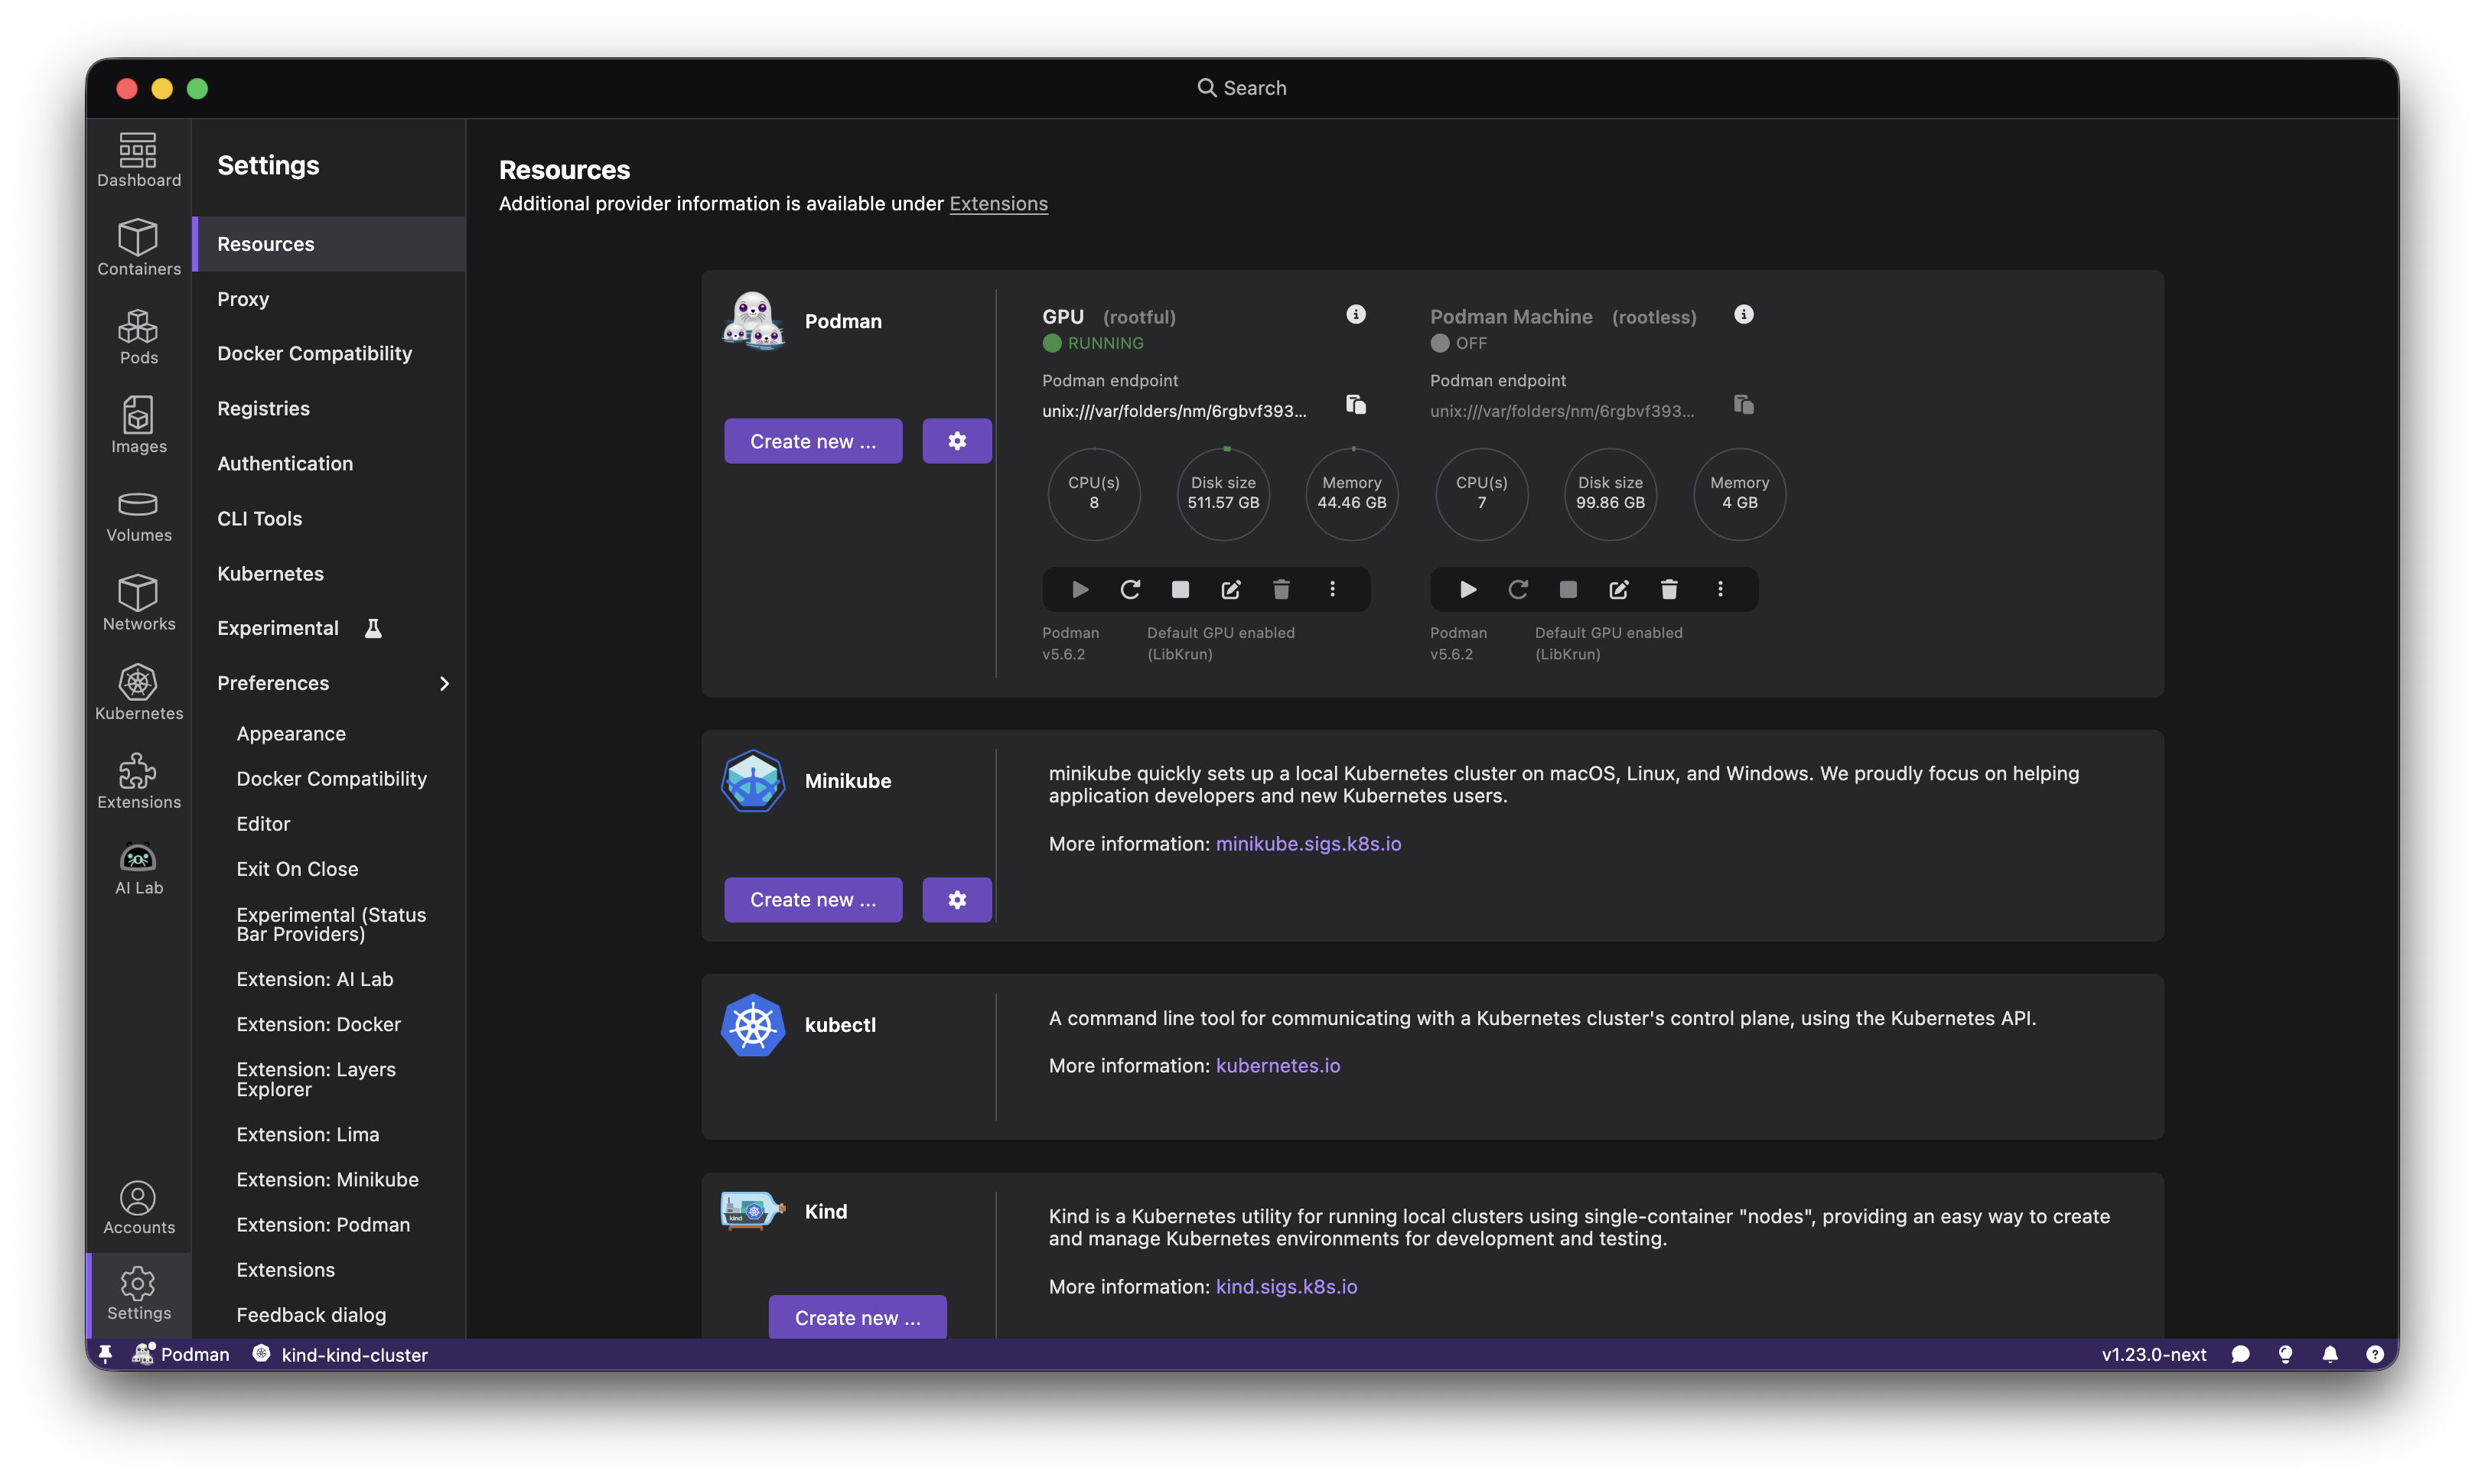
- Added rootless or rootful indicator to Podman machines: Adds a visual indication in the 'Resources' section of whether a Podman machine is rootful or rootless.
- Support for a managed configuration: IT teams can deploy pre-configured settings organization-wide. Administrators get consistent, ready-to-be-used Podman Desktop with managed settings already set up.
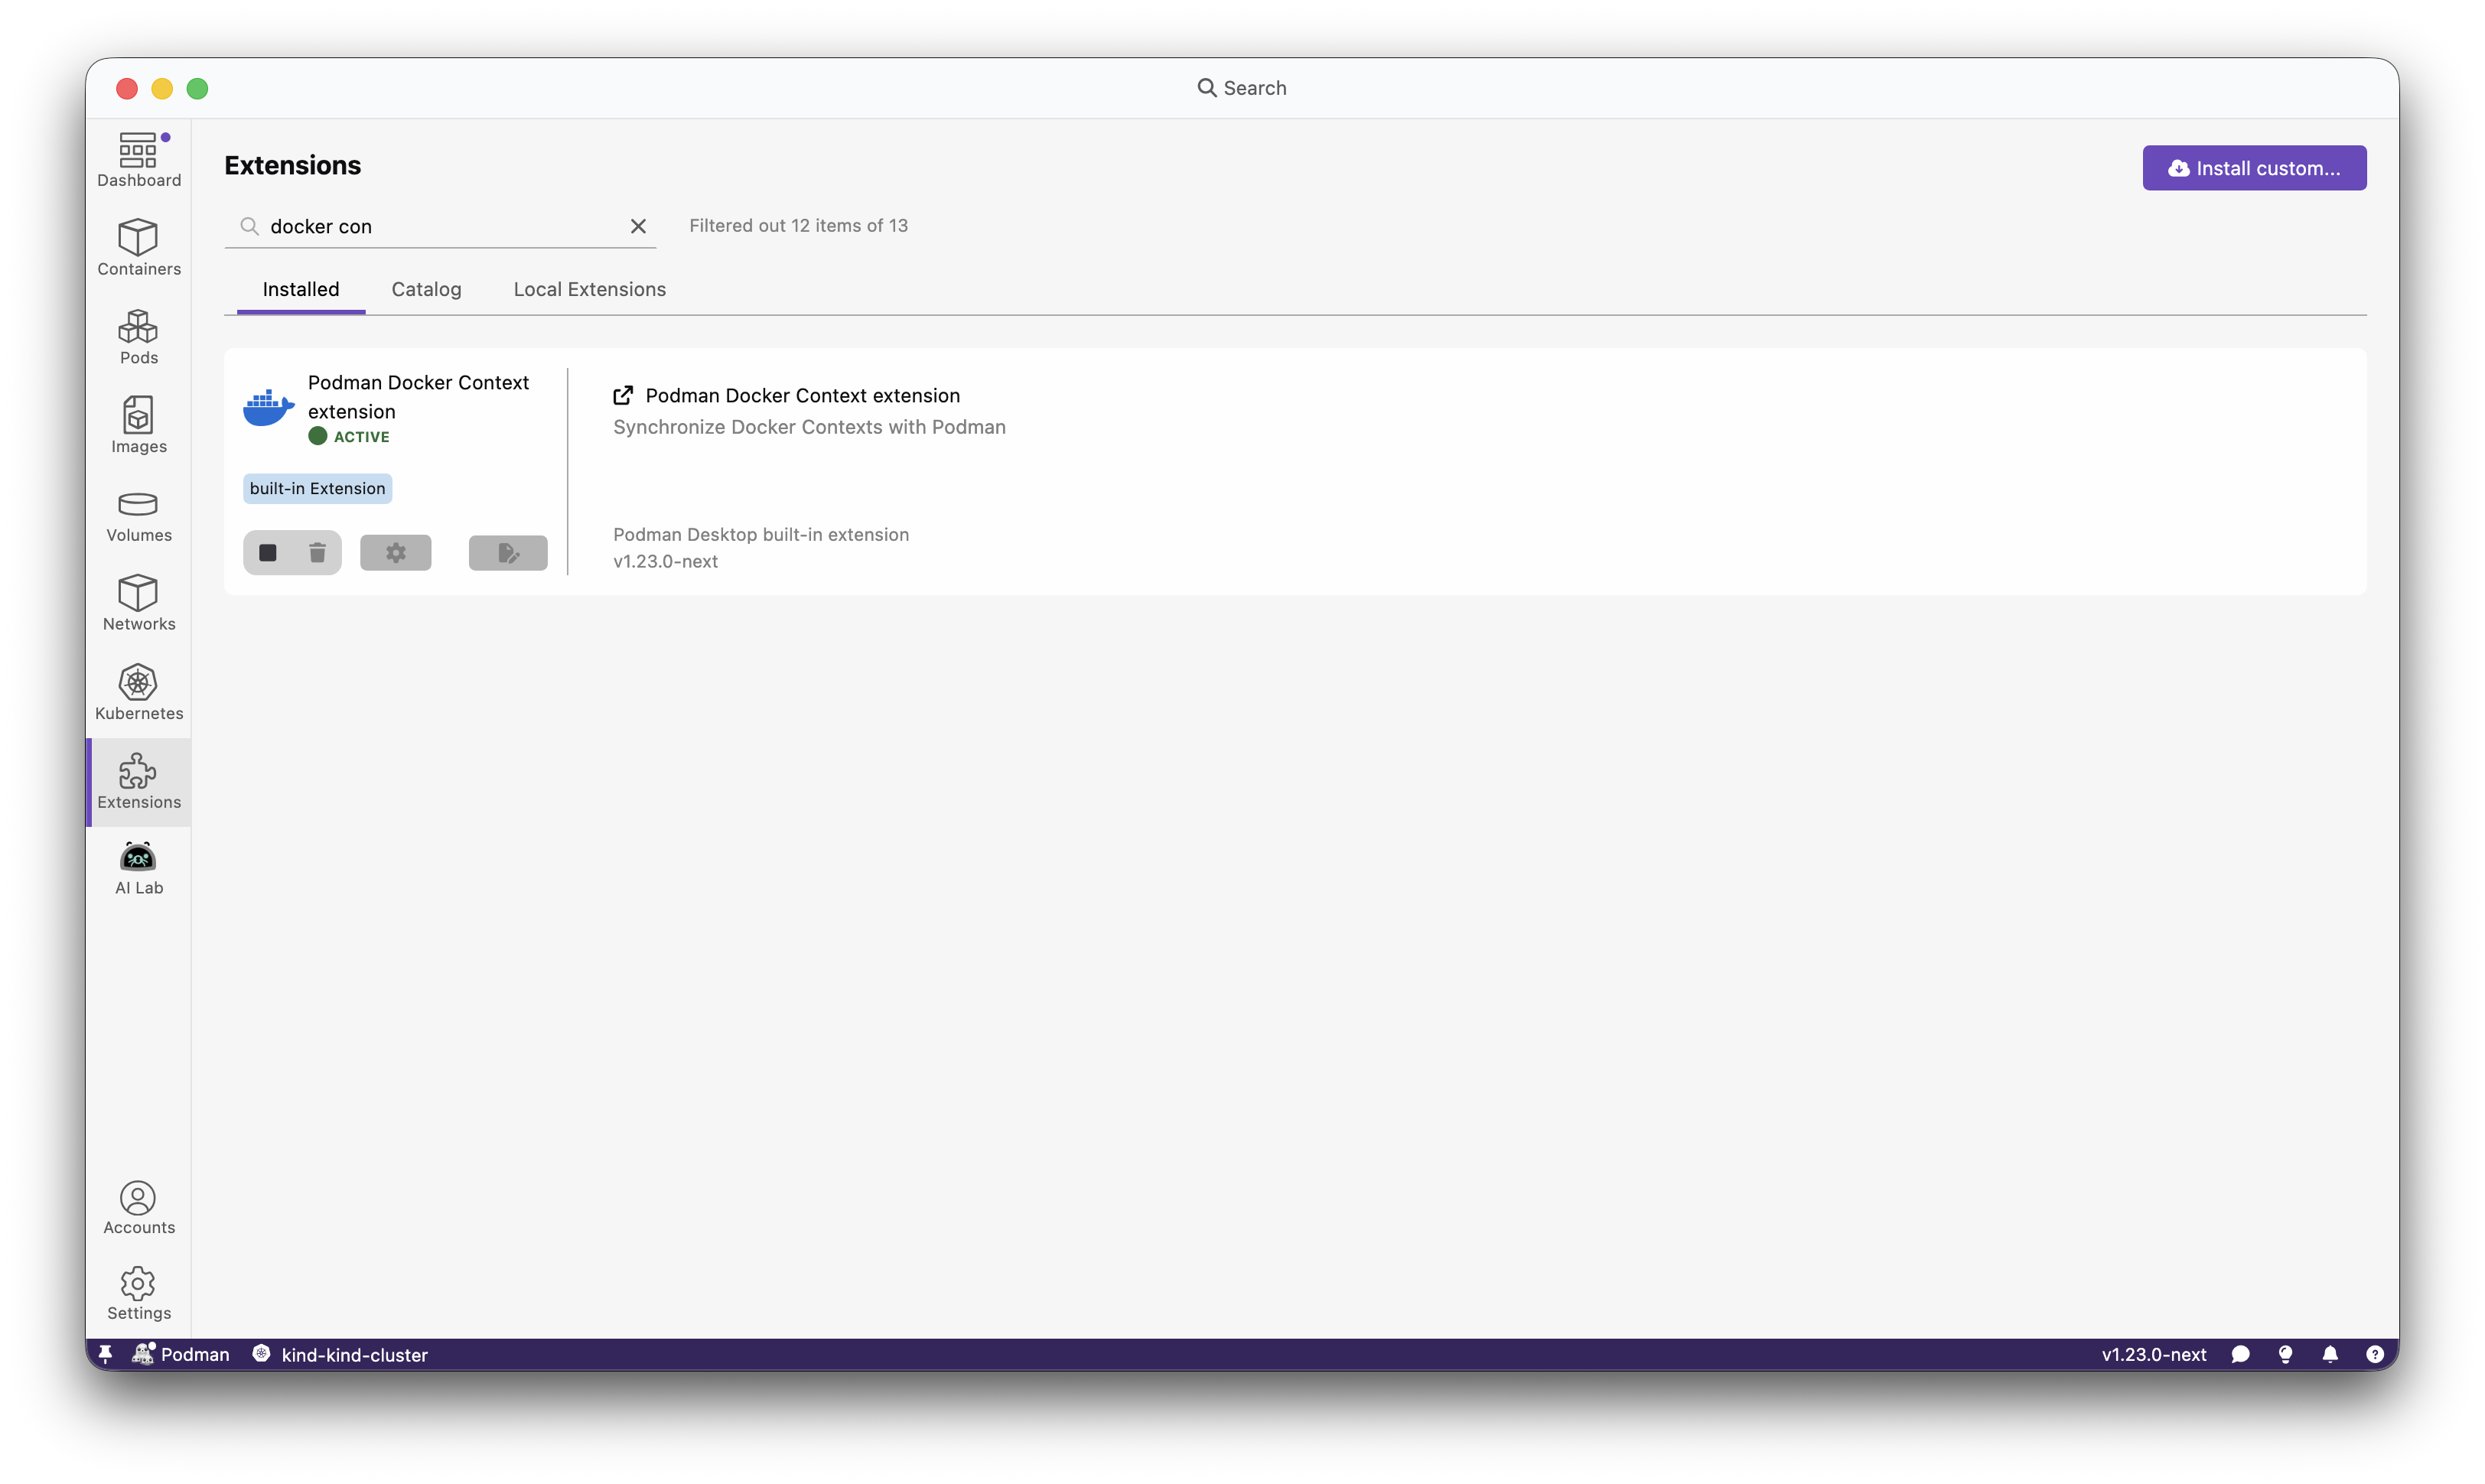
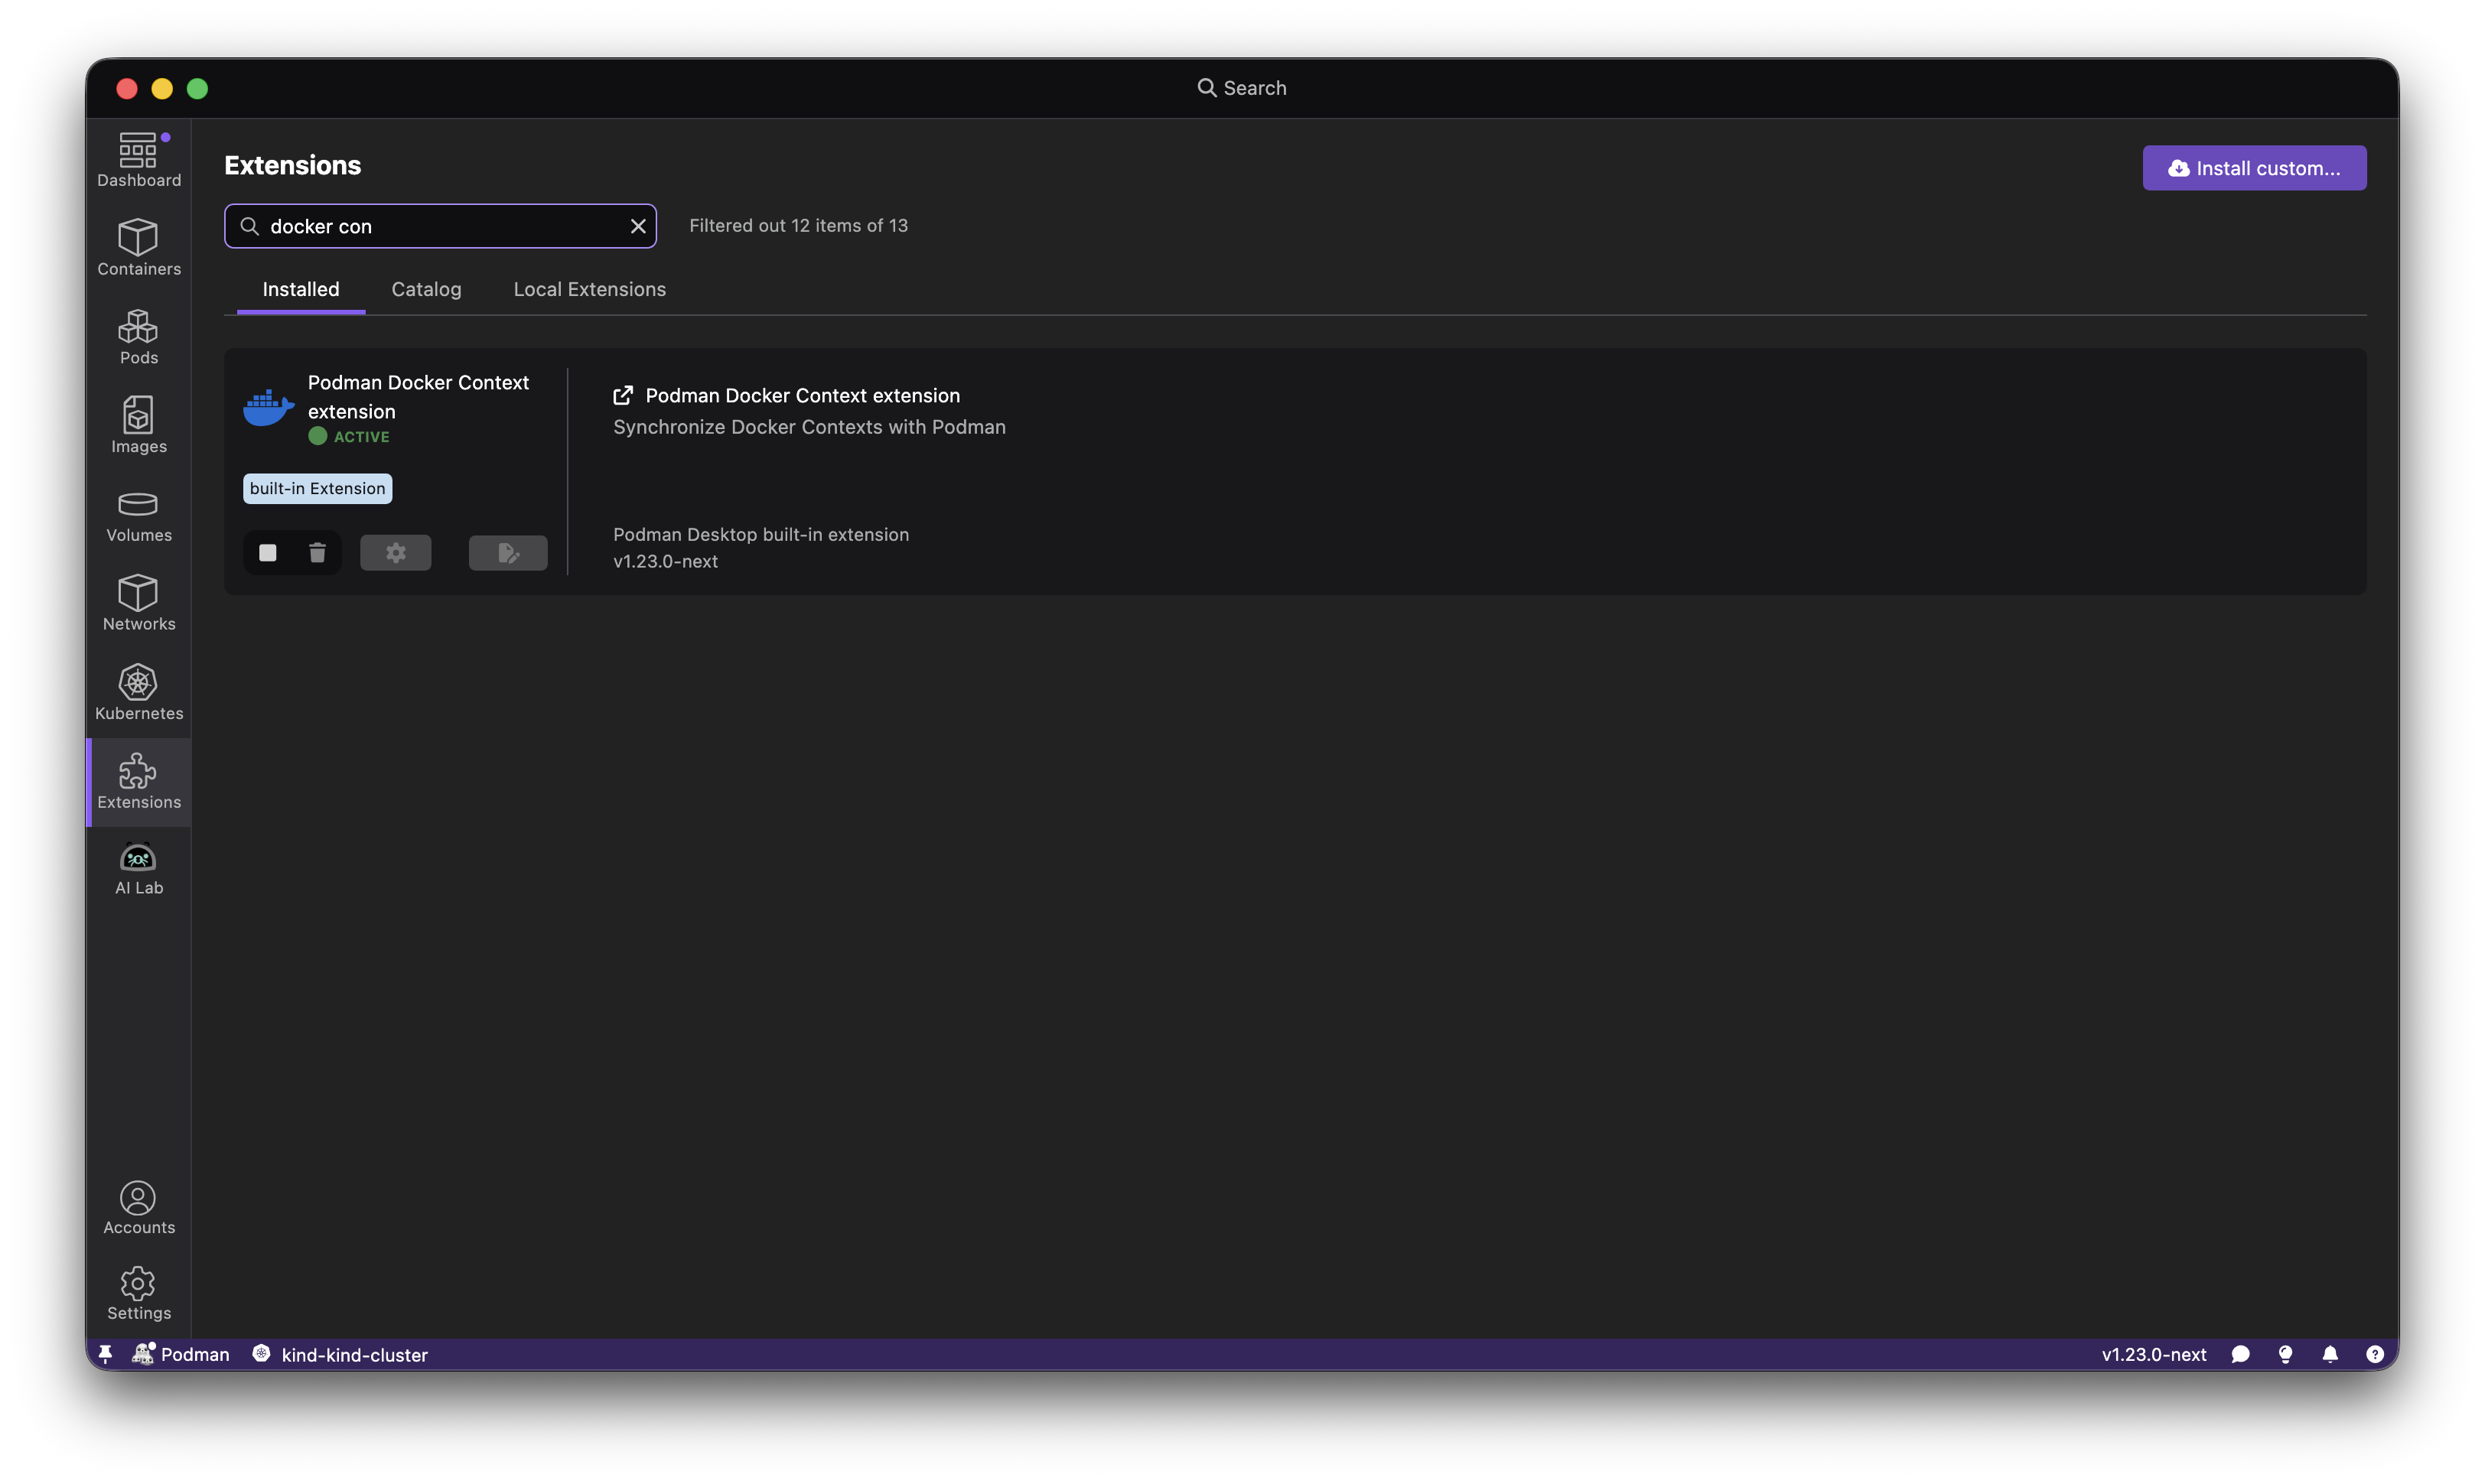
- Created Docker context for Podman machine: Improved compatibility with Docker contexts.
Release details
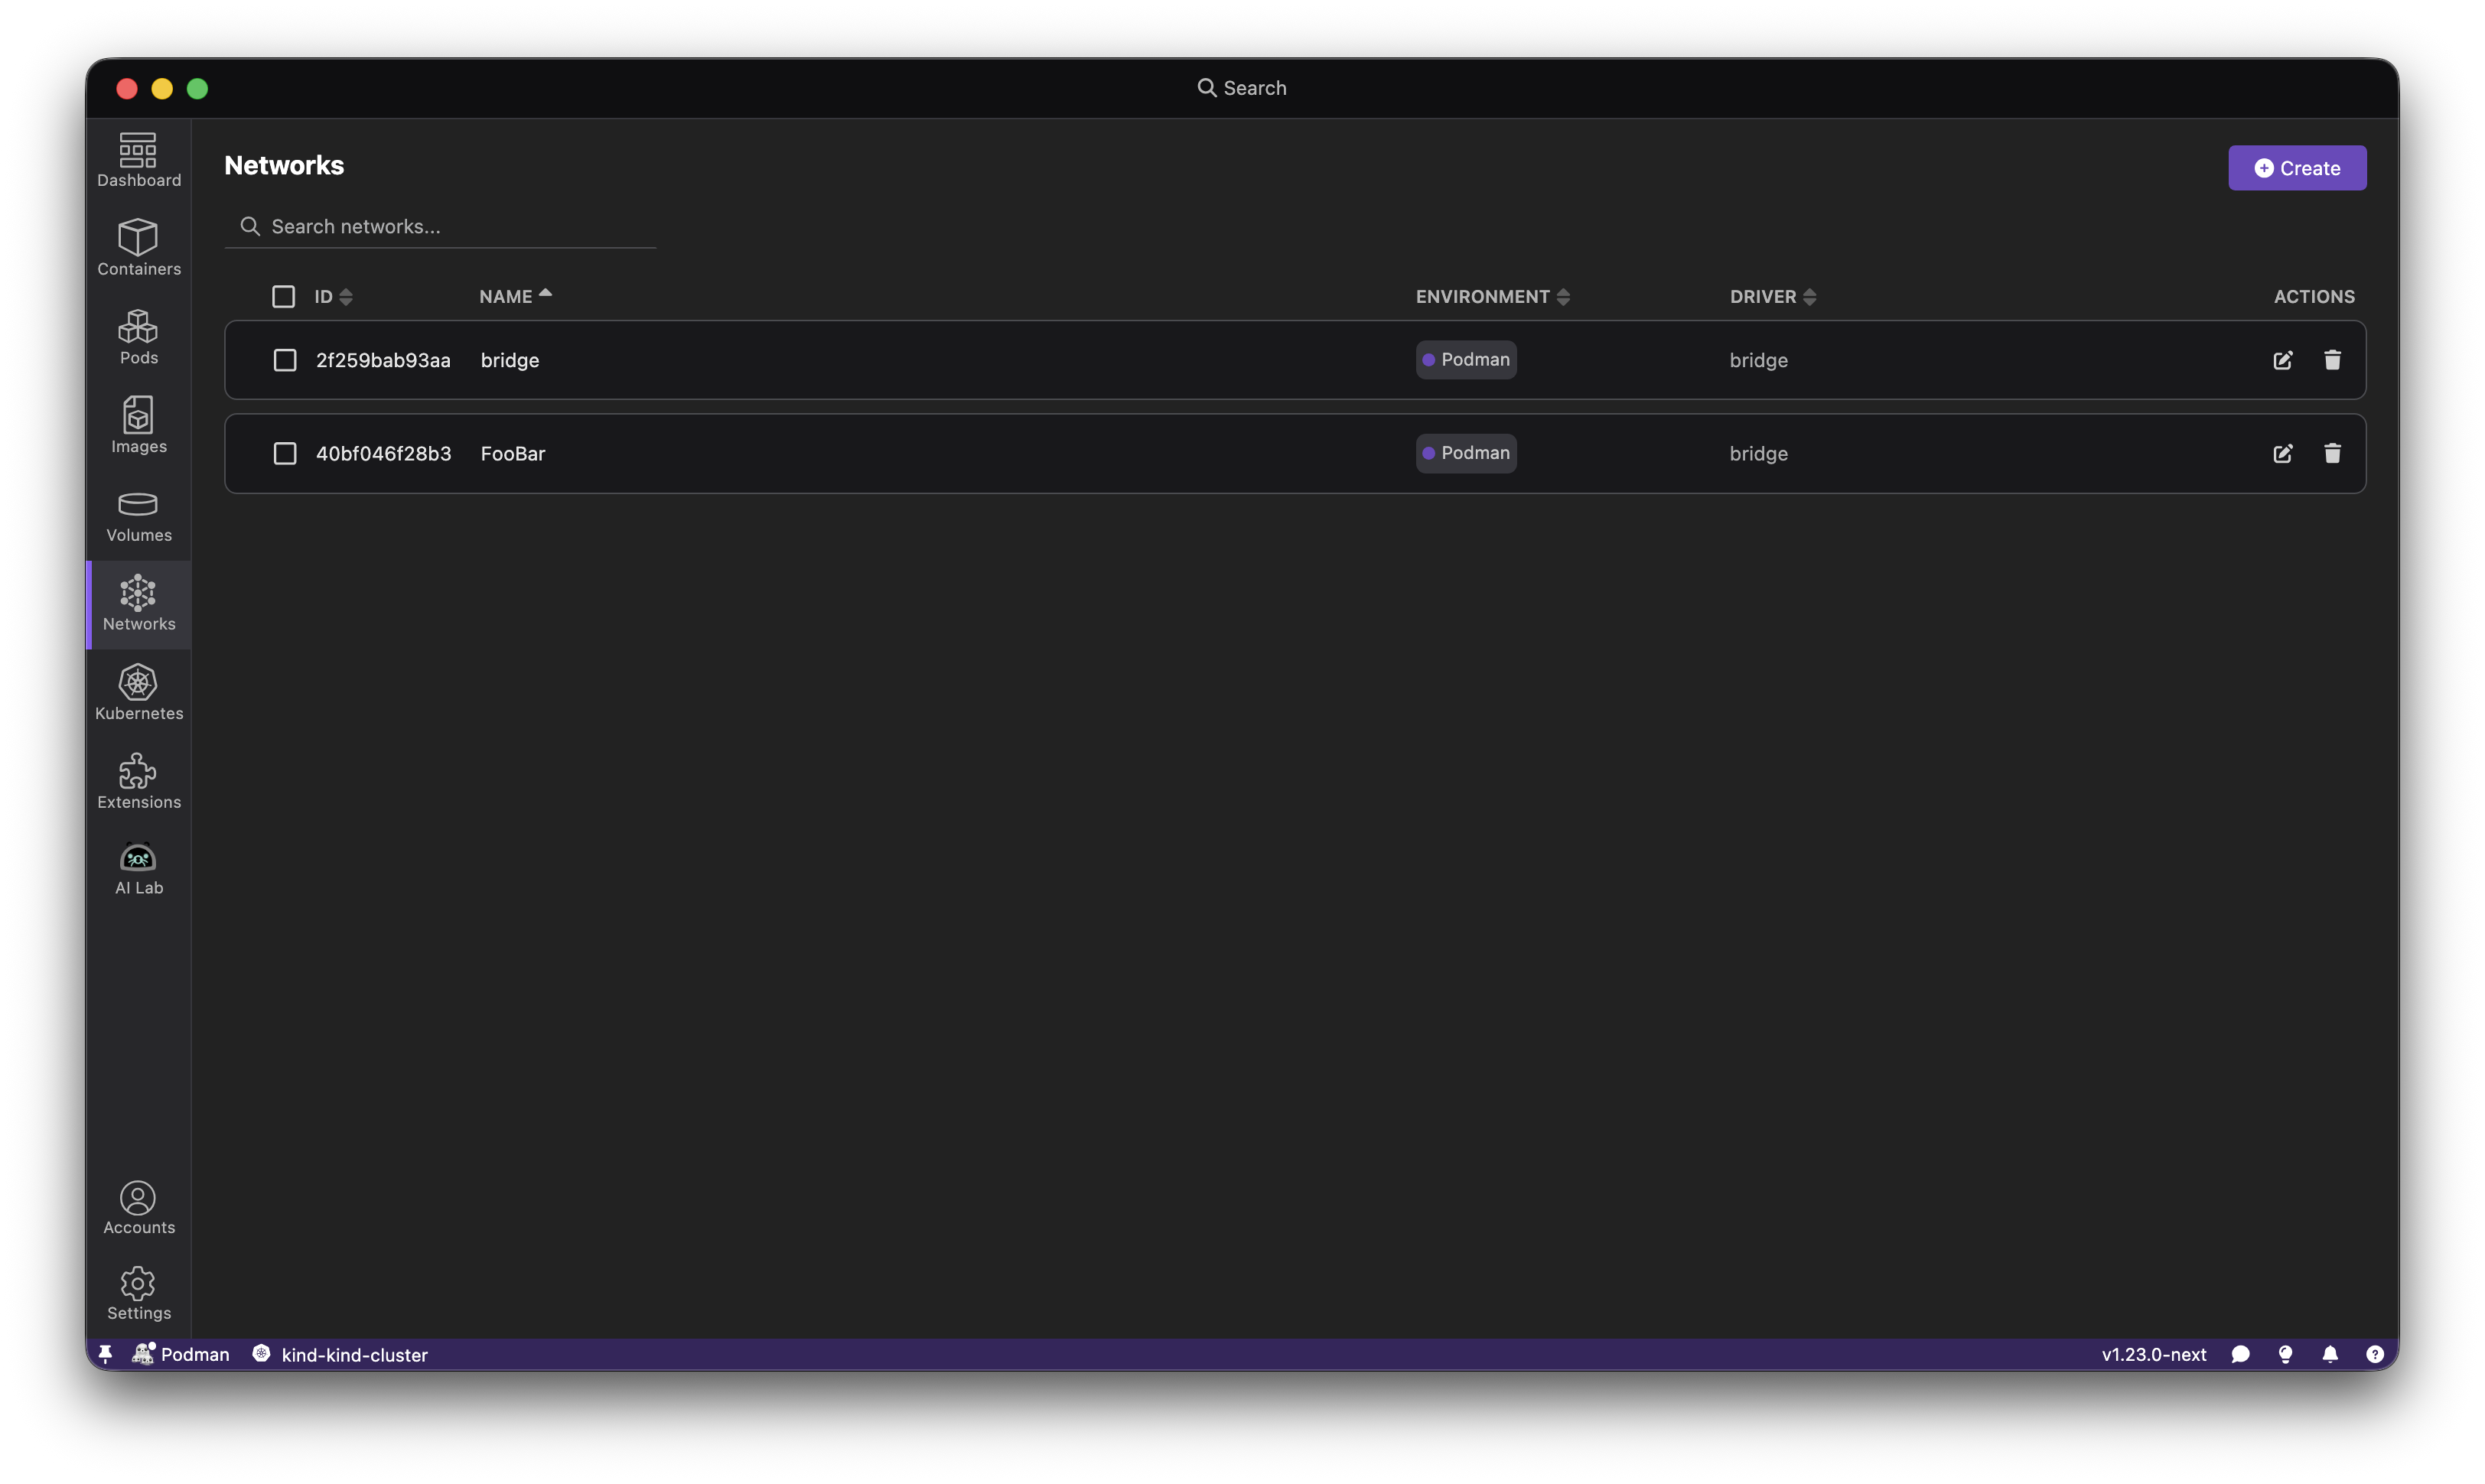
Podman network support
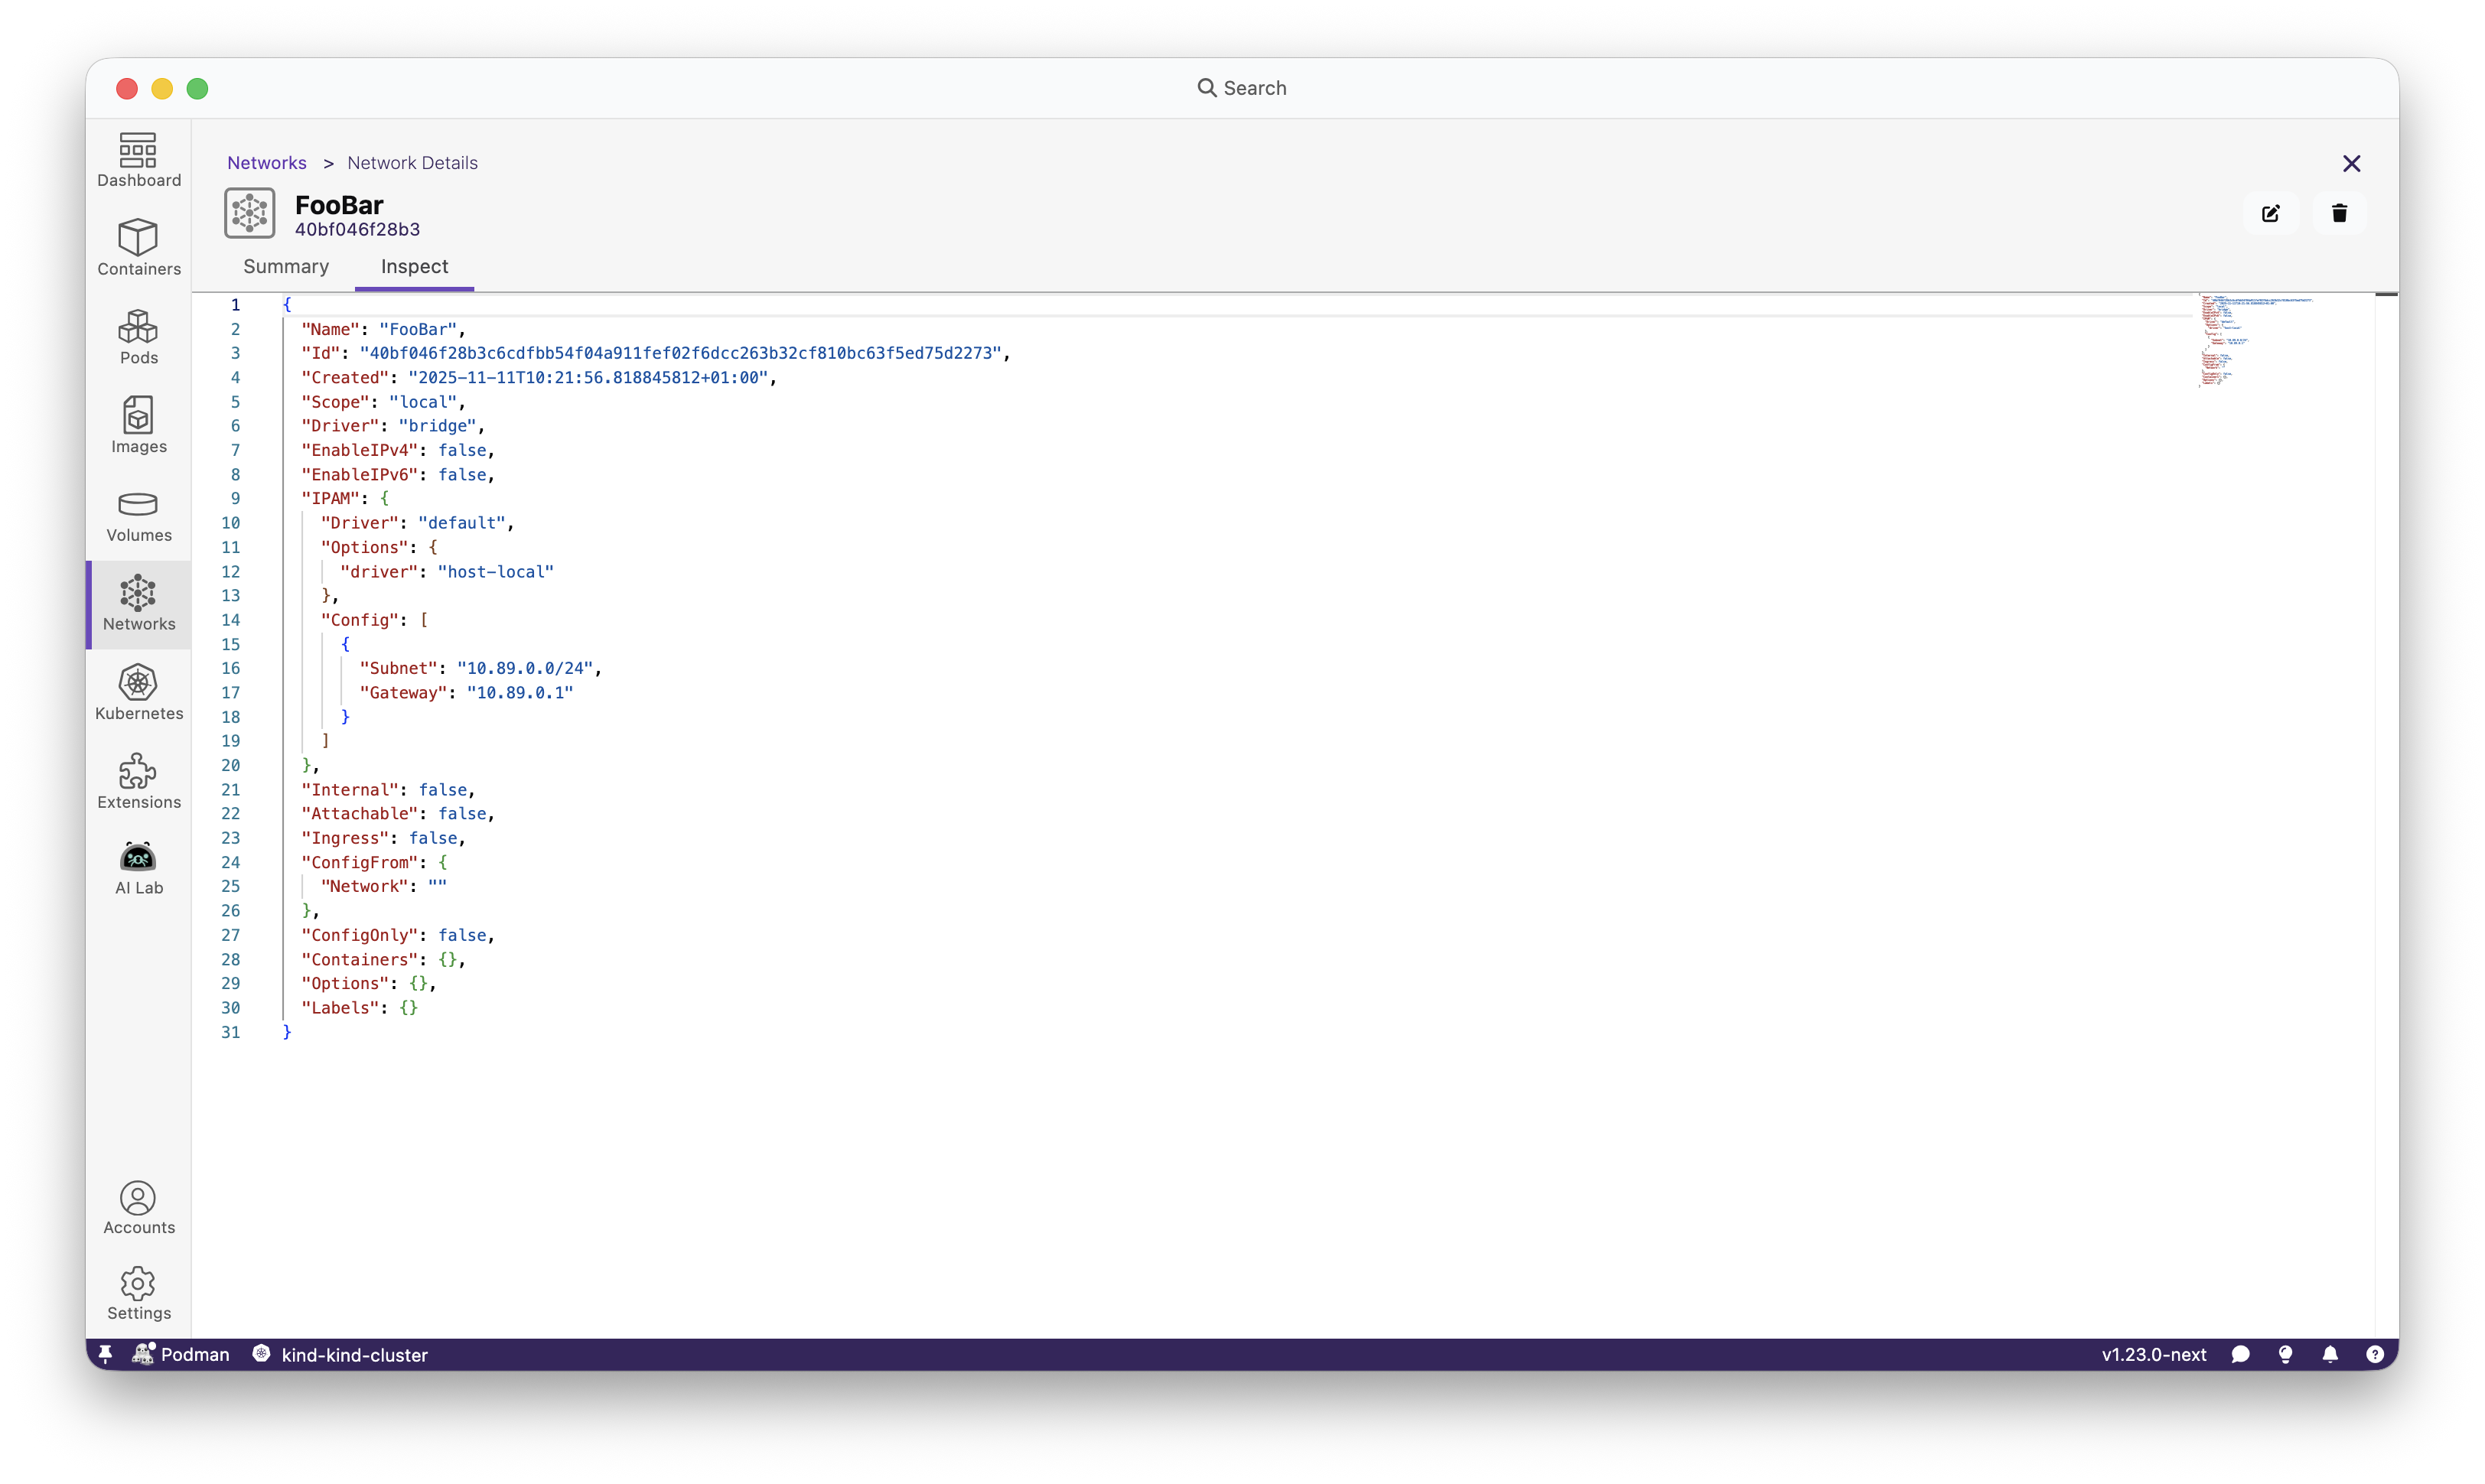
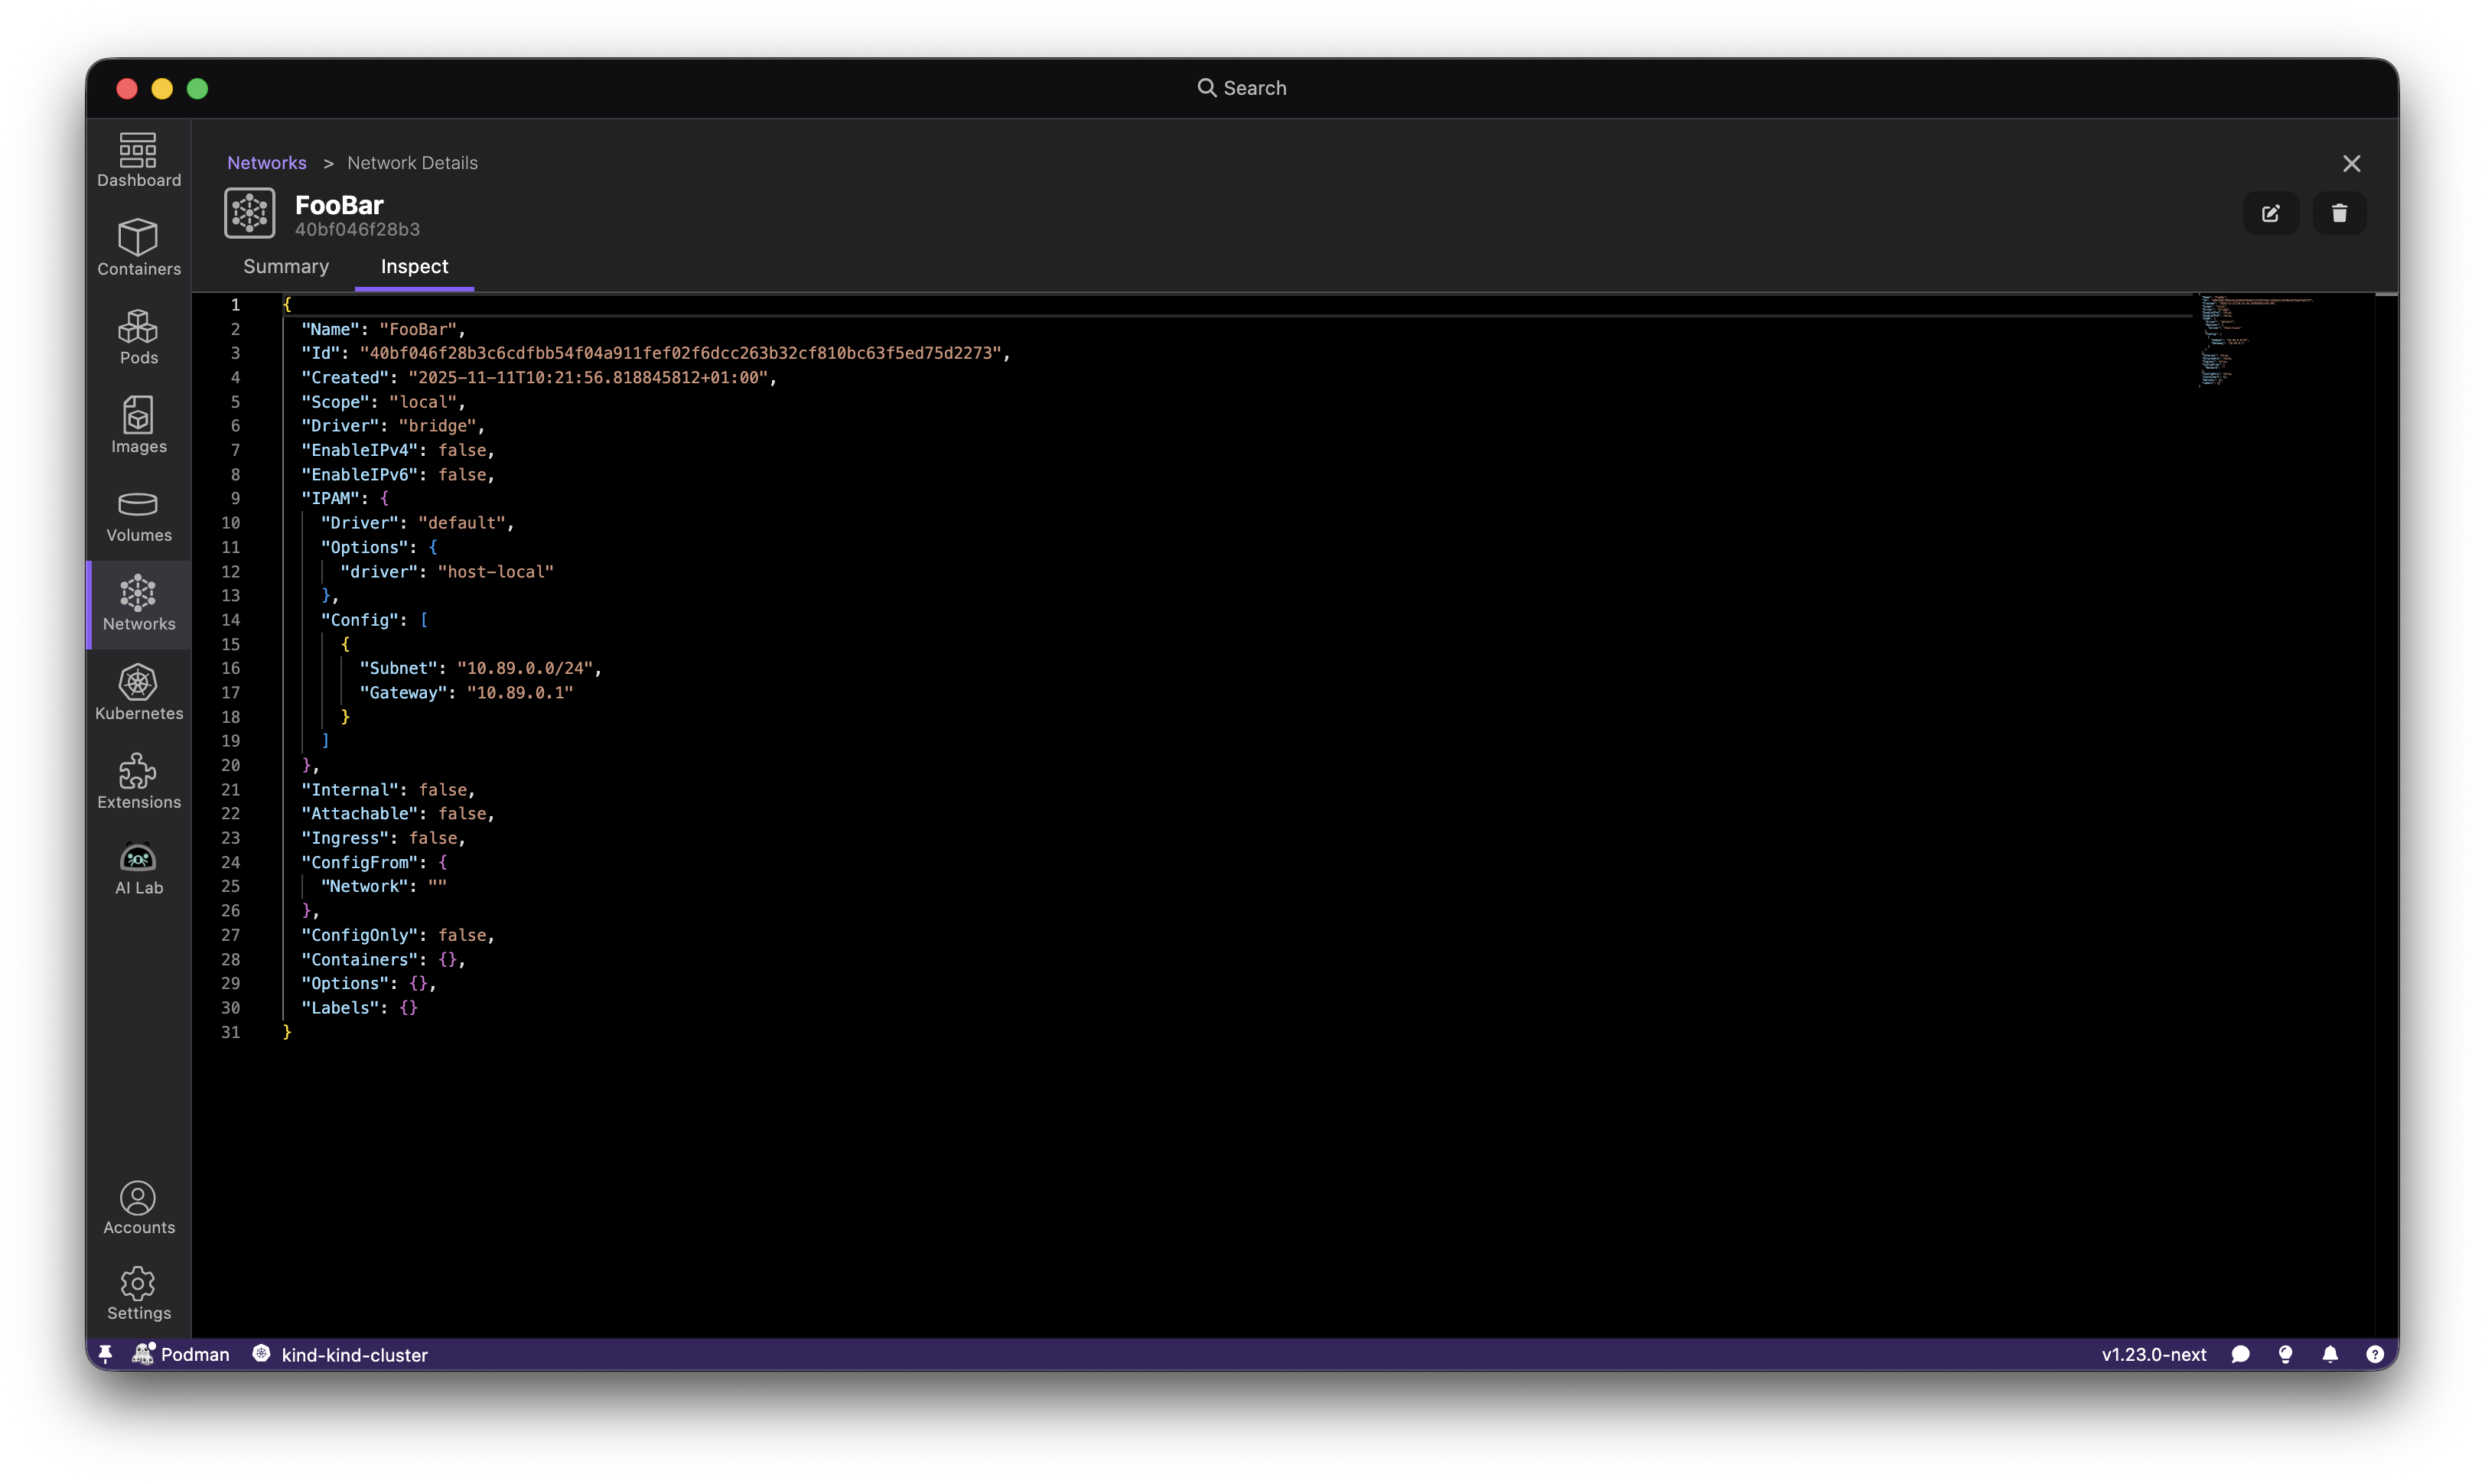
This release introduces a dedicated network page that brings Podman network management directly into Podman Desktop's UI. Previously, managing networks required using the command-line interface, but now you can handle all your networking needs through the new network page.
The network page provides comprehensive visibility into your container networks, displaying essential information including network IDs, names, drivers, and their associated container engine environments.
This feature is particularly valuable when working with complex multi-container applications that require isolated network environments, or when you need to configure custom network settings (such as DNS) for your containers.
Seet he podman network command for more information.

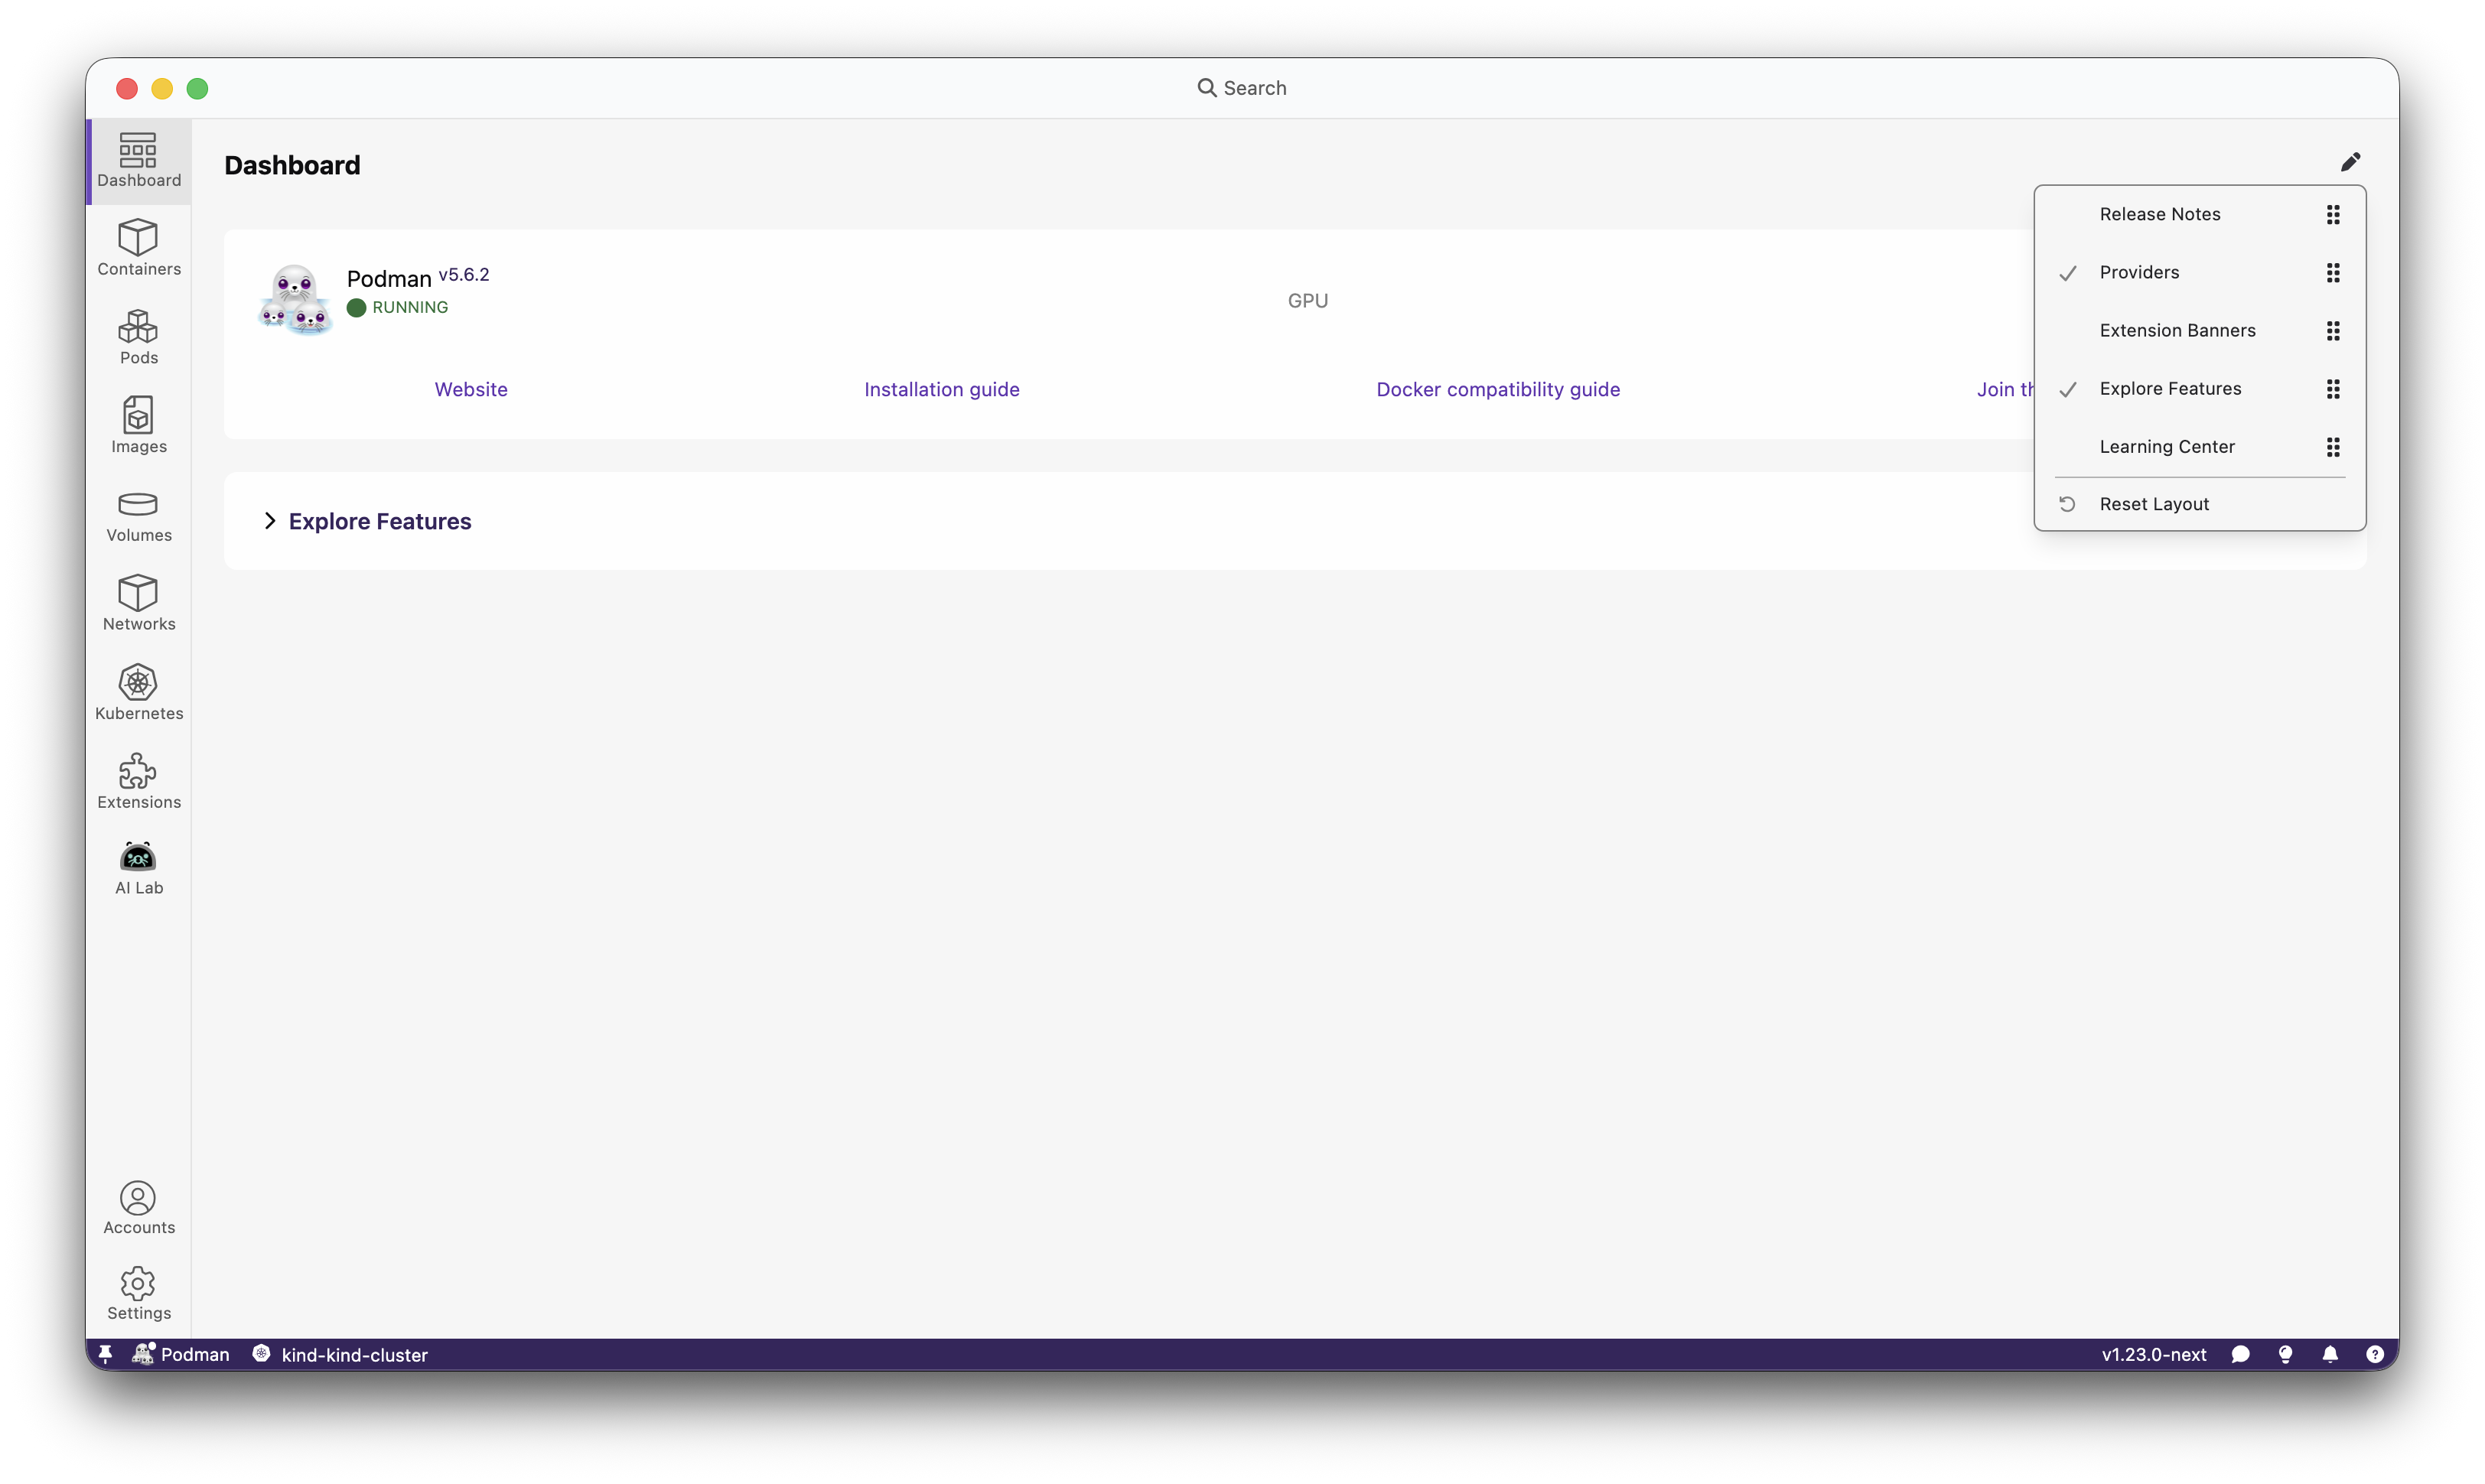
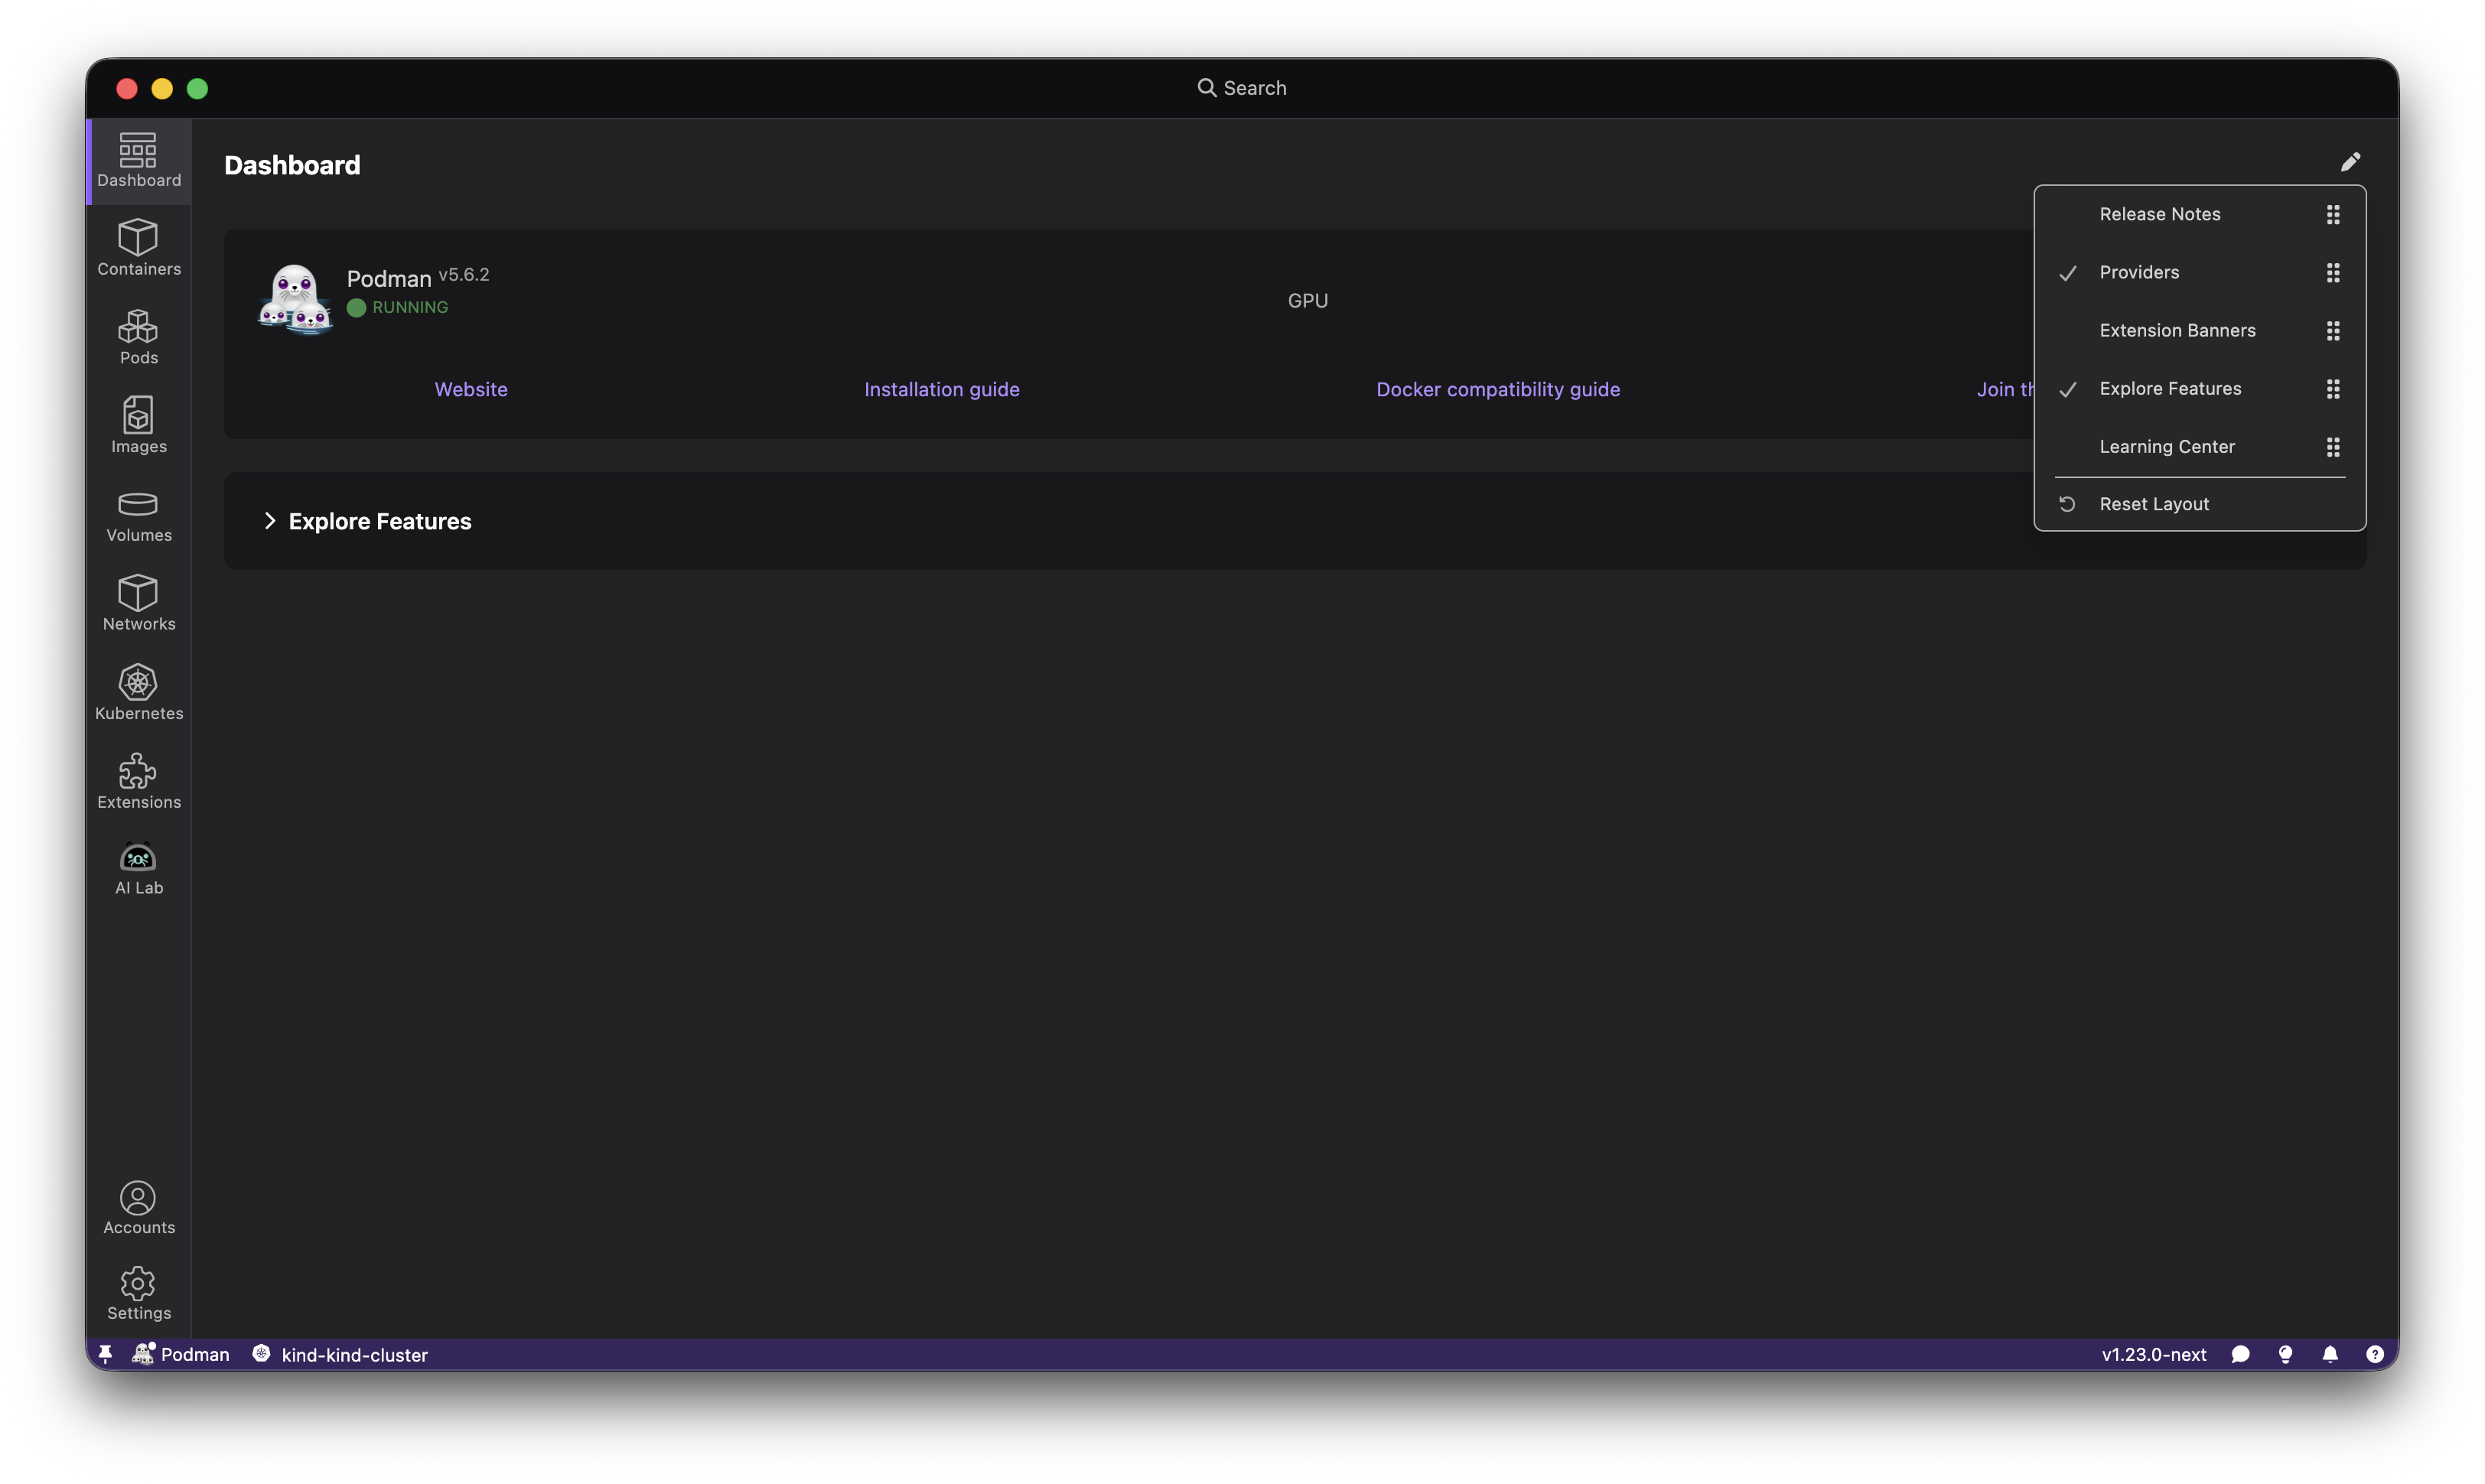
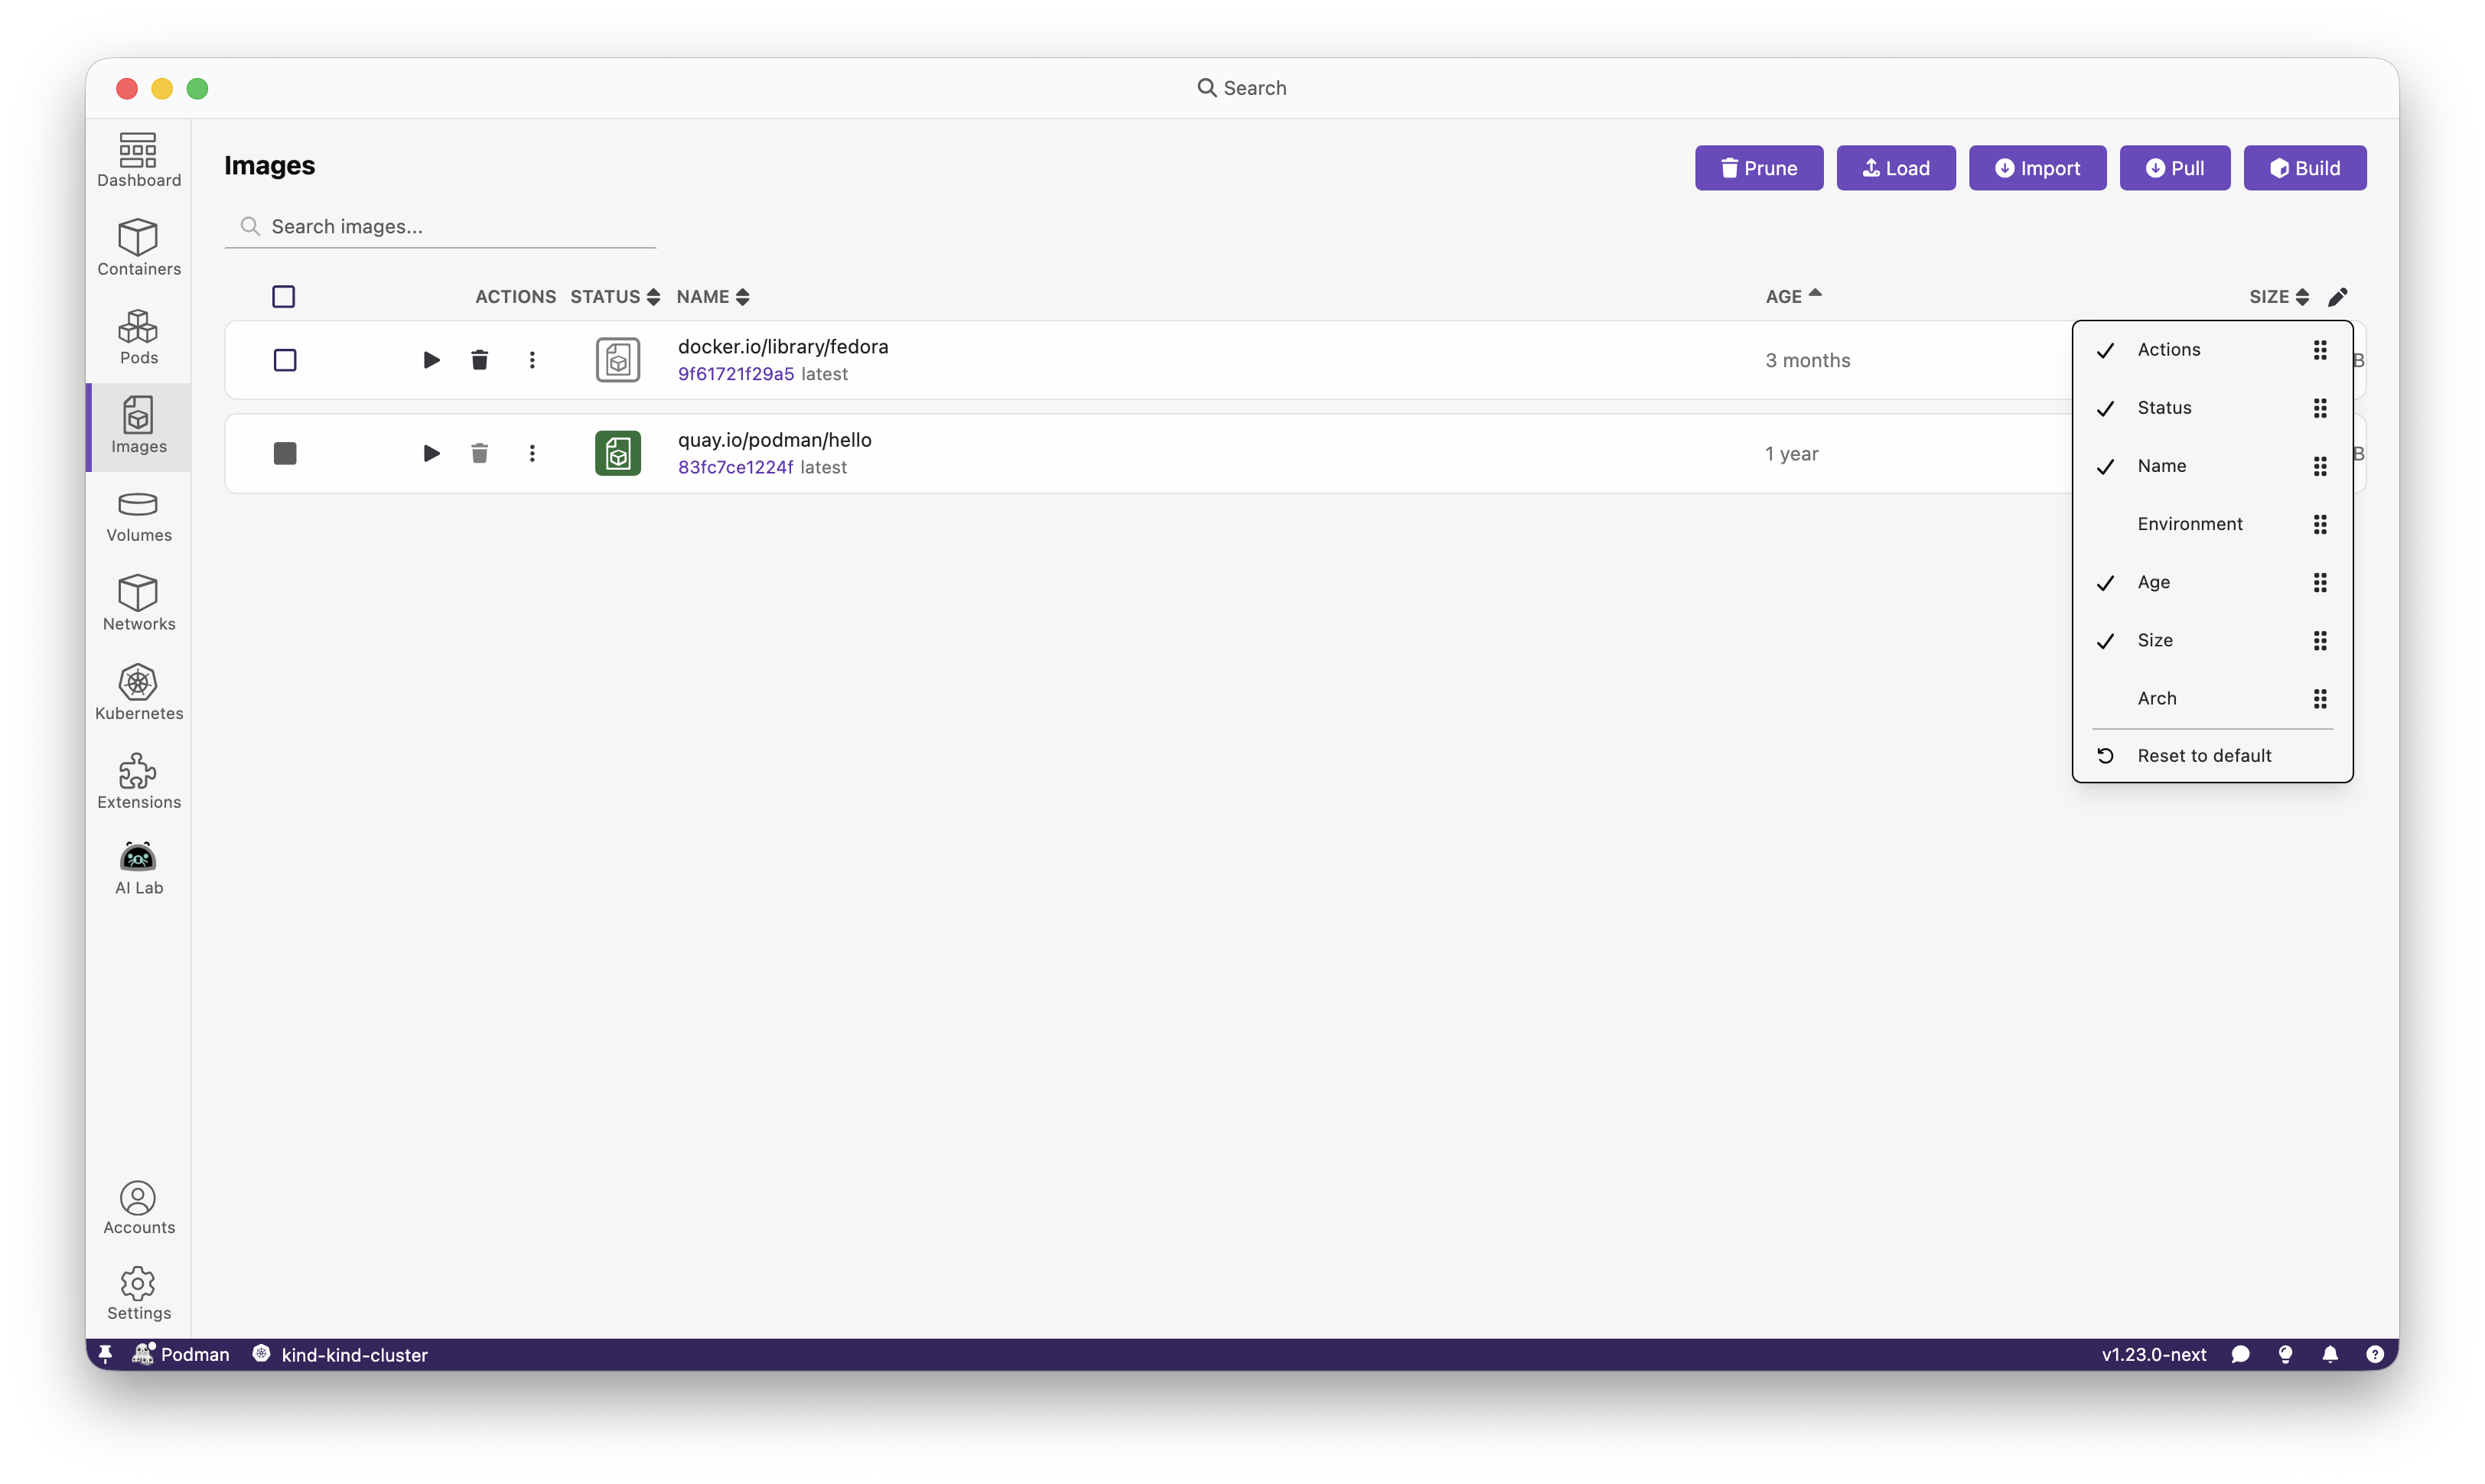
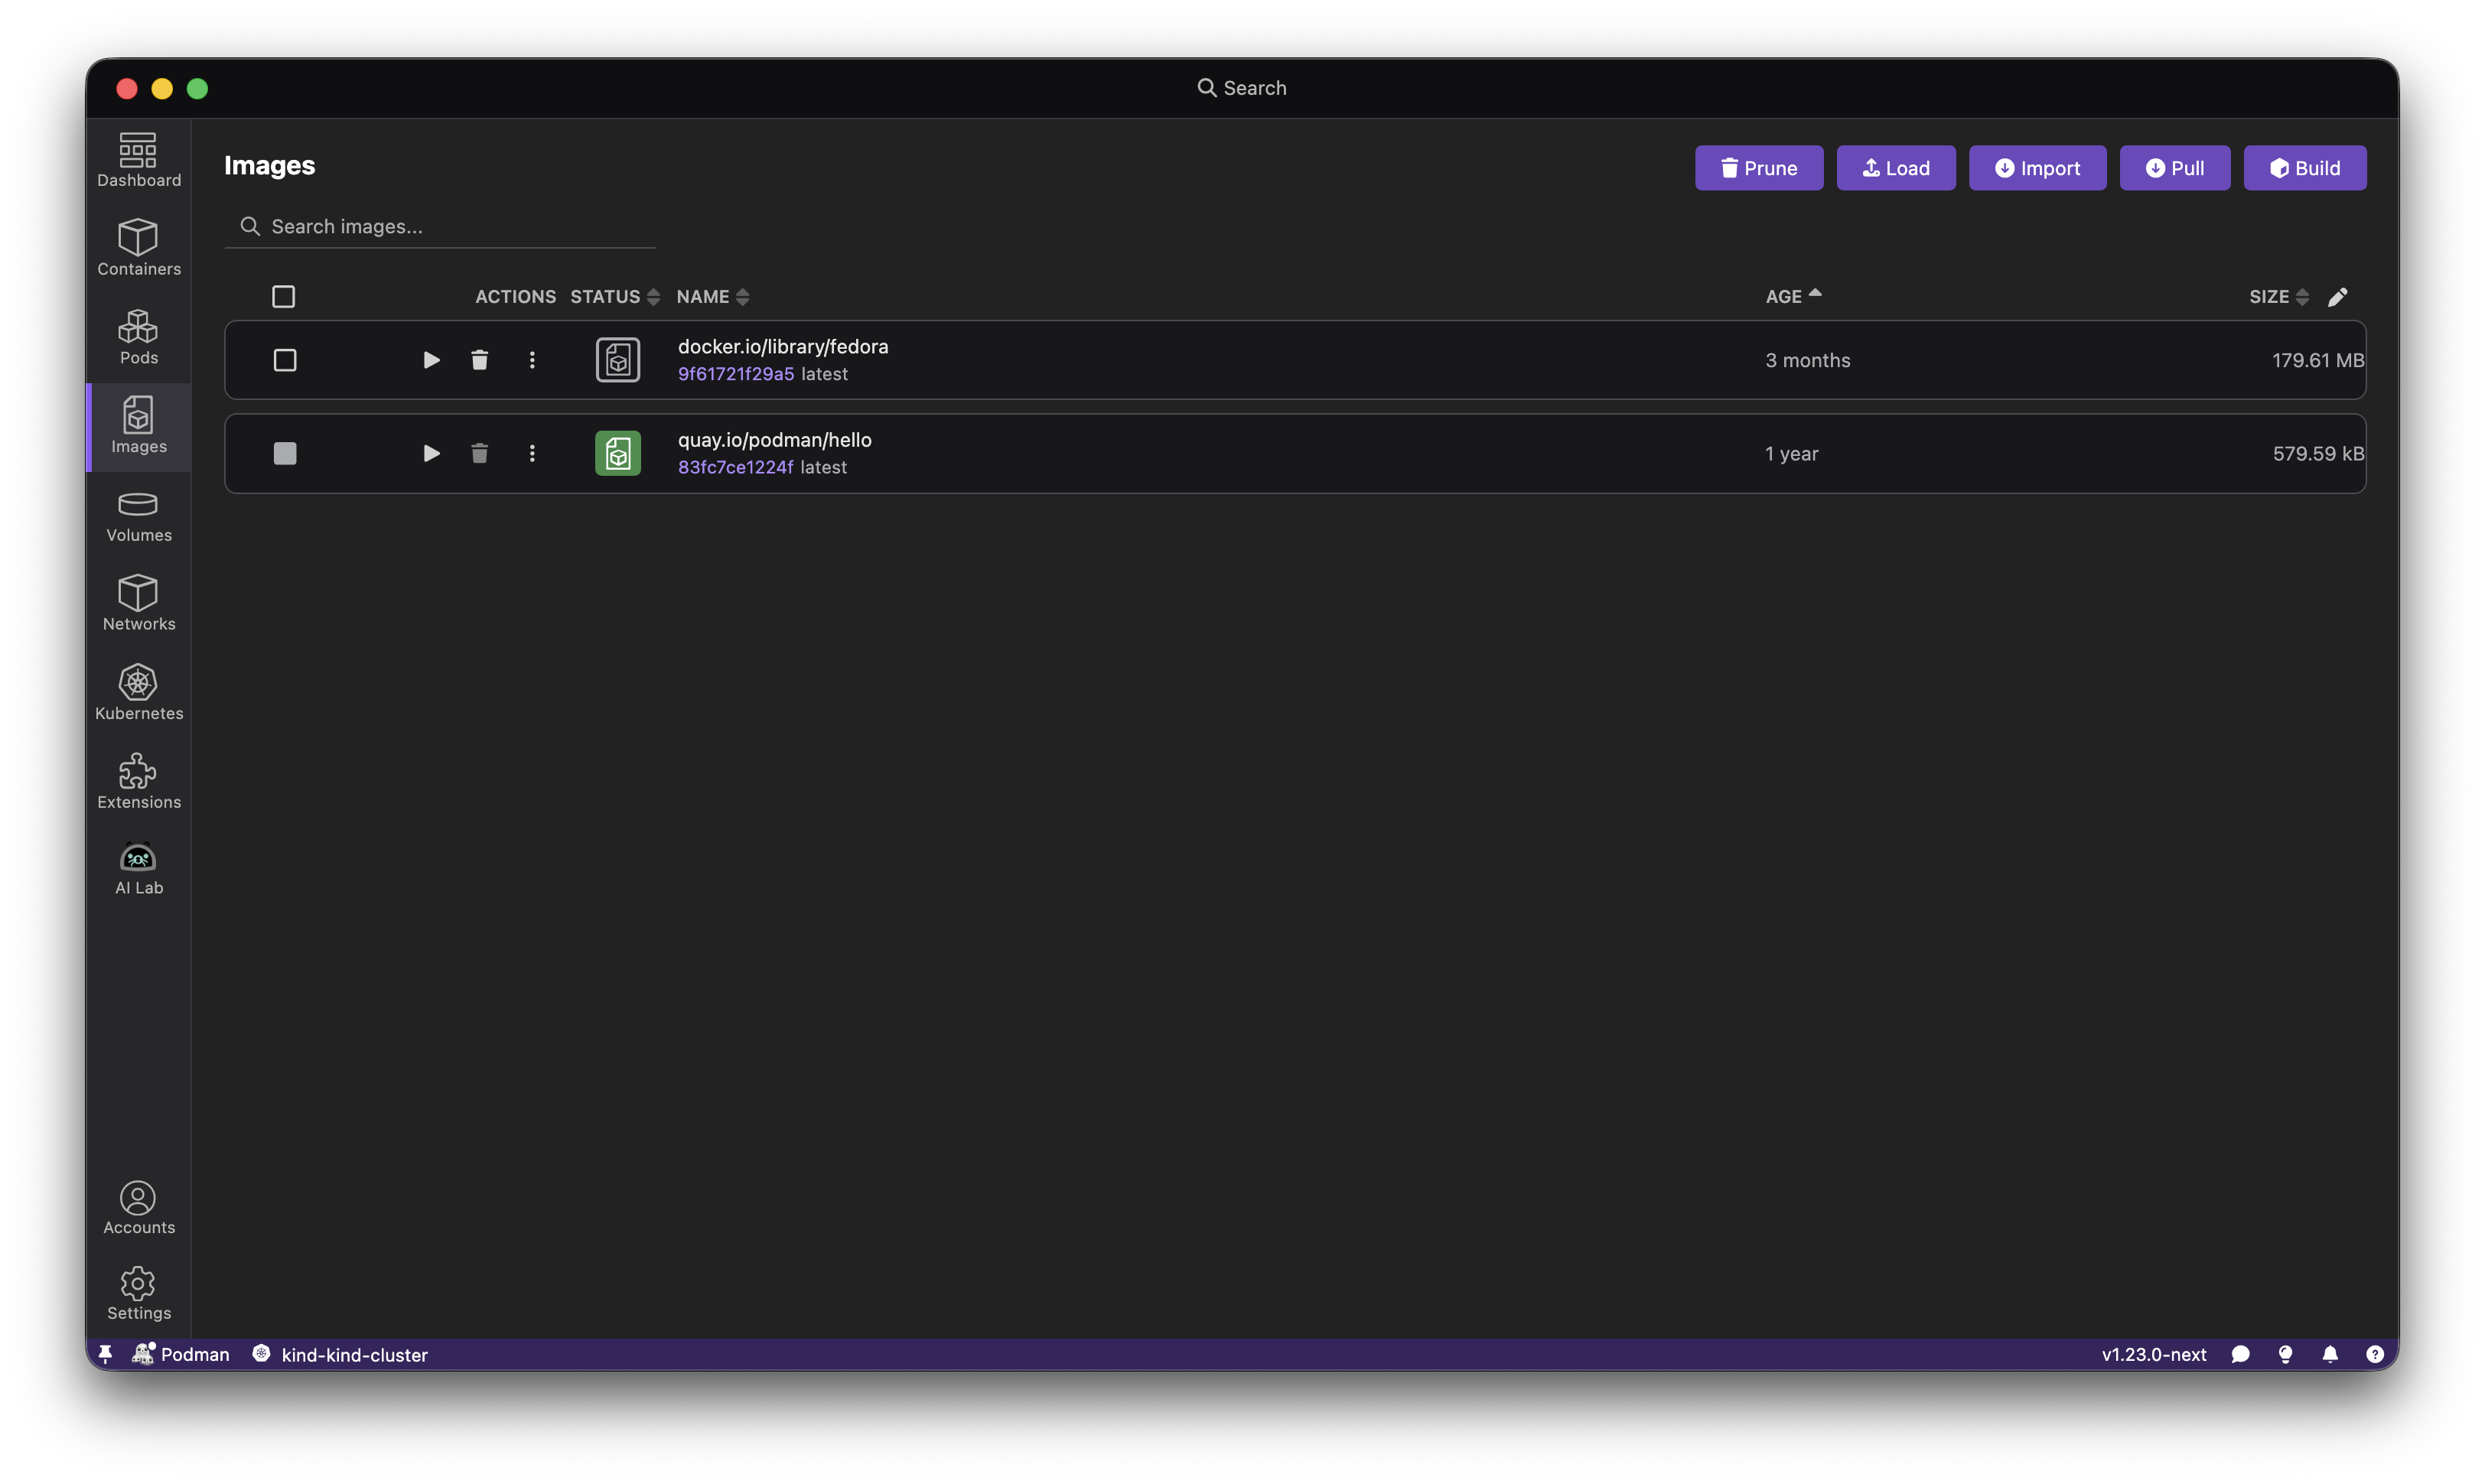
Customizable columns and dashboard sections
The new layout manager feature allows users to customize their dashboard sections and table columns to match their workflow preferences. Users can now reorder dashboard sections, show or hide specific table columns, and tailor their view to display only the most relevant information for their tasks.
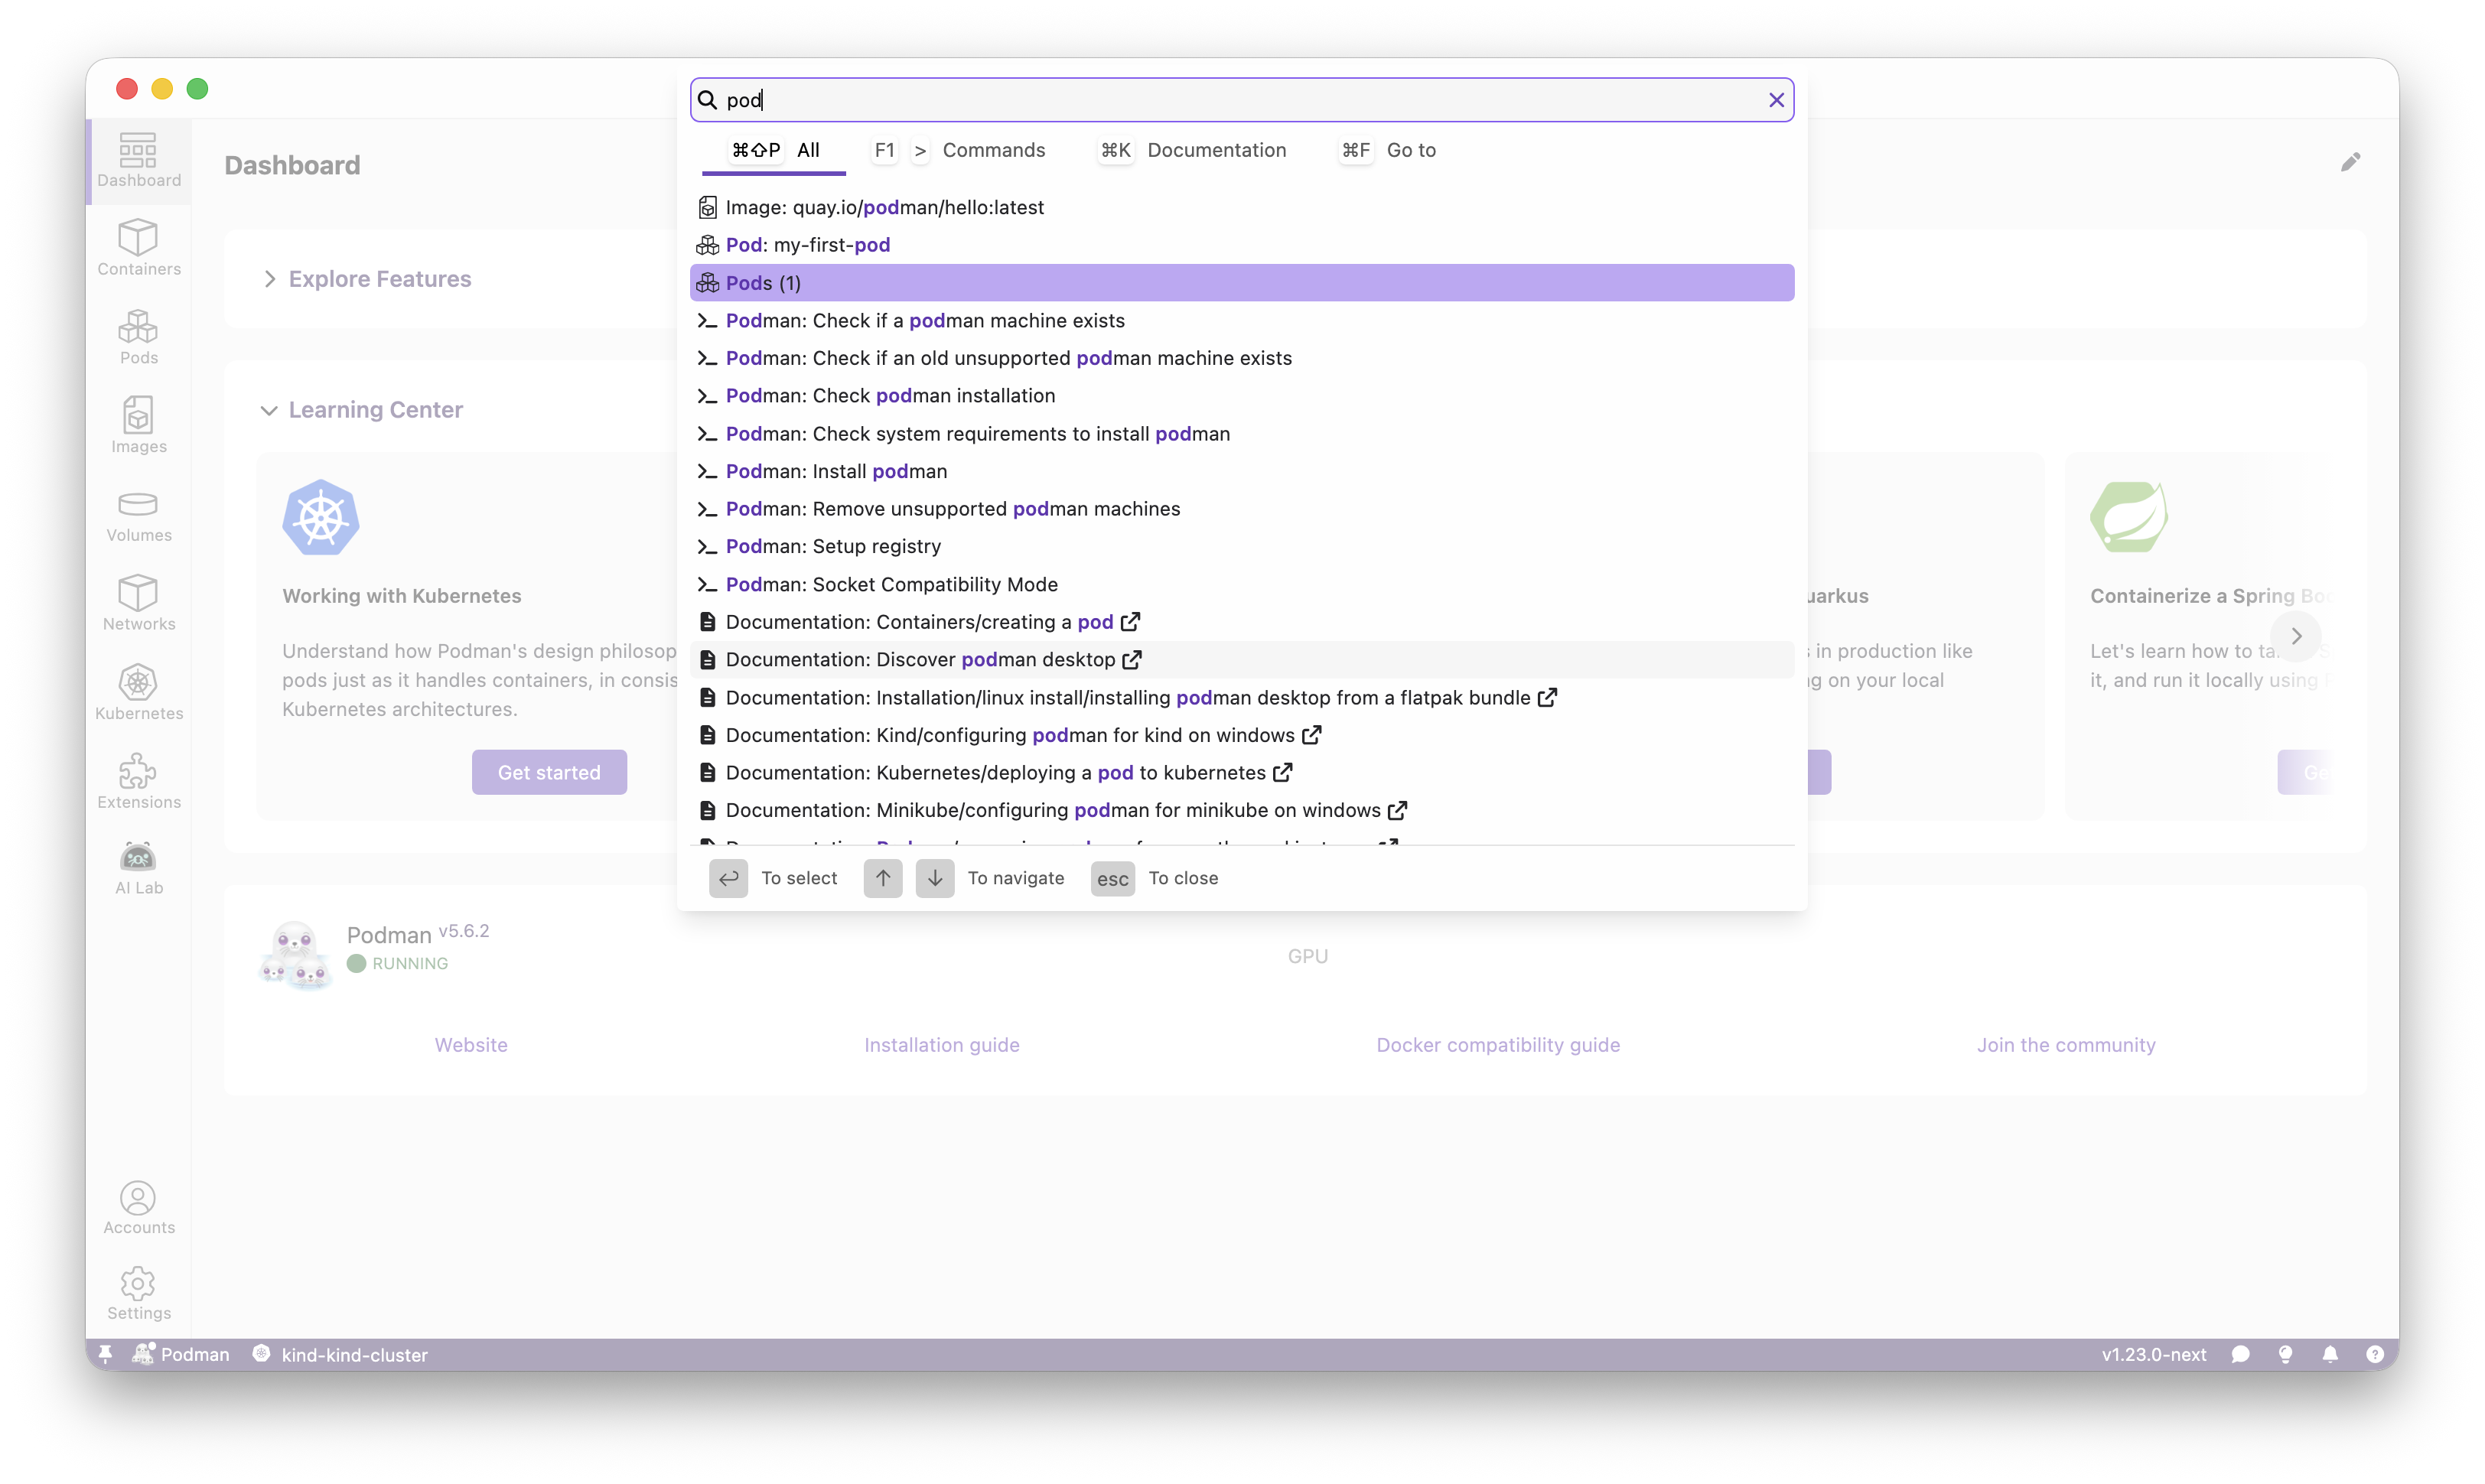
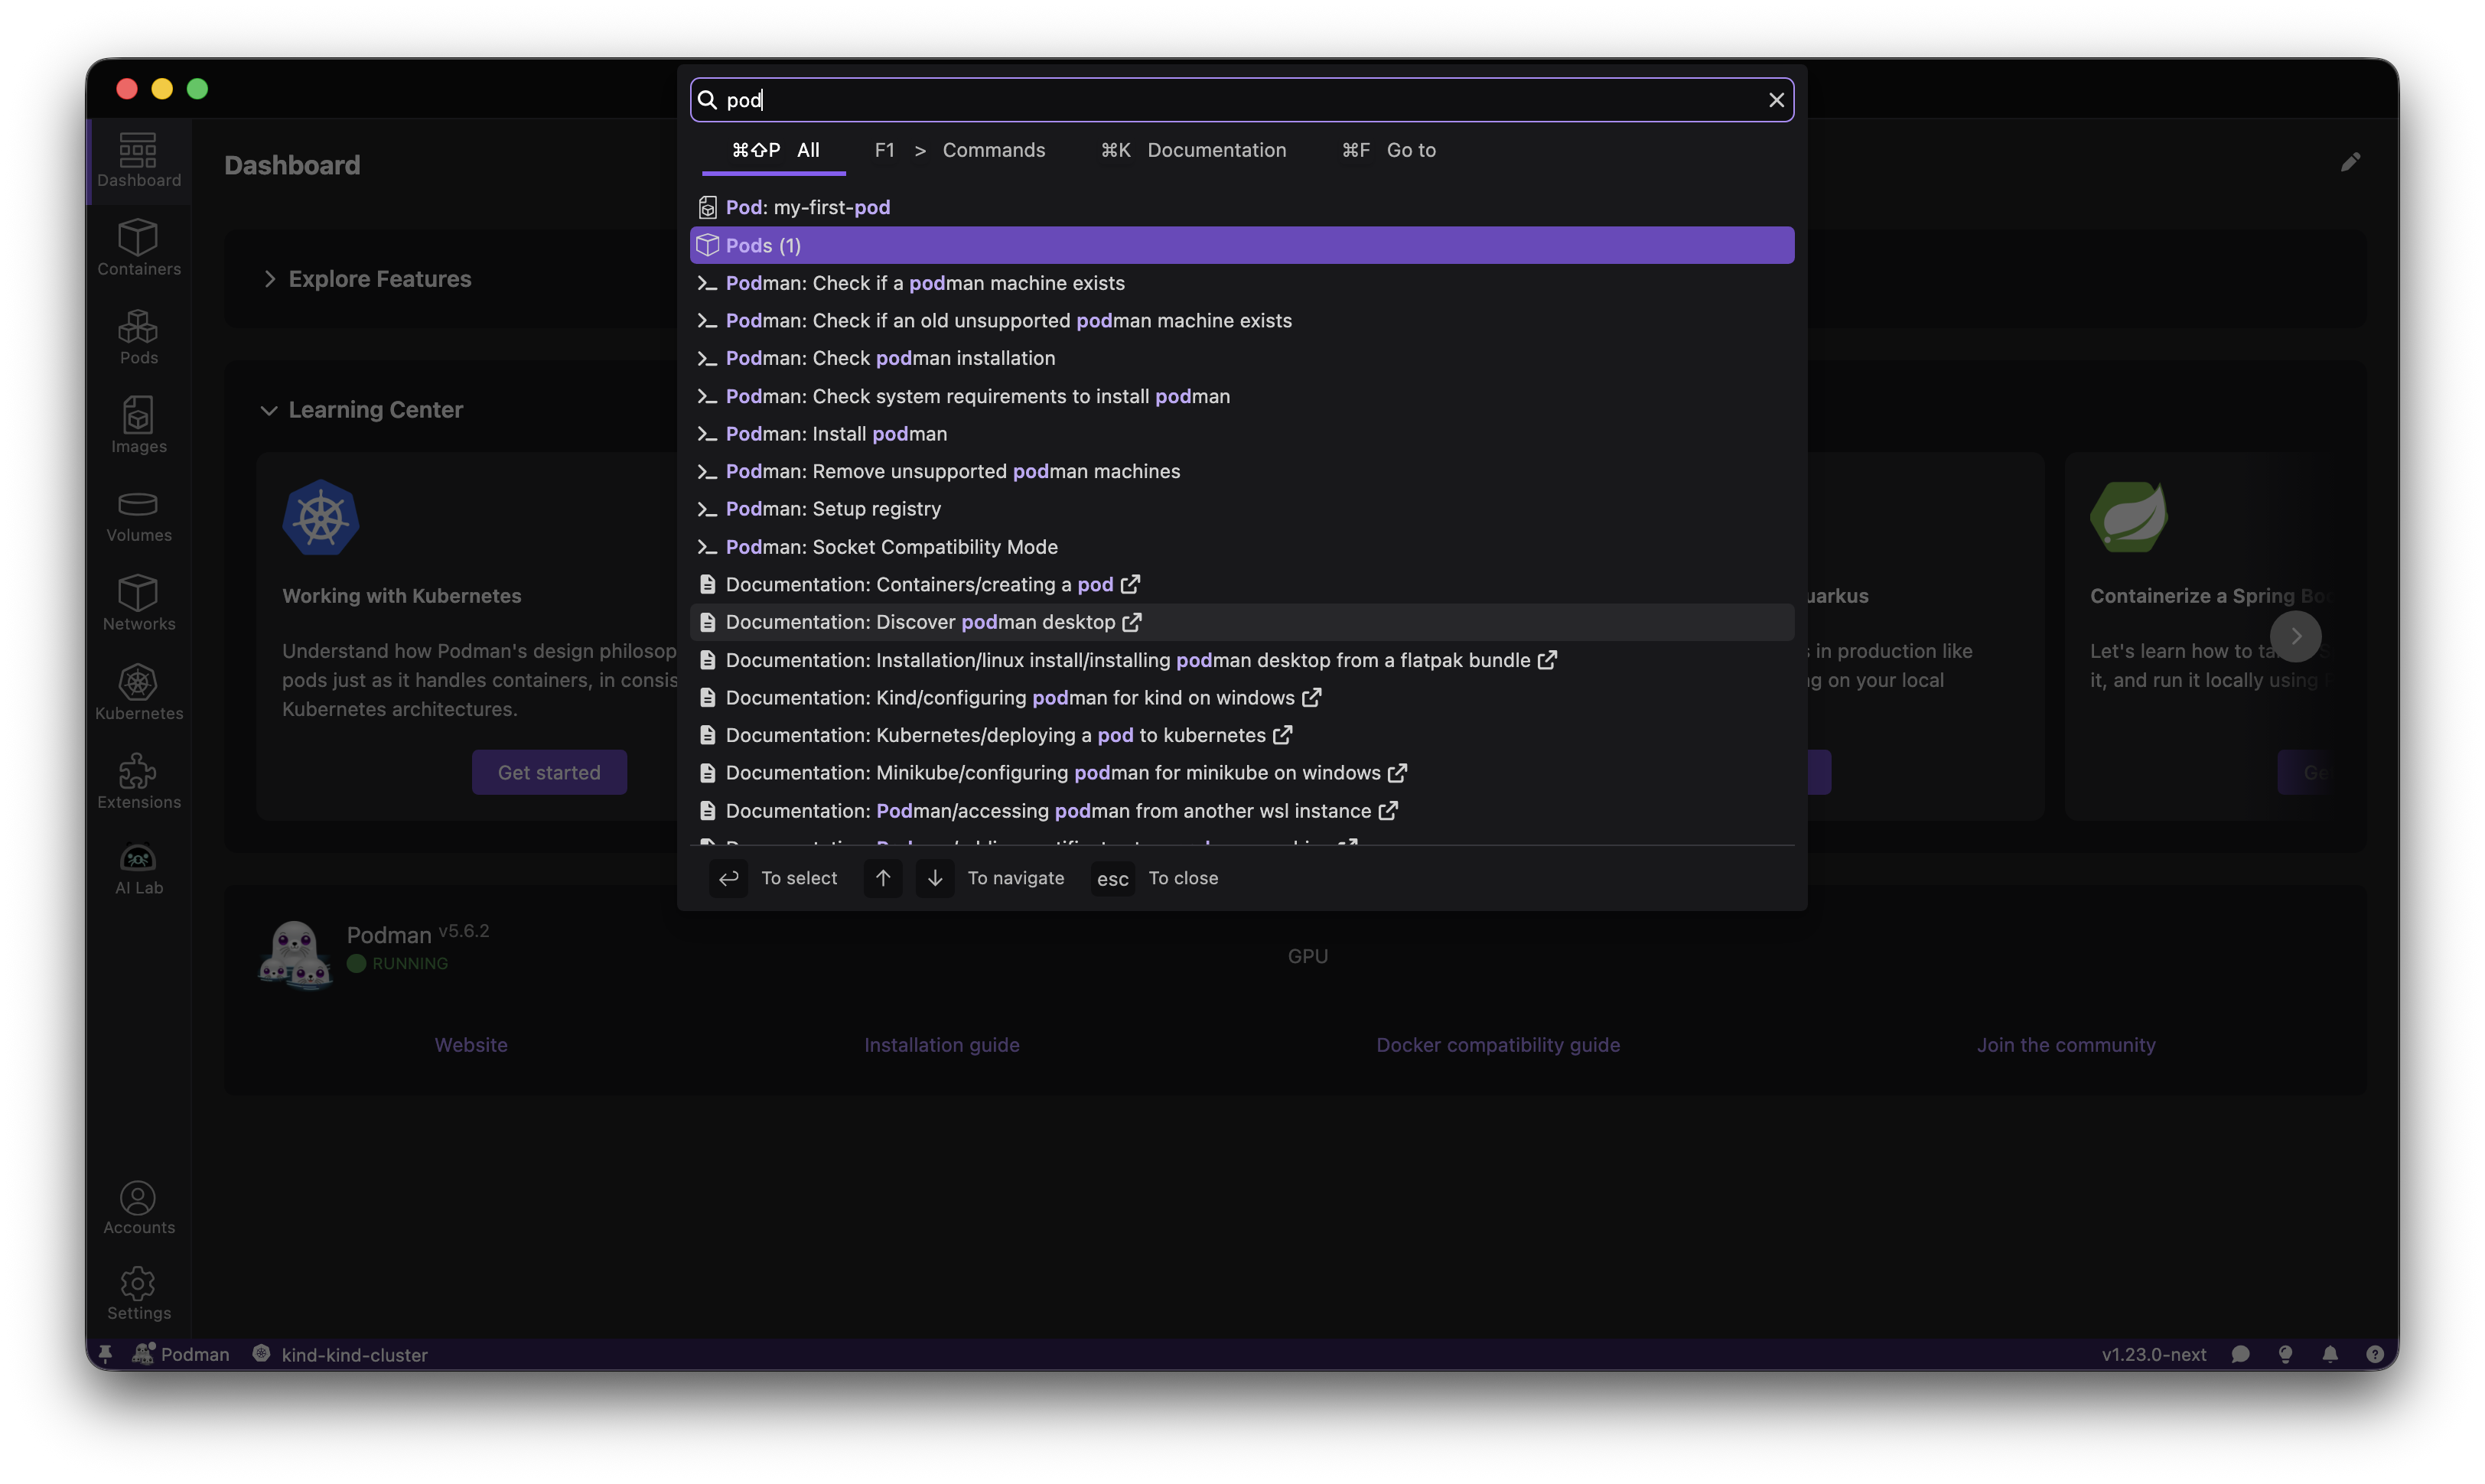
Enhanced search
The search bar has been enhanced with algorithmic text highlighting, quick navigation to application sections, and the ability to search for Podman resources (containers, images, pods, volumes) directly. The search bar now provides a command palette-like experience for faster navigation throughout the application.
Share your thoughts on this component on our GitHub discussion.
Added rootless or rootful indicator to Podman machines
Podman can run with or without root privileges, in Podman Desktop we received feedback that this nuance was not displayed in the UI, leading sometimes to some issues!
We've listened! We thank those who have used our built-in feedback functionality and submitted feedback.
To address this aspect following user feedback we added an indicator inside the Settings > Resources page to properly display if a machine is rootless or not.
A visual indicator now shows whether each Podman machine is running in rootless or rootful mode in the resources section. This helps users quickly identify the execution mode of their machines, making it easier to diagnose permission-related issues and follow security best practices.
See how you can enable/disable root privileges by editing your Podman machine.

Update Podman to v5.7.0
Updated the Podman engine to version 5.7.0. This update fixes one critical bug CVE-2025-52881 as well as adding multiple features and bug fixes. Such as adding enhanced security support for the remote Podman client and podman system service API server, which now supports encrypting connections with TLS and mTLS, including client authentication by certificate; the podman system connection add command has been updated to use this capability when creating connections to TCP sockets.
Check out the Podman 5.7 release.
Support for a managed configuration
Podman Desktop now supports managed configuration. Users can add a “managed-by” configuration file to enforce specific settings. This allows system administrators to apply configurations from a global system file. With this release, administrators can deploy a managed settings file to a predefined system location, enabling centralized control over Podman Desktop configurations across an entire organization.
Check out more details in this demo done by @cdrage:
Created Docker context for Podman machine
Podman Desktop now automatically creates a Docker context for each registered Podman machine, improving interoperability with Docker tooling. Each context is prefixed with podman- and derived from the Podman machine name, allowing users to seamlessly switch between contexts using the standard docker context use command.
Community thank you
🎉 We’d like to say a big thank you to everyone who helped to make Podman Desktop even better. In this release we received pull requests from the following people:
Final notes
The complete list of issues fixed in this release is available here.
Get the latest release from the Downloads section of the website and boost your development journey with Podman Desktop. Additionally, visit the GitHub repository and see how you can help us make Podman Desktop better.
Detailed release changelog
feat 💡
- feat(feedback): add design category for the feedback form by @jiridostal #14791
- feat: route with typed parameters by @feloy #14782
- feat(color-palette): add new spinner component colors by @vancura #14745
- feat: add scrollback configuration option for terminal instances by @ThanosTsiamis #14703
- feat(extensions/podman): add telemetry logger to notifications by @simonrey1 #14589
- feat(ui: table): adding optional label prop by @axel7083 #14516
- feat: add getManagedDefaultsDirectory() to Directories by @cdrage #14478
- feat: added telemetry to searchbar by @gastoner #14476
- feat: filter catalog extensions by @feloy #14457
- feat(Icon): added support for img component by @gastoner #14423
- feat(packages/api): introduce IAsyncDisposable interface by @axel7083 #14420
- feat: add network list page by @SoniaSandler #14366
- feat(extension: podman): introduce InversifyBinding class by @axel7083 #14312
- feat: add network create page by @bmahabirbu #14284
- feat: add API to Docker extension by @jeffmaury #14282
- feat: added searchbar text highliting by @gastoner #14271
- feat: add podman version update workflow by @vimode #14253
- feat: added component for handling enums for booleans by @MarsKubeX #14245
- feat: added entries from navigation to searchbar by @gastoner #14234
- feat: add navigate to provider new connection to API by @feloy #14227
- feat: add getKubernetesProviders to api by @feloy #14225
- feat(imageList): Show the architecture of the images in the image list by @simonrey1 #14194
- feat: added basic go to content for podman resources by @gastoner #14192
- feat: update podman to v5.6.2 by @benoitf #14169
- feat: implement DevTools lifecycle management to prevent app crashes by @vzhukovs #14112
- feat: added visual indication if a podman machine is rootless or rootful by @MarsKubeX #14076
- feat(docs): added generating tutorial and docs json files by @gastoner #14073
- feat: added layout manager backend by @gastoner #13772
- feat: added Layout Manager to UI lib by @gastoner #13771
- feat: added callbacks to table component for layout manager by @gastoner #13770
- feat: added support for layout manager in DashboardPage by @gastoner #13768
- feat(telemetry): report usage of custom registry certificates by @vzhukovs #13683
- feat: docs tab content by @gastoner #13661
- feat: create Docker context for Podman machine by @jeffmaury #12126
fix 🔨
- fix: remove quotes for Hide menu by @jeffmaury #14808
- fix: folder name should match application id by @benoitf #14783
- fix(preferences): replace share icon with info icon by @vancura #14733
- fix(extension/podman): extract + memoize user admin check by @simonrey1 #14722
- fix(podman): disable podman update when there are multiple installations by @jiridostal #14701
- fix(extension/podman): extract + memoize hyper-v installed check by @simonrey1 #14699
- fix(extensions/podman): inject WinPlatform and use the existing preflight checks by @simonrey1 #14692
- fix(extensions/podman): memoize WinMemoryCheck by @simonrey1 #14670
- fix(extensions/podman): memoize WinVersionCheck by @simonrey1 #14669
- fix(extensions/podman): memoize WSL2Check by @simonrey1 #14668
- fix(extensions/podman): memoize WSLVersionCheck by @simonrey1 #14667
- fix: extensions.onDidChange triggers when extensions are initially installed by @feloy #14647
- fix: More robust detection of multiple podman installs by @jiridostal #14588
- fix(plugin): improves port validation and error handling in getFreePort method by @vzhukovs #14586
- fix(renderer/PodActions): update to Svelte 5 by @simonrey1 #14582
- fix: unit test is missing mock on matchMedia by @benoitf #14560
- fix(kind): add check for waiting coredns to be ready when creating a kind cluster by @MarsKubeX #14532
- fix(ui: table): collapse icon is incorrect when the item do not have a name by @axel7083 #14512
- fix: addressed kind error msg showing for multi-vm by @bmahabirbu #14496
- fix(searchbar): removed background for highlited items by @gastoner #14485
- fix: a note about the issue when running Podman Desktop on Linux with Wayland by @dgolovin #14415
- fix: include XDG_SESSION_TYPE=x11 to flatpak build file by @odockal #14383
- fix: volume route by @gastoner #14325
- fix: broken podman-cli extension podman installation discovery on unix/macos by @ScrewTSW #14313
- fix: migrate Tooltip component to Floating UI for proper positioning by @vzhukovs #14246
- fix(docker-compatibility): do not show notification if status cannot be acquired by @simonrey1 #14226
- fix: address unhandled race condition for logs to console after windo… by @bmahabirbu #14093
- fix: add windows uninstaller script to remove startup entry by @dgolovin #14066
chore ✅
- chore(flathub): update pnpm version used in podman desktop by @benoitf #14811
- chore: use back the validation method by @benoitf #14807
- chore(deps): use latest version of pnpm (v10.20) by @benoitf #14786
- chore(deps): ensure dompurify is up-to-date by @benoitf #14784
- chore: add telemetry for explore feature tiles by @bmahabirbu #14775
- chore: add telemetry for managed and locked configuration by @SoniaSandler #14768
- chore: update docusaurus to v3.9.2 by @benoitf #14756
- chore: fix pnpm-lock file by @benoitf #14755
- chore(extension: podman): remove unused code by @axel7083 #14731
- chore: upgrade flatpak runtime to 25.08 by @renner0e #14707
- chore(extension/podman): rename file having hyperv to hyper-v by @simonrey1 #14704
- chore(extension/podman): introduce memoized base check by @simonrey1 #14666
- chore: update explore features context values on init and add a store by @SoniaSandler #14664
- chore: fixed insecure dialog visibility by @gastoner #14662
- chore: added searchbar image by @gastoner #14642
- chore(preferences): make task progress in status bar stable by @axel7083 #14640
- chore: fix linting for prefer-optional-chain eslint rule by @SoniaSandler #14623
- chore: when retrieving a configuration value, check locked and managed-by values by @cdrage #14616
- chore(extensions/podman): send to telemetry when mac cannot get disguised status by @simonrey1 #14612
- chore(extensions): suggest extensions for Visual Studio Code by @simonrey1 #14611
- chore: include svelte configuration in eslint parser for svelte by @benoitf #14571
- chore(vscode): new imports suggested by VS Code's should use non-relative paths by @simonrey1 #14570
- chore(extension: podman): adding missing copyright by @axel7083 #14537
- chore(extensions/podman): init inversify checkers by @simonrey1 #14486
- chore(extensions/podman): inject WinPlatform in extension by @simonrey1 #14474
- chore: remove duplicate disposable interface by @axel7083 #14473
- chore: remove duplicated entries in lock file by @benoitf #14472
- chore(extensions/podman): move constants to dedicated file by @simonrey1 #14454
- chore(extensions/podman): add inversify annotations by @simonrey1 #14441
- chore: added dashboard sections to dashboard registry by @gastoner #14439
- chore: add Network actions by @SoniaSandler #14425
- chore(extension/podman): typo by @simonrey1 #14379
- chore(searchbar): changes order of result when showing all items by @gastoner #14344
- chore: add removeNetwork and updateNetwork methods by @SoniaSandler #14336
- chore: moved pod info to api folder by @gastoner #14326
- chore: updated navigation routes by @gastoner #14322
- chore: add "locked.json" to managed-by by @cdrage #14316
- chore(extension: podman): adding
/@/path alias by @axel7083 #14309 - chore(extension: podman): update tsconfig with inversify requirement by @axel7083 #14306
- chore(extension: podman): adding inversify dependency to package.json by @axel7083 #14305
- chore(extensions/podman): introduce skeleton classes for handling platform (win, mac, linux) specific checks by @simonrey1 #14300
- chore: update to kubernetes client v1.4.0 and remove patch by @feloy #14270
- chore(storybook): update Storybook and addon-svelte-csf by @vancura #14244
- chore: use mockResolvedValue / mockReturn in some tests by @simonrey1 #14236
- chore: renames layout editor/manager to list organizer by @gastoner #14235
- chore: update license to correct one in website FAQ by @SoniaSandler #14199
- chore(search-bar): reverted commit bfb30c6 by @gastoner #14161
- chore: use state.snapshot to pass provider to load images by @SoniaSandler #14150
- chore: changed layout editor icon by @gastoner #14138
- chore(website): github stars dark mode by @statickidz #14124
- chore(website): added blog for hacktoberfest participation by @rujutashinde #14042
- chore: load 'managed by' default-settings.json into configuration scope by @cdrage #13981
- chore: added icons to searchbar by @gastoner #13960
- chore: added support for layout manager component by @gastoner #13769
test 🚦
- chore(test): waiting for podman machine startup after failure by @cbr7 #14810
- chore(test): remove unused variables from the Testing Farm gha workflow by @amisskii #14793
- fix(test): adjust timeout to accommodate all wait in the test by @odockal #14771
- refactor(test): change the way to wait for a condition in ContainerList.spec.ts by @benoitf #14742
- refactor(test): make command palette test more robust by @benoitf #14711
- refactor(tests): make test of ContainerDetailsLogsClear more robust by @benoitf #14710
- refactor(tests): make Appearance.spec.ts test more robust by @benoitf #14709
- refactor(tests): use proper type for fs.promises.readdir return type by @benoitf #14708
- chore(test): use latest Podman version in Testing Farm e2e workflow by @amisskii #14691
- chore(test): better handling for volume check by @cbr7 #14688
- fix(test): extend timeout for onboarding screen loading by @odockal #14686
- test(extensions/podman): memoize VirtualMachinePlatformCheck by @simonrey1 #14672
- test(extensions/podman): memoize WinBitCheck by @simonrey1 #14671
- test(extension: podman): init inversify in beforeEach in extension.spec.ts by @axel7083 #14643
- test(extension/podman): add UT for telemetry when mac not disguised error by @simonrey1 #14641
- test(e2e): add podman machine privileges check by @danivilla9 #14610
- chore(test): set test suite to be retried once on failure by @cbr7 #14594
- chore(test): adding smoke tests for windows in pr check by @cbr7 #14581
- chore(test): adding aria-label to error message by @cbr7 #14564
- chore(test): skip test in macos cicd pipeline by @cbr7 #14557
- chore(test): dont try to install on mac due to admin prompt request by @cbr7 #14513
- chore(test): ensure button enabling uses custom timeout by @cbr7 #14510
- chore(test): add proxy smoke e2e tests by @odockal #14490
- chore(test): run testing farm e2e tests on nightly basis by @amisskii #14487
- chore(test): better handling for container stop state by @cbr7 #14449
- chore(test): ensure pod cleanup before failure check by @cbr7 #14435
- chore(test): unskip podman compose test on macos by @amisskii #14386
- chore(test): try to detect bad machine state and heal it by @cbr7 #14360
- chore(test): extend timeout for onboarding where exts. load up by @odockal #14349
- test(e2e): add preferences text e2e test by @danivilla9 #14347
- chore(test): move tmt folder to tests folder by @amisskii #14345
- chore(test): add nonblocking k8s sanity tests to pr check by @cbr7 #14324
- chore(test): add a new e2e test for podman kube play from scratch option by @amisskii #14315
- chore(test): remove/refactor deprecated code for playing yaml files to Kubernetes runtime by @amisskii #14314
- chore(test): try to install cli tool before test suite by @cbr7 #14289
- chore(test): skip test when api quota is exceeded by @cbr7 #14281
- chore(test): revert change due to issue still existing on cicd by @cbr7 #14276
- chore(test): check rate limit flag in beforeEach hook by @cbr7 #14250
- chore(test): validate rate limit before downloading cli tool by @cbr7 #14211
docs 📖
- docs: added a troubleshooting section to the macOS page by @shipsing #14787
- docs: corrected the installation instructions on Windows by @shipsing #14663
- docs: corrected the procedure to install PD on mac by @shipsing #14609
- docs(code-guidelines): add guideline for path aliases in imports by @simonrey1 #14580
- docs: add section around the usage of fake timers in rendered unit tests by @benoitf #14558
- docs: fix a typo in index.md (Kubernetes/Existing Kubernetes) by @Aayushyamaan-Shah #14368
- docs: updated the sections referencing the Podman Kube Play feature by @shipsing #14323
- docs: add page about build and test with lima by @afbjorklund #14251
- docs: code guideline to mock a component, with bindable prop by @feloy #14249
- docs: update pnpm version requirement to v10.x by @benoitf #14023
refactor 🔄
- refactor: add protocol when using the validator isURL utility for adding a registry host by @benoitf #14761
- refactor(configuration): replace node:fs with node:fs/promises by @cdrage #14759
- refactor(extensions/podman): use constant in tests by @simonrey1 #14726
- refactor(extension/podman): move podman desktop elevated check to Base Check by @simonrey1 #14721
- refactor(vitest.config): replace workspace by projects by @benoitf #14712
- refactor(extension/podman): move hyper-v running check to Base Check by @simonrey1 #14697
- refactor(extension: podman): remove isHyperVEnabled in extension.ts by @simonrey1 #14696
- refactor(NetworksList.svelte): adding key prop to table usage by @axel7083 #14695
- refactor(extensions/podman): use mockResolvedValue helper in tests by @simonrey1 #14693
- refactor(extension/podman): move url and title of doc to constants by @simonrey1 #14689
- refactor(extension: podman): replace isWslEnabled with WinPlatform#isWslEnabled by @axel7083 #14674
- refactor(extension: podman): inject ProviderCleanup to PodmanInstall by @axel7083 #14659
- refactor(extension: podman): inject platform specific class for ProvderCleanup by @axel7083 #14645
- refactor(extension: podman): inject Installer to PodmanInstall by @axel7083 #14644
- refactor(renderer: ListTable): adding
labelprop to table usage by @axel7083 #14639 - refactor(renderer: VolumesList): adding
labelprop to table usage by @axel7083 #14638 - refactor(renderer: TaskManagerTable): adding
labelprop to table usage by @axel7083 #14637 - refactor(renderer: PodsList): adding
labelprop to table usage by @axel7083 #14636 - refactor(renderer: ImagesList): adding
labelprop to table usage by @axel7083 #14635 - refactor(renderer): migrate KubePlayYAML.svelte to Svelte5 by @axel7083 #14633
- refactor(renderer: ContainerList.svelte): adding label function to Table usage by @axel7083 #14565
- refactor: use advanceTime option in fakeTimers in renderer unit tests by @benoitf #14559
- refactor(svelte-config): externalize the svelte config to a separate file by @benoitf #14549
- refactor(extension: podman): create InstallerSymbol for binding platform-specific installer by @axel7083 #14544
- refactor(extension: podman): making PodmanCleanupWindows injectable by @axel7083 #14543
- refactor(extension: podman): making PodmanCleanupMacOS injectable by @axel7083 #14542
- refactor(extension: podman): making MacOSInstaller injectable by @axel7083 #14538
- refactor(extension: podman): make
WinInstallerinjectable by @axel7083 #14536 - refactor(renderer: TableList): adding key props to Table usage by @axel7083 #14518
- refactor(renderer: PortForwardingList.svelte): adding key props to table usage by @axel7083 #14508
- refactor(renderer: TaskManagerTable.svelte): adding key props to table usage by @axel7083 #14507
- refactor(renderer: VolumesList.svelte): adding key props to table usage by @axel7083 #14506
- refactor(renderer: PodsList.svelte): adding key props to table usage by @axel7083 #14505
- refactor(renderer: ImagesList.svelte): adding key props to table usage by @axel7083 #14504
- refactor(extensions: podman): adding win-related checks to WinPlatform by @axel7083 #14491
- refactor(extensions/podman): extract init of Inversify for test purpose by @simonrey1 #14458
- refactor(extensions/podman): move types to dedicated file by @simonrey1 #14452
- refactor(extensions/podman): bind in inversify with others by @simonrey1 #14451
- refactor: replacing hardcoded section with registry based aproach by @gastoner #14440
- refactor(Dashboard): moved providers to separate file by @gastoner #14438
- refactor: extensions filtering by @feloy #14422
- refactor(extension/podman): init test class in before each by @simonrey1 #14364
- refactor(ImageActions): switched to derived from onMount by @gastoner #14343
- refactor: migrate pod details to svelte5 by @gastoner #14331
- refactor: migrated volume details to svelte5 by @gastoner #14330
- refactor: migrated container details to svelte5 by @gastoner #14329
- refactor: moved logic to reactive derived by @gastoner #14328
- refactor(extensions/podman): change case for macOS by @simonrey1 #14311
- refactor(extension: podman): move windows related checks to
src/checks/windowsby @axel7083 #14299 - refactor(extension: podman): remove unnecessary installers map in PodmanInstall by @simonrey1 #14280
- refactor(renderer): rename 'Play Kubernetes YAML' page to 'Podman Kube Play' #14193 by @sAchin-680 #14261
- refactor: use mockResolvedValue / mockReturn in some tests by @simonrey1 #14241