Installing Podman Desktop and Podman on Windows
Installing Podman Desktop
You can install Podman Desktop by using:
- The Windows installer
- Windows Package Manager (WinGet)
- Other alternative methods
Using the Windows installer
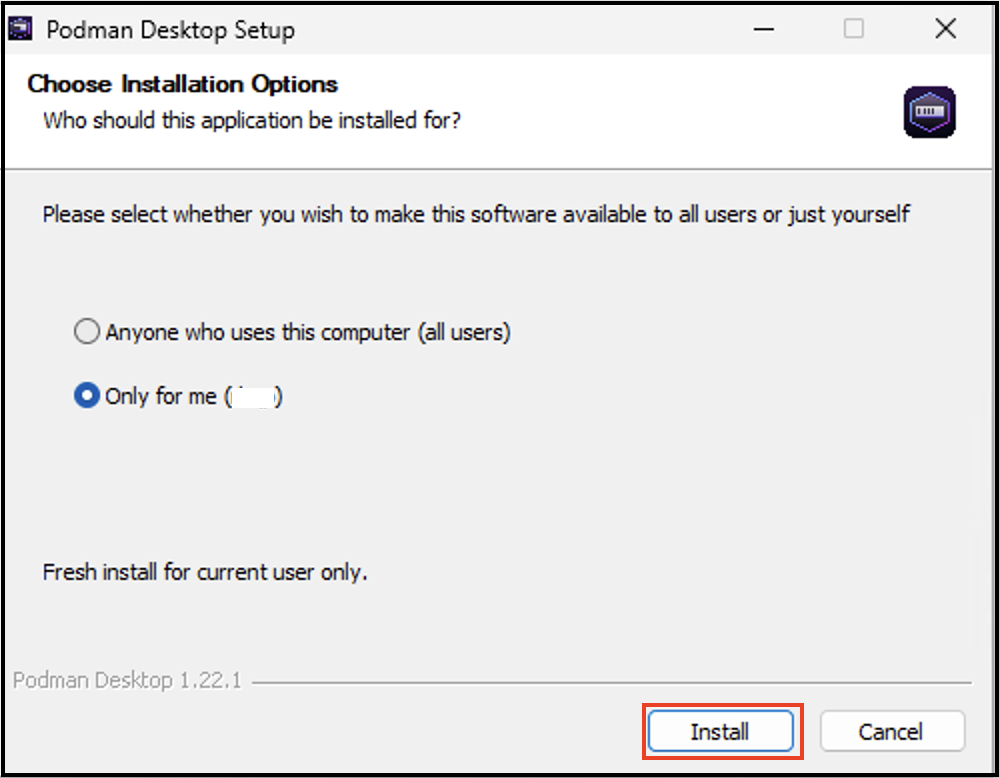
During setup, you can choose from the following installation scopes:
- Anyone who uses this computer (all users): Installs the application for all users and requires administrative privileges; enter your credentials when prompted.
- Only for me (Username): Installs the application for the current user only; no administrative privileges required.
Procedure
- Download the Windows installer.
- Locate the file in the
Downloadsfolder, and double-click it. The Podman Desktop Setup screen opens. - Select whether to install the application for all users or only for the current user.
- Click Install.
- After the installation is complete, click Finish to close the screen. The Get started with Podman Desktop screen opens.
Using WinGet
-
Install from the terminal:
> winget install RedHat.Podman-Desktop
Alternate installation methods:
- Silent Windows installer
- Chocolatey
- Scoop
Silent Windows installer
-
To install without user interaction, run the Windows installer with the silent flag
/Sfrom the Command Prompt:> podman-desktop-1.6.4-setup-x64.exe /S
Chocolatey
-
Install the Chocolatey package manager.
-
Install from the terminal:
> choco install podman-desktop
Scoop package manager for Windows
-
Install from the terminal:
> scoop bucket add extras> scoop install podman-desktop
Installing Podman
On Windows, running the Podman container engine requires a Linux distribution to run in a virtual machine. You can use Windows Subsystem for Linux version 2 (WSL 2) or Hyper-V as the machine provider.
During Podman installation, ensure that you have administrator privileges for the following tasks:
- Enable the WSL or Hyper-V feature.
- Create a Hyper-V Podman machine.
Use WSL2 as machine provider
Podman Desktop creates a Windows Subsystem for Linux version 2 (WSL 2) virtual machine, also known as the Podman machine. The major benefits are:
- Ease of use.
- WSL 2 native virtualization performance.
You must enable the WSL feature. This is required by Podman Desktop to create the default wsl Podman machine.
Prerequisites
Check that your environment meets the following requirements:
- 6 GB of RAM for the Podman machine.
- Required WSL 2 prerequisites:
- Administrator privileges for the Windows user.
- Windows 64bit.
- All editions: Windows 10 Build 19043 or later, or Windows 11
- Enable nested virtualization if you are running Windows as a VM on a host hypervisor.
Procedure
-
Run the following commands to enable the WSL feature without installing the default Ubuntu distribution of Linux:
> wsl --update> wsl --install --no-distributionnoteIf you run the Podman Desktop setup on a Windows 10 LTSC version, you require to install a specific WSL distribution. See Troubleshooting Podman on Windows
-
Restart your machine.
-
Run the
wsl --statuscommand in the CLI to check that WSL 2 is available.
Use Hyper-V as machine provider
As an administrator, you can set up a Podman machine using Hyper-V as the provider. Hyper-V on Windows offers the following benefits:
- Run multiple operating systems on a single machine.
- Speed up virtual machine deployment.
- Enhance security through environment isolation.
- Simplify management using native Windows tools and PowerShell.
You must enable the Hyper-V feature. This is required by Podman Desktop to create the Hyper-V Podman machine.
Prerequisites
Check that your environment meets the following requirements:
- 6 GB of RAM for the Podman machine.
- Required Hyper-V prerequisites:
- Administrator privileges for the Windows user.
- Windows 64bit.
- Pro or Enterprise edition: Windows 10 Build 19043 or later, or Windows 11
- Enable nested virtualization if you are running Windows as a VM on a host hypervisor.
Procedure
-
Run the following command to enable the Hyper-V feature:
Using command prompt
> DISM /Online /Enable-Feature /All /FeatureName:Microsoft-Hyper-VUsing PowerShell
> Enable-WindowsOptionalFeature -Online -FeatureName Microsoft-Hyper-V -All -
Restart your machine.
Verification
-
Check that Hyper-V is active.
Using command prompt
> systeminfoUsing PowerShell
> Get-Service vmcompute
Install Podman Desktop dependencies
When the Podman Desktop installation completes, the Get started with Podman Desktop screen opens. This screen helps you to start the onboarding process. Alternatively, you can completely skip this onboarding setup. You can always complete the setup later by using one of the following ways:
- Use the Set up button in the notification on the Dashboard page.
- Use the Setup Podman button on the Podman tile, located on the Settings > Resources page.
Procedure
-
On the Get started with Podman Desktop screen, click Start Onboarding.
-
Perform the following steps to install Podman:
- Click Next. A confirmation notification opens.
- Click Yes. The Podman Setup screen opens with the default WSLv2 virtualization provider selected.
- Optional: Select the Windows Hyper-V provider when needed.
- Click Install. A notification stating Installation Successfully Completed appears on the screen.
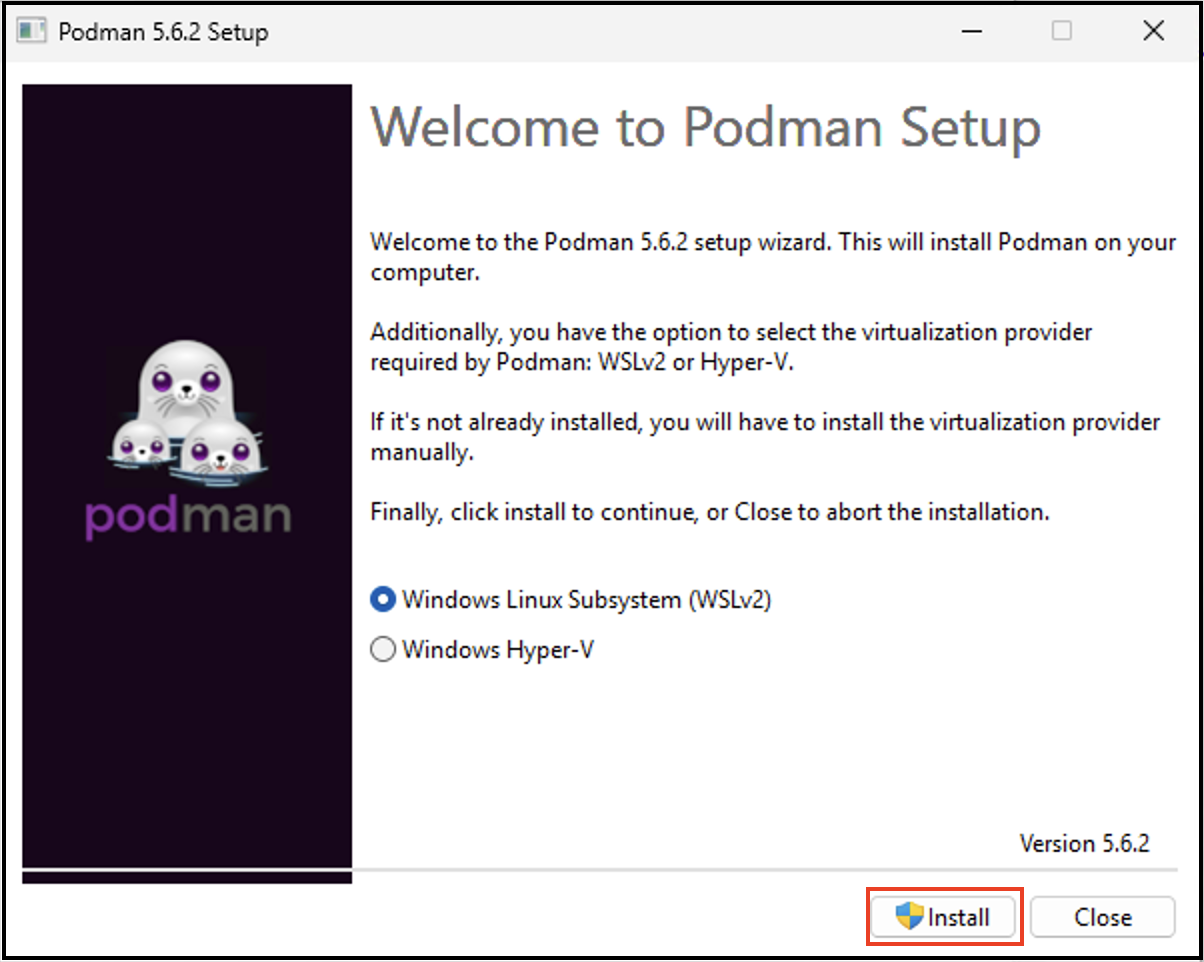
- Click Close. A page notifying that Podman is set up correctly opens.
-
Perform the following steps to create a Podman machine:
- Click Next. A page notifying you to create a Podman machine opens.
- Click Next, and then click Create.
-
Click Next, and follow the instructions on the screen to install the
kubectlandcomposeCLIs. -
After installing the CLIs, click Next to go to the Dashboard page.
Verification
- Go to the Settings > Resources page, and view the running Podman machine on the Podman tile.
You are ready to use the application.